With Power Automate combined with Dynamics 365 CE, there currently is a way to set up an on-demand Cloud Flow to run from the ribbon bar: select Flow > Create a flow and then add your business logic.

However, there is one glaring issue with using this method that makes it problematic. The connector that this feature uses is the Dataverse Legacy connector. This Legacy connector is not solution friendly and does not work well when promoting through upper environments like QA, UAT, or Production. After promoting this Flow, and others that use this connector, you are forced to open each one and re-connect to the current environment. This is not only time consuming, but also a major issue if you forget to do so. In addition, as evidenced by its name, it is a Legacy connector that we suspect will be deprecated at some point in the future.
There is a better alternative that not only uses the newest Dataverse connector, but also enhances the user experience at the same time.
Let’s use a classic user requirement of escalating a customer service case/ticket to show how this can work.
Set Up Escalate Case Column
- Create a Solution to hold your Flow and other table changes
- Click + Add Existing and select Table (Entity)
- Search (top right) for Case to get the Case Table
- Note: this may be a different name if the Cases (incident) entity has been renamed
- Select Case and click Next
- DO NOT Select any components, just click Add
- Click Case to open the table definition
- Select the Columns tab and then click the + Add column button
- Display Name: Escalate Case
- Name: EscalateCase
- Data Type: Yes/No
- Default Value: No

- Click Done
- Click Save Table
- Click the Forms Tab
- Click + Add subcomponents button
- Select the form Case for Interactive Experience
- You can also select the default form you use for editing cases.
- Click Add to add it to the solution
- Click the Forms tab
- Select to edit the form you just added
- Add a new Section on the form and add the new columns
- After adding the columns/fields
- Click the Escalate Case field
- In the left slide out, Click Components
- Click + Component and add the Toggle control

-
- Click Save to save your changes
- Click Publish to Publish the changes
- Click <- Back button to return to the case table definition
- Click your solution name in the breadcrumbs navigation to return to the solution
Set Up Escalate Case Cloud Flow
Now that we have set up a new triggering Y/N column, we need to create the flow that will run the business logic. For the purposes of this blog, we will set the case priority of the escalated case to High.
- Create a new Cloud Flow in your solution
- Select the Microsoft Dataverse trigger type
- Note: DO NOT select the Microsoft Dataverse (legacy) type
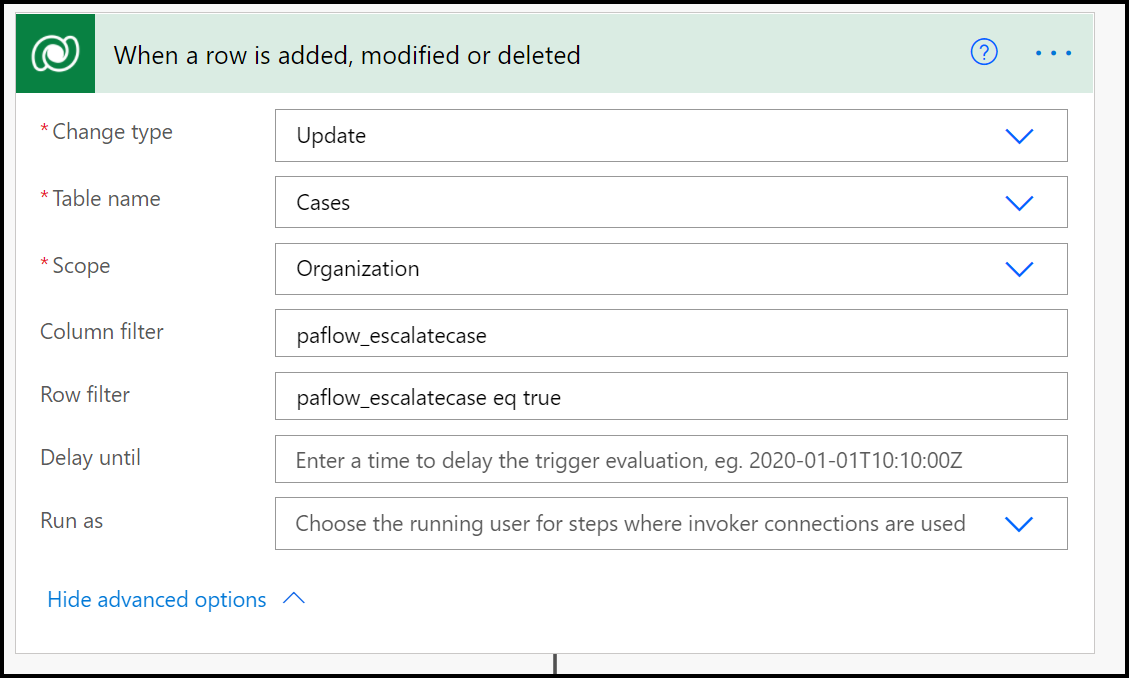
- Select When a row is added, modified or deleted trigger
- Setup the trigger to run on Update of the Cases table
- Change Type: Update
- Table Name: Cases
- Note: this may be a different name if the Cases (incident) entity has been renamed.
- Scope: Organization
- Note: You may select a different Scope for this Flow based on your requirements and data model
- Column Filter: Use the new Escalate Case column you created in the previous steps.
- E.g., paflow_escalatecase
- Row Filter: You want to execute when the Escalate Case field is set to true
- E.g., paflow_escalatecase eq true
-
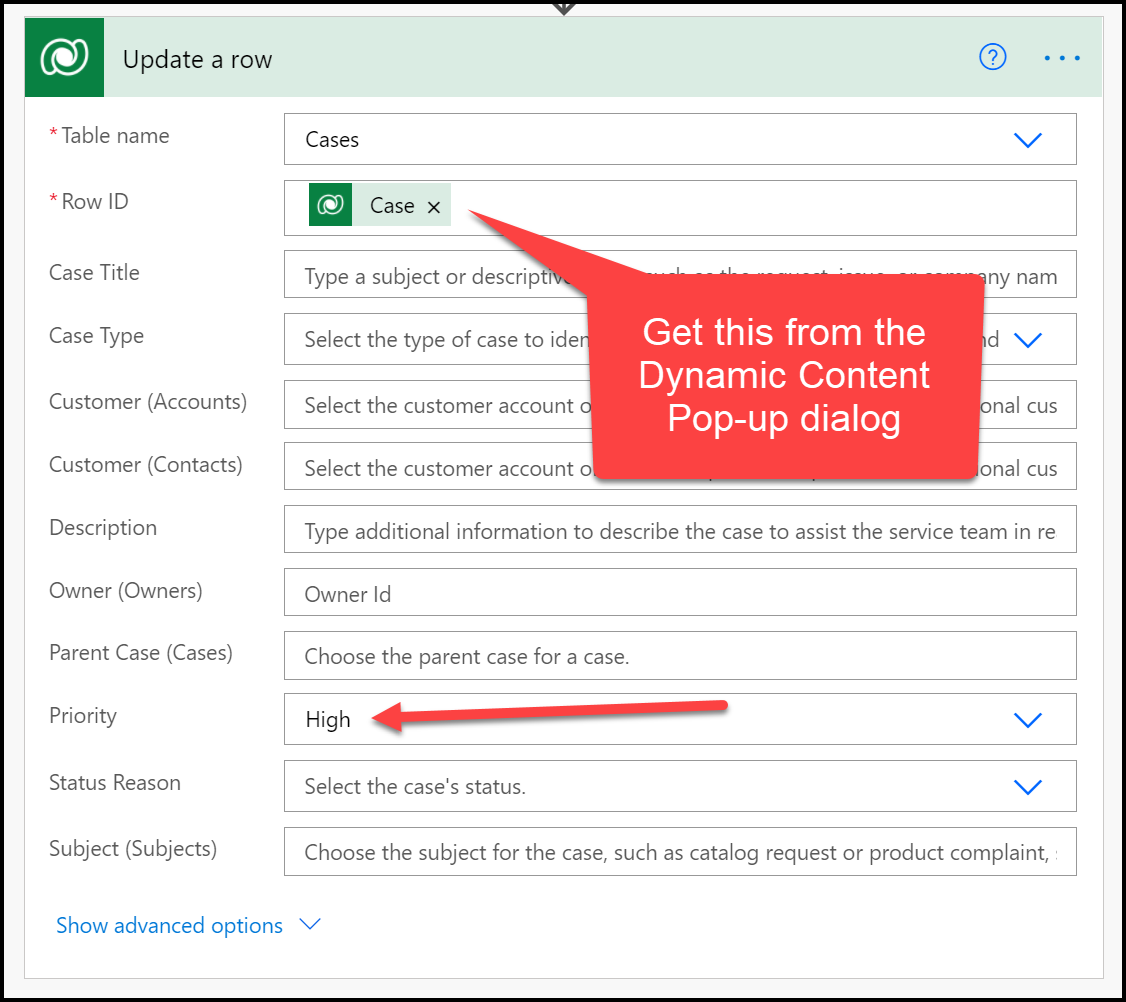
- Add a + New Step using the Dataverse connector to Update a Row by ID
- Table Name: Cases
- Row ID: From the Dynamic Content popup, select the Triggering Case GUID
- Priority: High
-
- Set a name and Save your Flow
To use this new on-demand flow, all the Dynamics 365 CE user needs to do is toggle the new Escalate Case to Yes and save the row.
For the purposes of this demonstration, we only did a simple update of the priority. You could easily enhance this to add some additional logic to this flow:
- Send an email to the escalations support team
- Perform other updates to the case record
- Kick off another flow
- Send an email to the contact on the case to let them know it has been escalated
- Post a Microsoft Teams notification to the person that escalated the case to let them know the flow has completed.
In addition, you could add more data parameters the user needs to enter on the form and make them required using a business rule when the Y/N field is toggled to Y. One example of this for the escalate case example would be a text field describing WHY the case is being escalated. This could then be sent in a notification to others (Escalation Team, Contact, etc.) as the flow is executing.
The possibilities are endless!