Security Roles
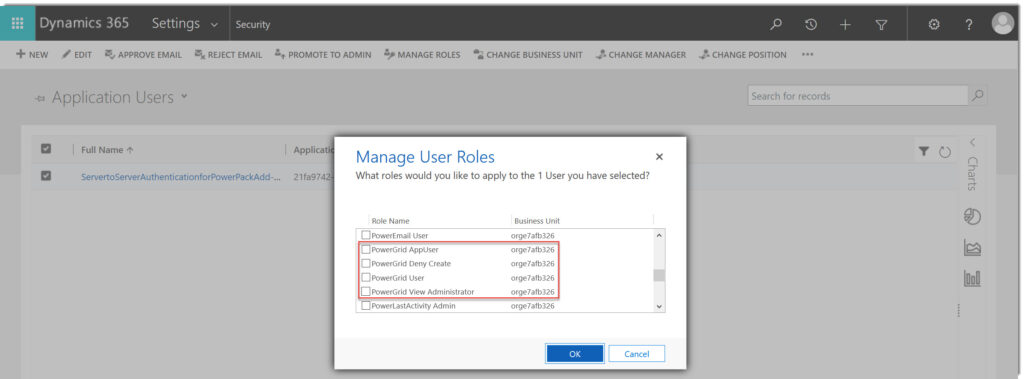
Every user who would like to use the PowerGrid add-on will need the PowerGrid user security role assigned to them. They will also need to be assigned the PowerGrid App User role to access the PowerGrid model driven app. System Administrators will automatically see PowerGrid in the PowerPack section of CRM and be able to use the PowerGrid, without having the security role assigned. If you would like to restrict the ability to create new records from the PowerGrid web resource you can apply the PowerGrid Deny Create role which will hide the ‘+ insert’ button from the users options when using PowerGrid.
Please Note: the user role does respect the existing read, write and create privileges of your users.
Configuring PowerGrid
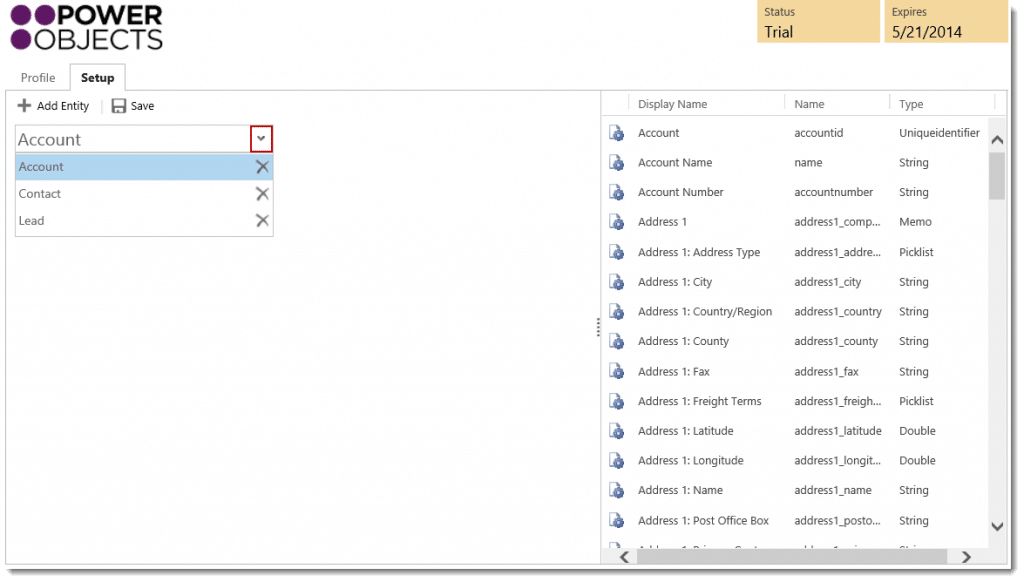
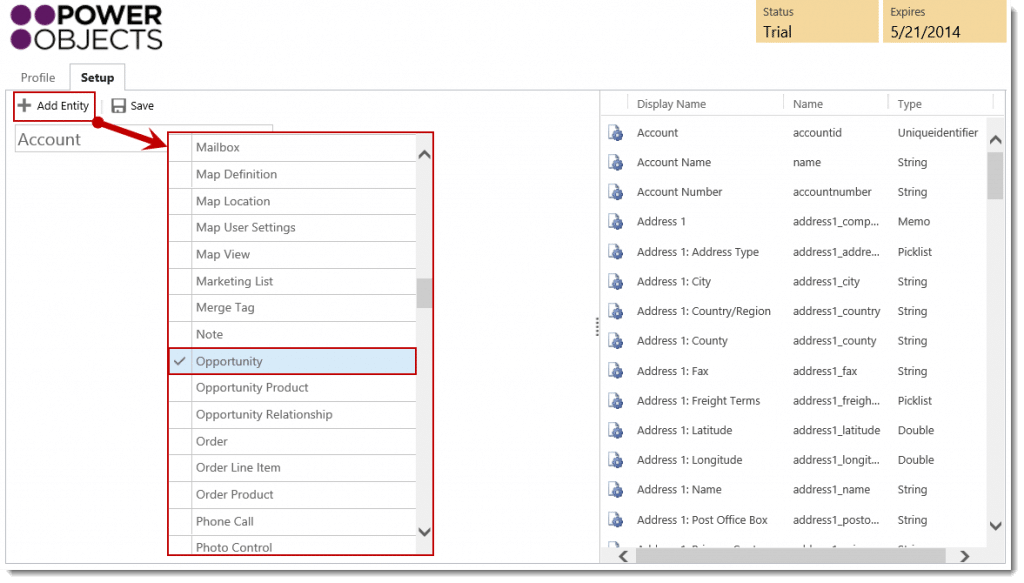
Once you have imported and registered the PowerGrid solution for your Microsoft Dynamics CRM system it will need to be configured. In Microsoft Dynamics CRM Navigate to Settings > Solutions and double click on PowerGrid. The setup tab is where you configure which entities you would like PowerGrid users to be able to search within. Please note that the system and personal views that each user is allowed to see in CRM for each entity you setup will be available to them in PowerGrid. Out of the box PowerGrid pre-configures the three most common entities; Account, Contact and Lead. If you would like to add additional entities select the “+ Add Entity” and select a new entity.
Note: PowerGrid is not supported on the product entity.
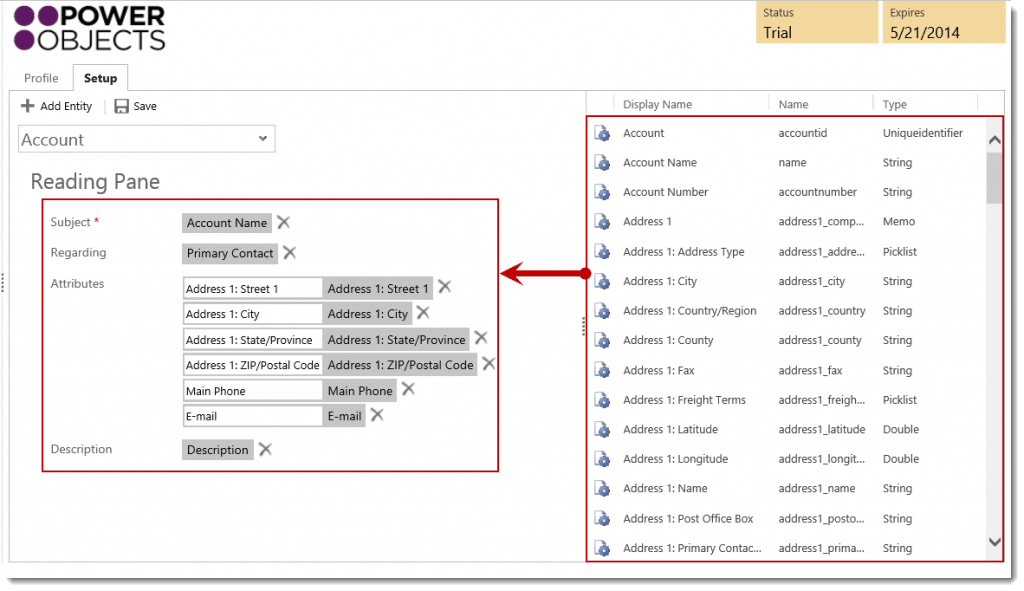
For each entity you will need to configure your reading pane – again we have given you a head start with pre-configured fields for the Account, Contact and Lead entities; but feel free to change these to meet your needs. To edit what is shown in the reading pane, simply drag and drop fields from the list of options on the right to the reading pane section on the left. To delete a field from the reading pane, simply select the ‘x’ listed after the field name. If you need the fields to be in a certain order you must delete all of the fields in the reading pane and drag the fields over in the desired order.
For each entity, you can also choose to set up “Read Only Fields” for the grid. This means that users will NOT be able to edit the fields added here inline, in PowerGrid. This may be useful for fields who have JavaScript or other functions that run when that field is modified, as these functions would not run when editing a field inline in PowerGrid.
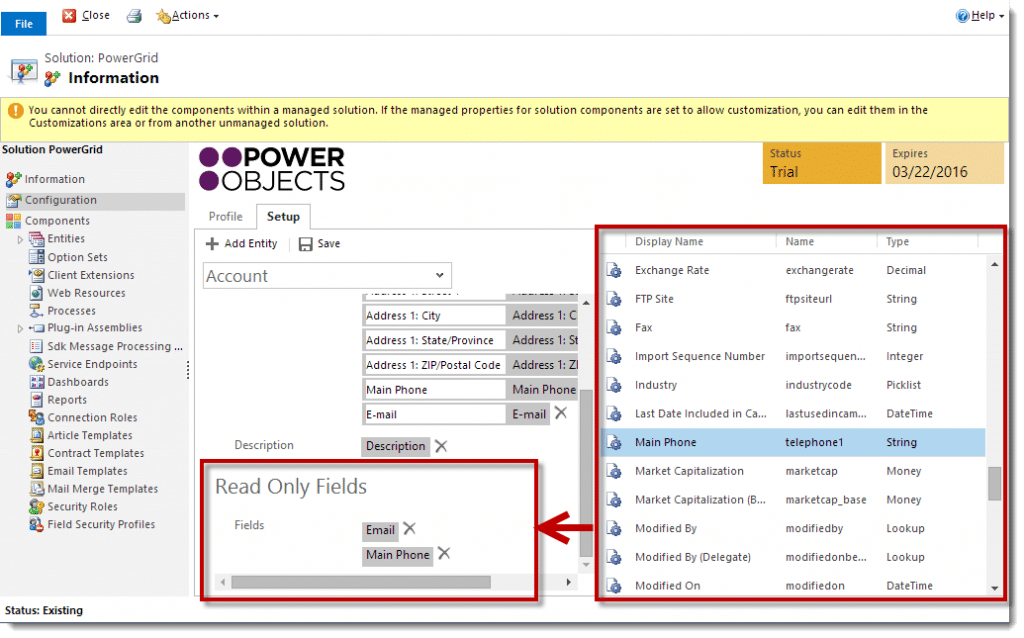
Once you have completed the configuration of your entities and reading pane select save.
Activity Setup
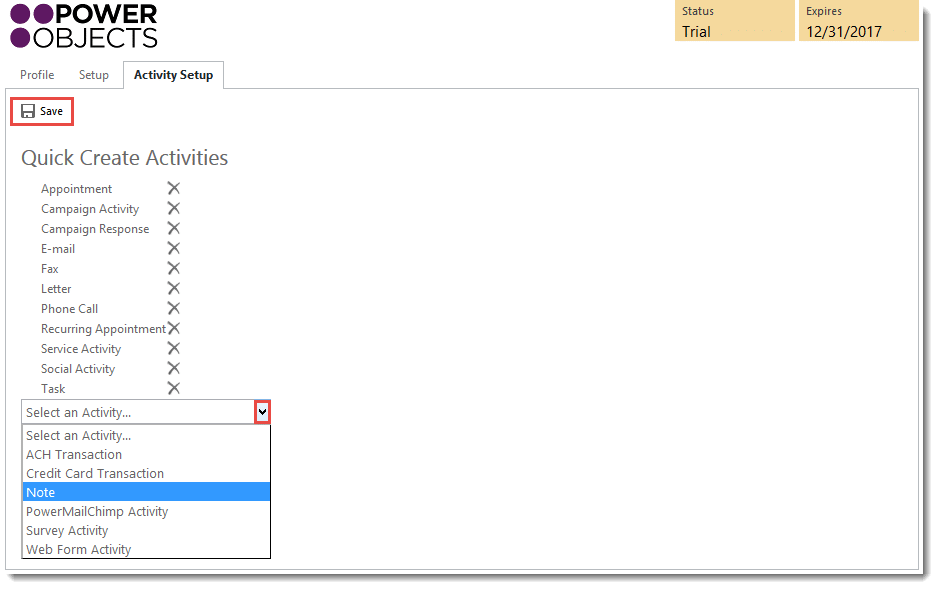
The next tab is the Activity Setup tab where you will be able to choose which CRM activities you would like to be available to PowerGrid Users, out of the box activities will automatically be setup for you, but if you would like a custom activity type added you will have to choose the activity from the dropdown and select ‘Save.’ It is crucial that you hit save, because that then creates the appropriate configuration values in the PowerGrid configuration table. The "+Quick Create" requires the values in the configuration tab in order to function.
Navigating to PowerGrid
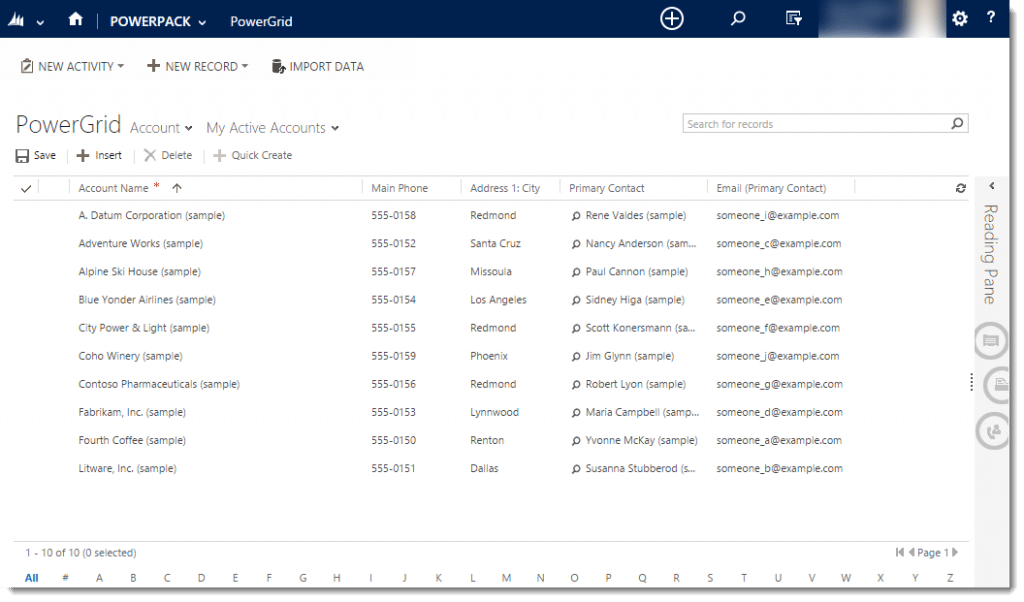
To begin a search, navigate to the Microsoft Dynamics CRM dropdown and select the PowerPack section, then select the PowerPack tab and click on PowerGrid.
Grid
Once you are in PowerGrid you have many different options for searching, filtering, editing and reading your results.
Entity
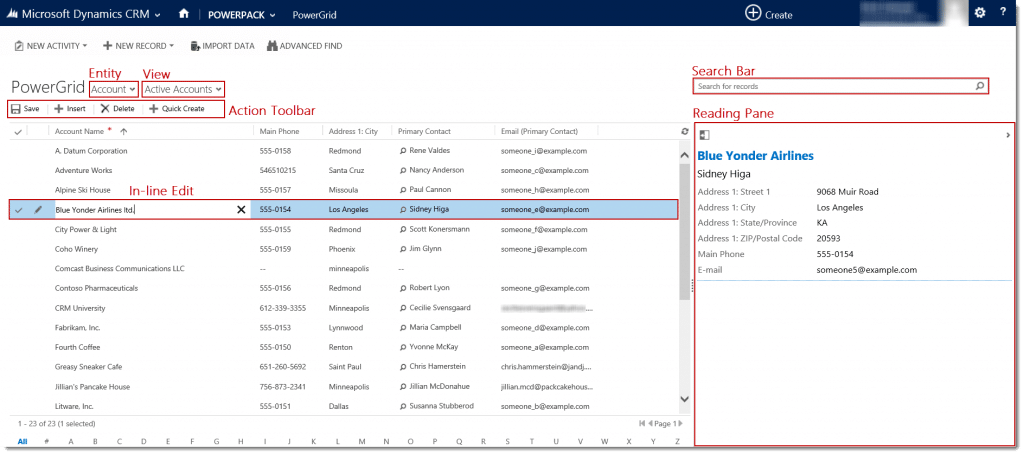
First you will want to select the entity you want to search within, you can do this by selecting the entity dropdown and choosing an entity.
View
After selecting your entity, you will need to select the view that you want to search or edit. This can be a system view or a personal view.
Search Bar
To search within PowerGrid, select the search bar, and type a search word. PowerGrid will then search the selected Entity View and display the results in the grid.
Reading Pane
The reading pane allows you to see details of the selected record without having to open it. Fields will only be displayed in the reading pane if they contain a value. If you would like to add or edit fields that are in the reading pane, you can update those preferences in the configuration screen. If you do not have access to view the configuration screen, please contact your System Administrator.
In-line Edit
With PowerGrid, users are able to edit record information on the fly with the In-line Edit functionality. Simply click on the section that you want to edit and the field will change to an editable area. Once you have made your changes you will notice a small pencil icon next to the record. This indicates that there are unsaved changes to that record. Once you select Save from the Action Toolbar the icon will disappear.
Action Toolbar
PowerGrid’s action toolbar allows users to insert records into views, use the quick create functionality to create activities for records displayed in the grid, delete records in the grid, and save changes made with the in-line editing functionality.
*One thing to note is that the Quick Create will only work after successfully configuring it in the configuration page. To configure this functionality, you would need to navigate to Settings>Solutions>Double click to open PowerGrid configuration page>Click on Activity setup tab>Make changes or leave it as is on the Quick create activities area>Click on Save. It is crucial that you hit save, because that then creates the appropriate configuration values in the PowerGrid configuration table. The "+Quick Create" requires the values in the configuration tab in order to function.
Opening a Record
If you’d like to open a record you’ve found with PowerGrid, simply double click on the record in the view, or click on the name of the record in the reading pane. This will pop open the record in the window.
Using PowerGrid as a Sub-grid
If you would like to use PowerGrid as a sub-grid on Entity forms, you will need to manually add the PowerGrid web resource to each entity form you would like to utilize the sub-grid functionaility. Edit the form and insert the PowerGrid web resource (popg_/Grid.html) in to a section or tab.
You will need to select the “Pass record object-type code and unique identifier as parameters” box in the Web Resources Properties in order for the sub-grid to filter only the related records.
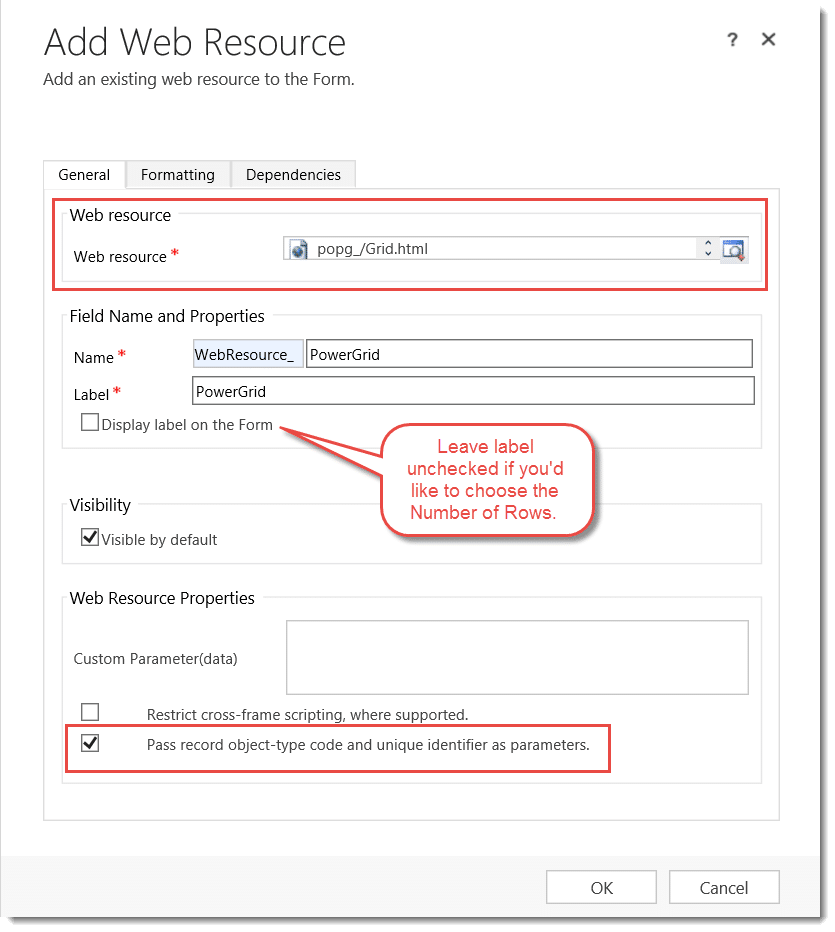
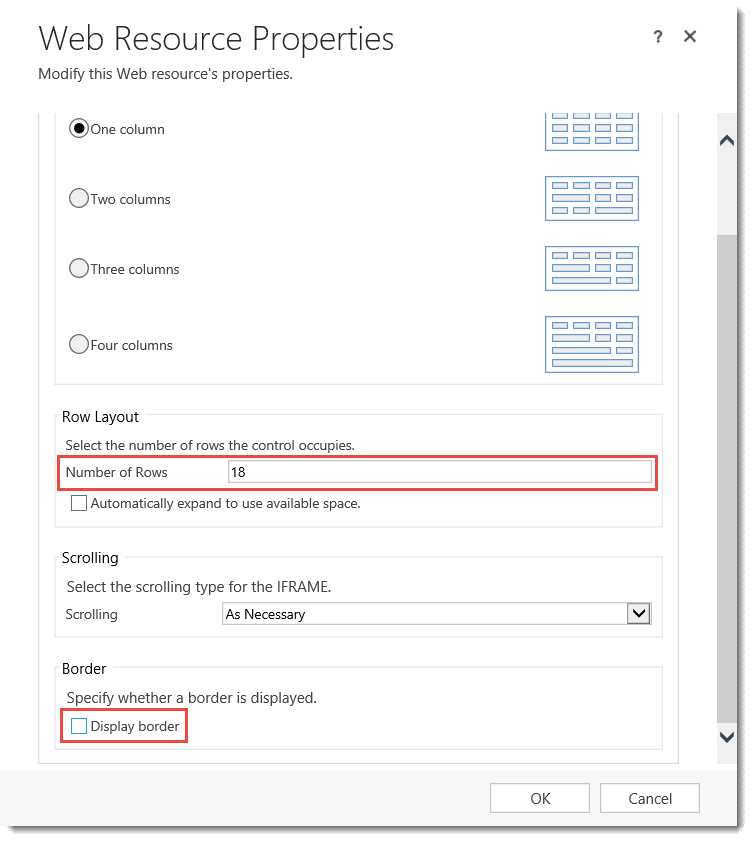
Then select the Formatting tab and change the Number of Rows field to the recommended 18 rows, for best use the minimum value should be 12 rows, and uncheck the Display Border option.
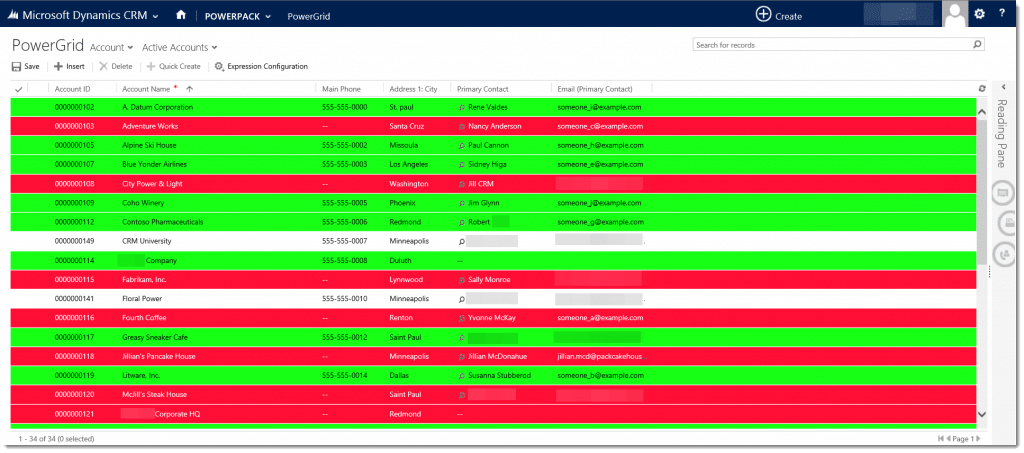
PowerGrid users can add conditional formatting to their grids by creating expressions which will allow you to highlight matching records. To begin, navigate to PowerGrid and display the Entity and View for which you want to add conditional formatting. Select the Expressions button and select the view column you wish to use for the expression criteria. Then you’ll select the Operator for which you want to condition by, enter a Value if needed, and finally select the background (B/G) and Font Colors. You can choose to list multiple expressions for formatting, just be aware the solution applies the conditioning in the displayed order and once formatting has been added to a row, no other formatting will be applied.

Adding PowerGrid to Other Sections
in CRM
To add PowerGrid to other sections in CRM such as a dashboard, simply navigate to the dashboard section of your CRM system – here you can choose whether you would like to edit an existing dashboard or create a new one. Then select the Web Resource button.

This will prompt a lookup where you can search for the PowerGrid html file, give the Web Resource a logical name such as PowerGrid and select the checkboxes for Display label on the Dashboard and Visible by Default. Then select ok.
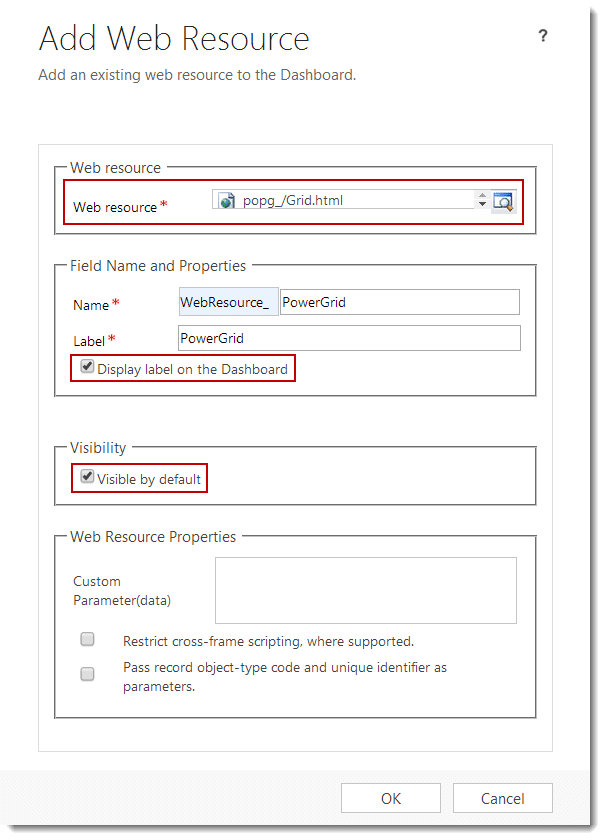
PowerGrid will then be populated on your dashboard, from the ellipsis you can choose to adjust the width and height of the web resource to fit your needs. Make sure that you save your changes before closing the window.
Using PowerGrid in new UCI
PowerGrid is compatible with the Dynamics 365 online UCI. Make sure you have the UCI compatible version downloaded from our website and installed in your CRM.
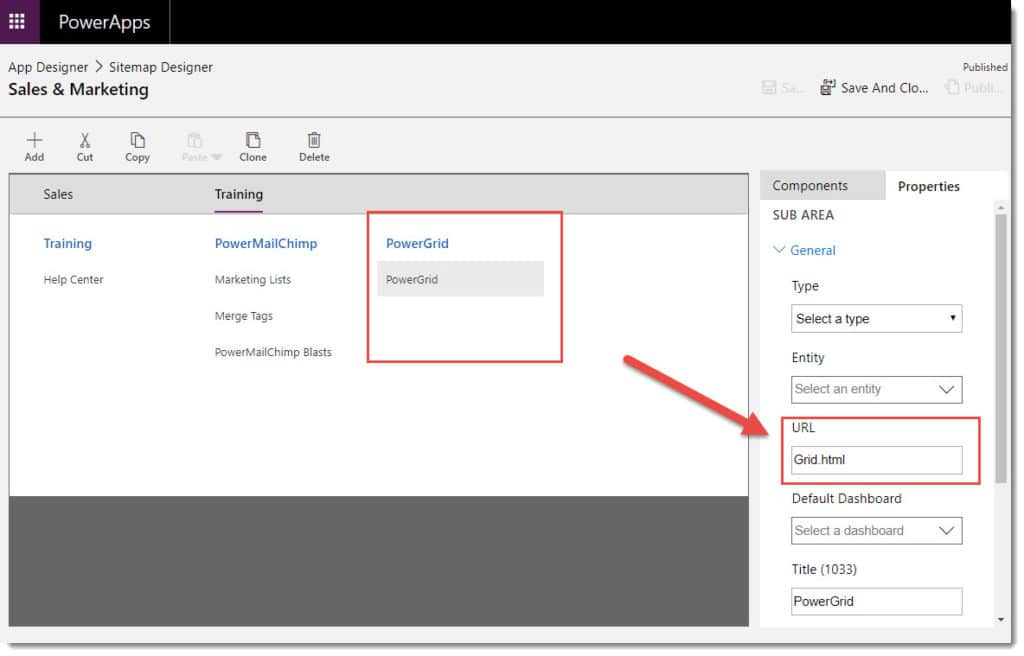
Once you have PowerGrid installed you can to add it to your sitemap, along with the entities and web resources the solution provides by editing an app and adding the components in your app designer.


Uninstall PowerGrid
Uninstall PowerGrid by deleting the solution from the solutions list in CRM. Deleting the solution will remove all pieces of PowerGrid from your CRM system.
Uninstalling the solution does not unsubscribe the solution. If you're discontinuing use of the add-on, you must first unsubscribe in the solution.
 How Microsoft Power Platform is helping to modernize and enable...
 Deliver an Extraordinary Omnichannel Experience
 Data Interoperability Key to Improving the Patient Experience


