
How Microsoft Power Platform is helping to modernize and enable...
In this webinar, our experts showcase a variety of demo use cases of how different components of the...
Every user who would like to have access to PowerPhoto will need the PowerPhoto User security role assigned to them. System Administrators will automatically see PowerPhoto and be able to use PowerPhoto, even without having the security role assigned.

Once you have imported and registered the PowerPhoto solution for your Microsoft Dynamics 365 system it will need to be configured. To configure PowerPhoto navigate to the setup tab. By default, PowerPhoto images are compressed and saved with a maximum pixel height of 305 and a maximum pixel width of 225 while preserving the image’s aspect ratio. If you’d like to change the maximum height or width, it can be changed in this tab.
*Please note, that PowerPhoto supports .png, .jpg, .jpeg, and .gif photo types.
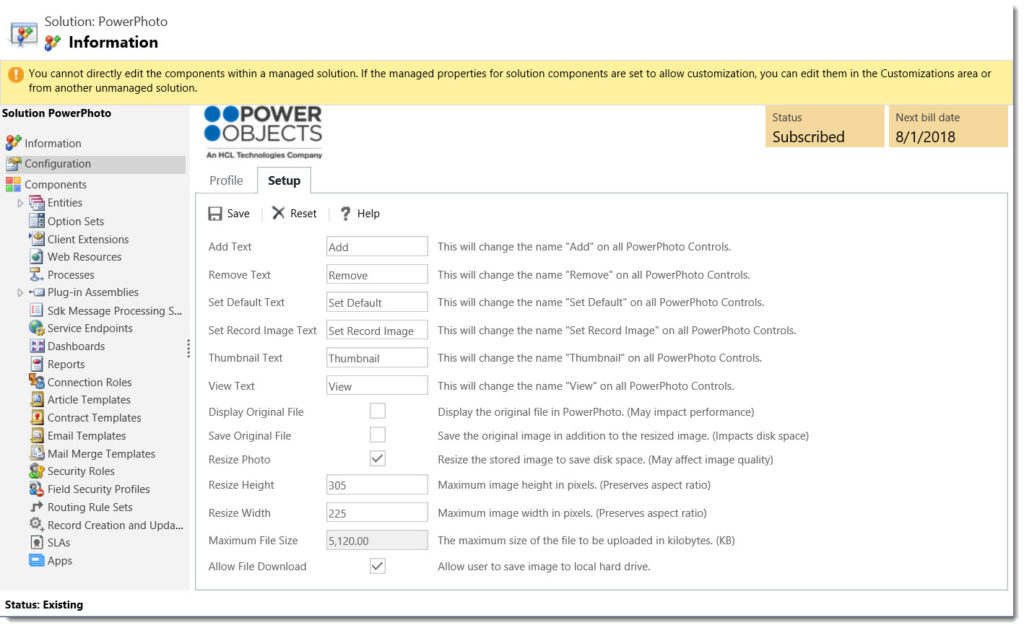
In the PowerPhoto control, you will have words displayed - Add, Remove, View, Thumbnail, Set Default and Set Record Image. You can change the words that are displayed in the control by changing the wording here, in the setup tab of the PowerPhoto solution, this feature is designed to support foreign languages.
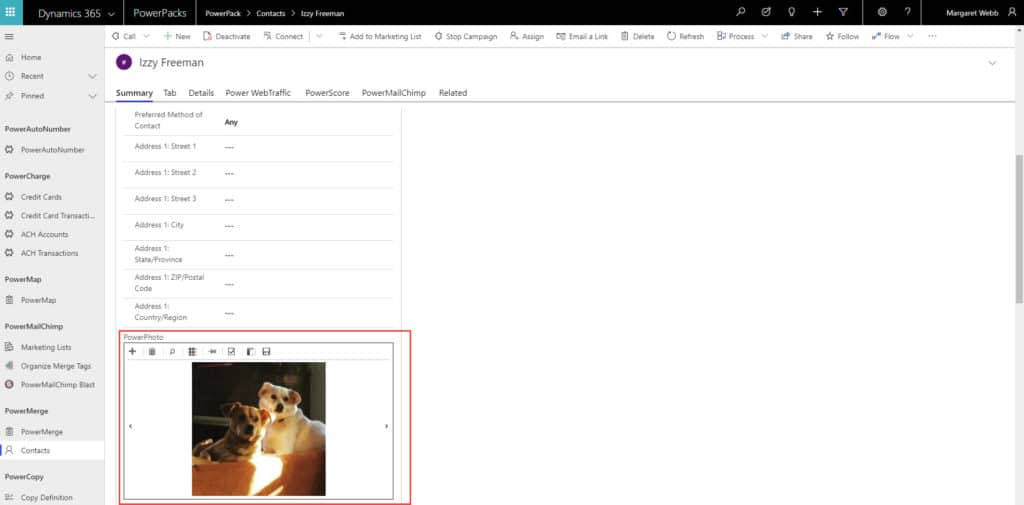
Example of the PowerPhoto control, and the text that can be changed:

Selecting ‘Yes’ will display the original uncompressed file instead of the resized image in the PowerPhoto control on the CRM form.
Displaying the original file may impact performance due to the potentially large size of images. To ensure optimal performance, the recommended setting for this option is ‘No’.
Selecting ‘Yes’ will store the original image in addition to the resized image. This allows for utilization of the uncompressed image to be used in reporting and other processes.
Controls whether or not the image dragged into the PowerPhoto control should be resized and compressed to save disk space. Selecting ‘Yes’ will resize the dragged image to the maximum pixel dimensions specified in the Resize Height and Resize Width options.
To ensure optimal performance PowerObjects recommends that this value be set to ‘Yes’ and that the resized image should not be larger than 1 megabyte (MB) in size. Should the need arise to save an image larger than 1 MB, the Save Original File option should be set to ‘Yes’.
Represents the maximum pixel height that a dragged image will be resized to while preserving the original image’s aspect ratio.
Represents the maximum pixel width that a dragged image will be resized to while preserving the original image’s aspect ratio.
This option displays CRM’s maximum file upload setting as defined in CRM’s E-mail settings. PowerPhoto will not store an uncompressed image that is larger than the value defined in this field. Images larger than this value can be saved if they are resized to less than 1MB as defined by the image resizing options described above.
To modify this value, manually access CRM’s E-mail settings by navigating to Settings > Administration > System Settings and selecting the E-mail tab. Change the value listed for Maximum file size and click OK.
Note: The maximum value that can be entered in CRM’s E-mail settings is defined by the CRM server that hosts the CRM organization. Always consult your system administrator before making changes to CRM settings.

If you check this box, users will be able to save the image in the PowerPhoto control on their local machines, by using a small "Save" icon on the control.
Once you are finished editing these settings, remember to click Save. You can also choose to set the settings back to their defaults, by clicking the “Reset” button.
After you’ve imported the PowerPhoto add-on, the first thing you will want to do is add a PowerPhoto control, where the images are displayed, on to an entity in CRM. To do this, navigate to the entity you’d like to place it on and open that entity. Then click the ellipses, and Form/Form Editor.

Click on the insert Tab, and Web Resource.

Search for the resource called “popp_/Photo.html”. Give the resource a name and check the box next to “Pass record object-type code and unique identifier as parameters”. Do not click OK yet or the window will close.

Go to the Formatting tab, and decide how many columns and rows you would like the PowerPhoto control to fill. Then click OK.

Save & Publish.

Note: It is possible to add more than one PowerPhoto control to each record in CRM, if you’d like.
In the Web Resource Properties, Navigate to the Custom Parameter (data) field, and type in “type=multiple”. Then click OK.

Save and Publish.
You will now be able to view multiple images on the record. You can choose to view one image at a time, and scroll through them, or you can choose to view thumbnails of the images.
Note: For each CRM entity, you can either have support for one image, or support for multiple images per PowerPhoto control. For example, if you enable multiple images on the PowerPhoto control on Contacts, this will
go across all contacts. You cannot have support for a single image on one contact record, and support for multiple images on another contact record.
After you’ve added the PowerPhoto control to an entity, there are a few different ways in which you can use the photo control.
First you can use the simple drag and drop functionality; on the PowerPhoto control you will see a message which says “Drag and Drop images here.” To put an image here navigate to your images folder on your machine, choose your image, drag it over to the photo area, and drop it.

Another method of adding images to the PowerPhoto control would be to use the ‘+’ or Add button. Selecting this button on the photo control will open your files where you can then navigate to your images and select open, which will add them to the PowerPhoto control

Lastly, you are able to copy and paste images into the PowerPhoto control. Simply navigate to an image that you want to add to your PowerPhoto control, copy it, then in CRM select the “Paste Image Content,” in the photo control, in the dialog box that opens hit “Ctrl + v” to paste your image.

You can also choose to set the record’s image, by clicking the “Set Record Image” button on the control.

Clicking “View” in the control will open the image in a new tab. Clicking “Remove” will remove the photo from the PowerPhoto area. If you’ve set the photo as the record image, and you delete the photo from the control, the record’s image will still remain intact.
To add another photo to the control, simply drag and drop another picture over, and it will be added to the record. You can also add an image by clicking the “Add” button, and browsing to the image you wish to add. To scroll through the images on the record, select the arrows on the right or left side of the PowerPhoto control. To view thumbnails, click on Thumbnail at the top of the control. If you are in thumbnail view, and you would like to view a specific picture, select the picture you would like to view and it will be displayed. You can choose to set a default in the control by clicking on “Set Default”. This will ensure that this image is the one that first displays in the control when you open the record.

Note: It is not recommended to change controls to single images after they have been set as multiple image controls.
PowerPhoto is compatible in the Dynamics 365 online UCI. In order for PowerPhoto to work in the UCI, you will need to make sure you have the UCI compatible version downloaded from our website and installed in your CRM. Then, all you need to do is make sure that for whichever entities where PowerPhoto is displayed on, you have the form enabled in the UCI. For example, if I have PowerPhoto displayed on my contact form, I need to click on the contact entity forms, and make sure that the contact form checkbox is checked.

Then, you will be able see PowerPhoto on the forms that you have enabled in the UCI.
To uninstall, first remove the PowerPhoto control from your forms. Then uninstall as usual, by deleting the solution. Deleting the solution will remove all images and data related to PowerPhoto.
Uninstalling the solution does not unsubscribe the solution. If you're discontinuing use of the add-on, you must first unsubscribe in the solution.
Thank you for your interest in PowerPhoto, should you choose to subscribe you will be charged $1/enabled CRM user/month. If you have any questions or run into any issues with PowerPhoto, our friendly support team is here to help!

