
How Microsoft Power Platform is helping to modernize and enable...
In this webinar, our experts showcase a variety of demo use cases of how different components of the...
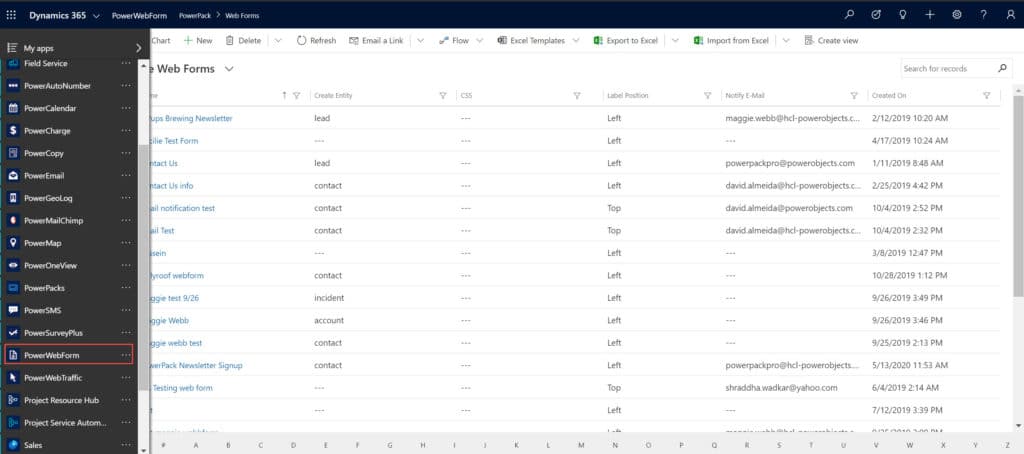
To use PowerWebForm in the Unified Interface (UCI), we’ve created a model driven app. You will need to use PowerWebForm through this model driven app in order to experience proper functionality. The model driven app is included in versions 5.2.0.0 and above. When you install a version above 3.2.0.0, you will notice a new PowerWebForm app in the UCI:
Once you open the PowerWebForm app, you will notice the PowerWebForm components, along with the following sections:

Every user who needs to see or use PowerWebForm will need one of the PowerWebForm security roles assigned to them.

There are three different security roles:
This security role will give users full rights to anything related to PowerWebForm, including the ability to create web forms, as well as read the activities associated with them.
This security role needs to be assigned to the user whose username and password is entered in the PowerWebForm configuration screen, if they are not a system administrator.
This security role will give users the ability to see the web form activities, but not make changes to the form.
Please Note: Any CRM user that you’d like to assign a web-form created lead to, must have rights to read the PowerWebForm activity detail. You can either add this permission to an existing security role associated with that user, or assign them the PowerWebForm user security role.
Once you have imported and registered the PowerWebForm solution for your system it will need to be configured. To configure PowerWebForm navigate to Settings > Solutions and double click on PowerWebForm. Click on the setup tab to configure your settings.
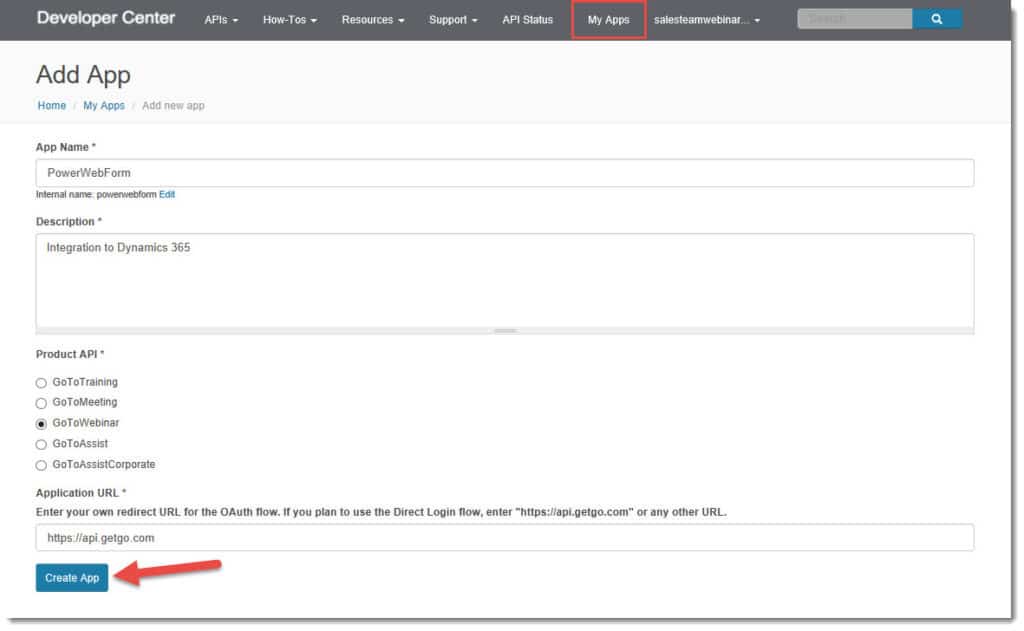
Organizations are able to connect their PowerWebForm solution to their GoToMeeting/GoToWebinar account. Enter the credentials for the organization’s GoToMeeting account. This will allow you to point your web forms to specific GoToMeeting registrations as well as your CRM system. To grab the Consumer Key, log into GoToWebinar Developer with your GoTo credentials, and under My Apps, create a new app. Type in a name and description and choose "GoToWebinar" under the Product API field. Then enter https://api.getgo.com in the Application URL field.
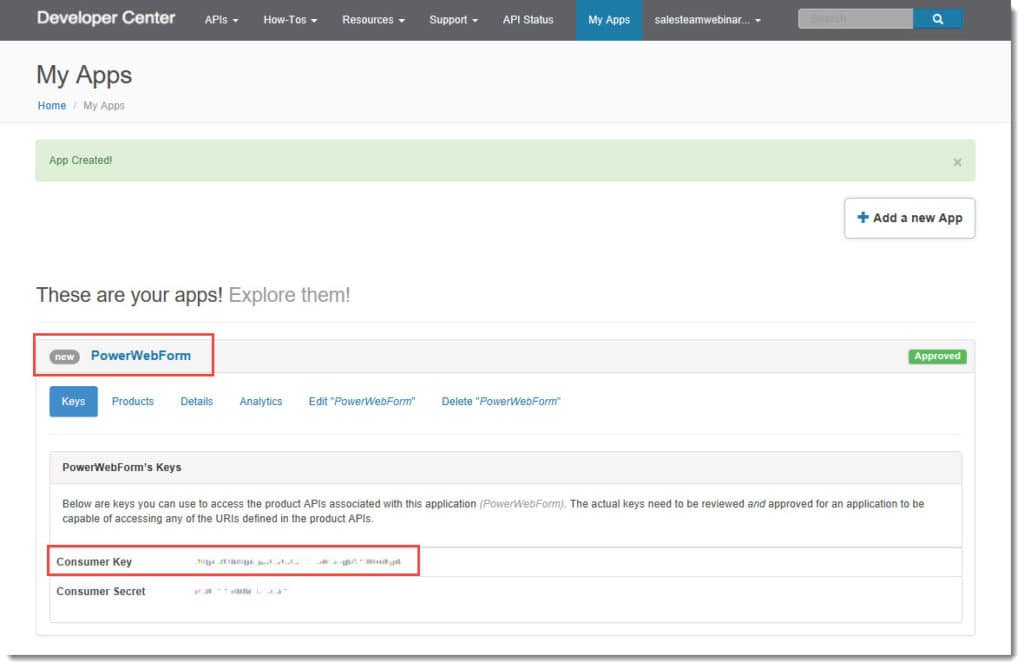
Once an app is created, click on the name of the app, and you will see your Consumer Key. Copy the Consumer Key and paste into the PowerWebForm Consumer Key field. Then copy the Consumer Secret (directly below the Consumer Key) and paste into the Consumer Secret field in the PowerWebForm solution, and save.
Please see the GoToMeeting section for more details on the GoToWebinar integration.
The “Field Separator” is a field you will use if you are mapping a web form field to a custom multiple checkbox field on your CRM record.
The Target Service is the Azure cloud where your web forms will be stored, as well as the submissions staged in the event your CRM is unavailable.
The “Sync” button is meant for users who are going from an older version of PowerWebForm to a later version of PowerWebForm. It will re-deploy the web forms to the cloud location selected. If you've changed cloud locations for any reason, you will need to click on this button in order for webforms to be deployed to the new cloud.
The “Reset” button will reset the value of the “Field Separator” to the default value.
Make sure to save any changes you’ve made in the setup tab, by clicking the “Save” button.

Important: There are a number of workflows that were imported when the solution was imported. Please ensure that these workflows are active, or PowerWebForm will not function.
To use PowerWebForm, one of the two below forms of authentication is required. From November 9th onwards, PowerPack add-ons will be supporting ServertoServer authentication (recommended and supported for CRM online) along with IFD authentication (supported for on-premises). If you are on version 9.1.0.23474 or above of Dynamics 365, you will not be able to authenticate using username and password at all. Instead, you will be required to use ServertoServer authentication, as Microsoft turned off authentication using App password starting with this version.
Configuring PowerWebForm using servertoserver authentication
Check out this blog for instructions on how to set up servertoserver authentication. Then, navigate to the PowerWebForm configuration page authentication tab, and select “server-to-server” as your authentication method. Add your App ID, App Secret, and Tenant ID, and click on “save.”

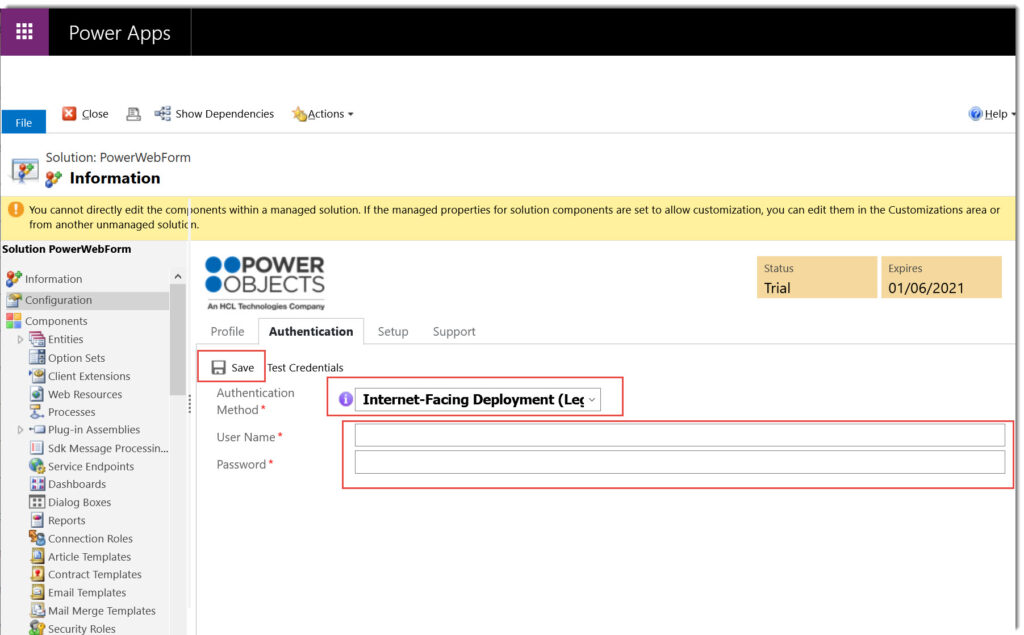
Configuring PowerWebForm using username and password
If your CRM is on-premise or you have a version of Dynamics 365 online that is below 9.1.0.23474, you can still authenticate using username and password. If you have MFA enabled, you will need to create an app password and then enter in your username and app password into the PowerWebForm configuration page as usual
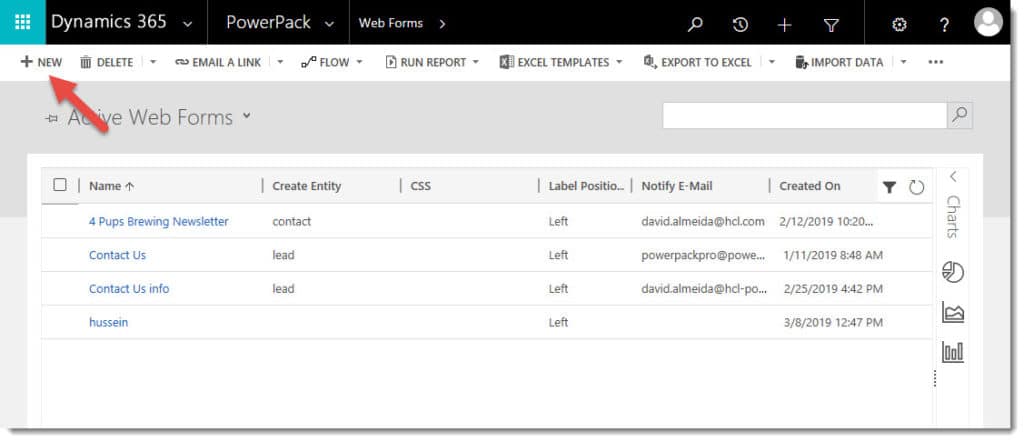
Once you have installed PowerWebForm, you will see a new option set under PowerPack, called PowerWebForm. To create a new web form, click on New in the upper left-hand corner.
At the top of the web form, you will notice a number of fields that need to be filled out:
The name of the web form (for internal display only). This name will also be on the web form activity that is created, so be as specific as possible.
An email will get sent to this email address, notifying this person that a new web form has been filled out. The email will include the name of the form, all of the various form fields and what was input into those form fields. If you’d like the notification to be sent to multiple email addresses, separate them by semicolons.
Note: You must have an email router set up for CRM in order for the notification emails to go out.
This is the entity that will be created in CRM when a web form is submitted. If you don’t want an entity to be created when the web form is submitted, you can choose not to associate a related entity. Then the information will simply be kept within the web form activity that’s created when a form is submitted.
This is where the label for the field will display – either on top of the answer field or to the left of it.
If a lead or contact is chosen as the Related Entity, users have the option to associate this form to a campaign. When the form is submitted, a campaign response will be created, if a campaign has been chosen here.
This is the message that will display after someone has submitted their form, as long as you are not automatically redirecting people to another web page.
Whether or not the submitter will need to identify a captcha before submitting the form. (This is used to prevent spam)
If you would like users to be redirected to a different web page after they submit a web form, enter a URL here. Remember to put http:// in front of your URL, so that the redirect works properly.
Note: If you decide to use the iframe to deploy your web form, users will be redirected inside of the iframe, if you place a URL in this field. In order to properly use the redirect function, you will need to use the HTML source code to deploy the form on your web page, which requires a moderate amount of HTML knowledge.
Here, you have three choices:
Once you’ve finished filling out these fields, click on Save.
Note: The owner of the record that is created with each PowerWebForm, is the same as the owner of the web form itself. The owner of the web form activities that are created, is the user whose username and password is entered in the PowerWebForm configuration area.
Enabling Google Captcha on your webform
Whether you deploy your webform via the Iframe or source code, PowerWebForm allows you to enable google captcha on your webform.
Enabling google captcha via Iframe deployment:
If you have your webforms deployed to your website via the Iframe, all you need to do in order to enable google captcha is to set the "require captcha" field to "yes." From there, google captcha will be enabled on your form.

Enabling google captcha via source code deployment:
If you have your webforms deployed to your website via the source code, enabling google captcha will require one additional step. On top of setting the "require captcha" field on the webform to "yes," you will also need to add your site key and secret key to the PowerWebForm configuration page setup tab. The site key and secret key is specific to your domain, which you can find in your google account. Please note that if you modify your keys (site key & secret key) after initially inputting them in the configuration page, then at that point you would need to redeploy your webforms to your website.

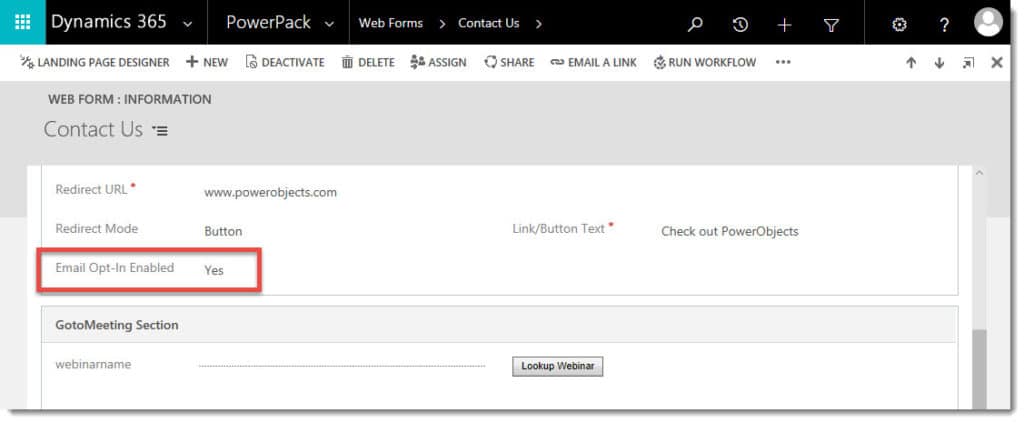
Users have the option to apply the double opt-in process to emails being sent from CRM on the web form level. Select yes, to apply email opt-in.
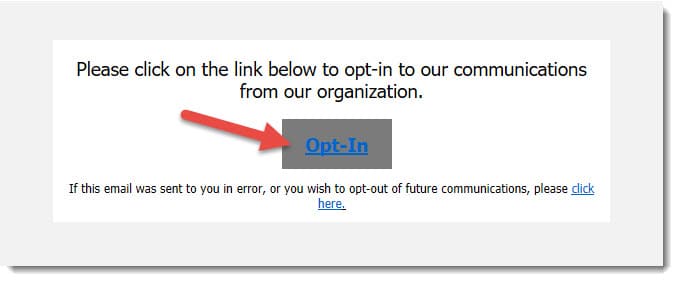
If the Opt-In Selection is set to yes, once a web form is submitted a double opt-in record is created and a pre-configured workflow generates and embeds a unique URL link into a confirmation email. This email is then sent to the address entered in the email address field on the web form.

Once the link has been clicked by the potential subscriber, the opt-in will be verified. If a contact or lead chooses to opt-out of receiving future emails, the workflow will not proceed further.
If the double opt-in process has been verified, all accounts, contacts, and leads to the associated email address pre-populated will have the primary email opt-in lookup populated with the verified double opt-in.

To view a list of all Double Opt-In subscribers, navigate in your CRM to PowerPack, PowerWebForm and select Double Opt-Ins.
The status of the Double Opt-In record will be one of the following:
4. Opted Out: This status is similar to an unsubscribe, meaning that the user has clicked the link saying that they wish to opt out of future communications, in the double opt-in email they were sent. Once that link is clicked, the Double Opt-In record’s status changes to Opted Out.

5. Duplicate Exists: If the same email exists on more than one Double Opt-in records, the status of the record will become Duplicate Exists automatically.
6. Staged: After the new Double Opt-In record is saved, the status changes to Staged. This status occurs between the New and Email Sent statuses. The Staged status will automatically change to Email-Sent when the email is sent to the email address on the record.
If you would like to connect your PowerWebForm to a webinar setup in GoToMeeting, you can utilize the GoToMeeting Section. Simply select the “Lookup Webinar” button.
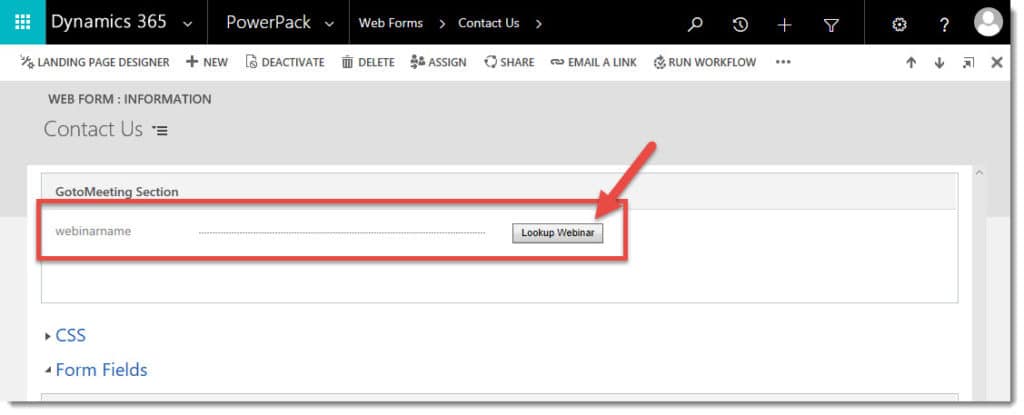
This will open a dialog box where you can choose which webinar you would like the PowerWebForm to connect to.

Simply select the webinar this PowerWebForm will connect to and select ok. Once you have selected the webinar that you want the PowerWebForm to map to, you will notice that there will automatically be three form fields added to your form field section. First Name, Last Name and Email, these are the minimum requirements for GoToWebinar registrations, so we have created and mapped them automatically for you.

Once you have this setup, all submissions through the PowerWebForm will map to your CRM system as well as the GoToMeeting system, so that you no longer have to manage multiple databases.
If you’d like to change the look and feel of your web form, you can input CSS in this field. If you do not upload a CSS, your web form will default to a white background, with black text, like the example below.

The next thing you’ll want to do to create a PowerWebForm is create fields for your web form. To add a form field, click on the “+” next to the form fields grid.

When creating a new form field, there are a number of items that need to be specified about the field:

Web Form
Notes what form this fields will be tied to. This is automatically populated for you.
Display Order
What order the field will be displayed in (i.e. 1, 2, 3 for 1st, 2nd, 3rd…)
Field Label
The text that will appear either on top of or next to the field.
Field Tool Tip
This will display below the Field Label on the form in a smaller font.
Field Type
This field will let you choose what type of answer you are looking for. Each field type is described in detail in the next section.
Field Length (chars)
Denotes if there is a limit to how many characters can be typed into a web form field.
Field Required
Whether or not the field is required to be filled in, in order for the form to be submitted.
Map Field
Where in CRM this web form field will map to. For example, if you have chosen a lead for your related entity, and you are creating a first name field, you will want to map the first name field on the form to the first name field of the lead entity when the record is created.
Search
Used for duplicate detection – If you want to use this field on the web form to detect duplicates in your CRM or not.
Note: If you say “Yes” to use more than one field for duplicate detection, the two fields must both match a record in your CRM in order for a duplicate to be detected.

Your web form needs to contain all of the CRM forms required fields. If the web form does not contain values for all of the forms required fields, the new record will fail to save.
Text
A single line of text can be entered in this field.
Multiple Text
Multiple lines of text can be entered in this field.
Drop-down List
A list with multiple options that drops-down when you click on the field. If you select this type of field, an “Options” field will appear, where you can type in what options you would like to list in the dropdown field.
Radio Button
A list of items that are displayed, and you can only choose one of the answers. If you select this type of field, an “Options” field will appear, where you can type in what options you would like to list in the radio buttons.
Check Box
One check box that can either be checked, or unchecked.
Multiple Checkbox
A list of items that are displayed, and you can select multiple items. If you select this type of field, an “Options” field will appear, where you can type in what options you would like to list in the dropdown field.
Date
A field where submitters can enter a date. Please note that this date field is in U.S. date format of mm/dd/yyyy.
Phone Number
This field will only allow users to enter numbers, and can be used for numeric values, such as phone numbers.
Zipcode
This field is meant for a number such as a zip code.
Email Address
This field will only allow users to enter an email address.
File Upload
This field will allow users to upload a document to be submitted with their webform submission. If you choose this field, you will be able to specify what file types you will accept in this field, the maximum size the uploaded file can be, and whether you would like to attach the file to the record that’s created or simply keep it within the web form activity.
Hidden
A hidden field can be used to pull in a value from the form that you don’t want the person submitting the form to have to fill out. For example, if you’re creating a lead with the form, you may want the hidden field to populate the “source” or “topic” field on the form, telling you this lead came from a web form.
You can also use a guid in a hidden form field to populate a CRM lookup field type with a specific CRM record. For example, if you want to create cases with a PowerWebForm, you could assign all cases to a specific account named “Unassigned Cases”.
Note: You cannot dynamically populate a lookup on a CRM record with a web form submission. You can only populate a lookup field on a record with a static value, using a PowerWebForm.
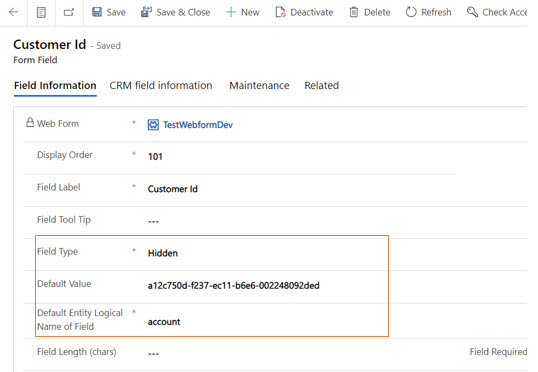
To populate a lookup field on a record with a static value, you would need to put the technical name of the entity (or the “Primary Key”) in the format entitynameid, in the Field Label field (so contactid, accountid, po_newentityid, etc.). Choose the hidden Field Type, and enter the record’s unique identifier (or guid) into the Default Value field. This ID must be 36 characters long. Take a look at the example below:

To find a specific record’s unique identifier (or guid), open the record, and pop it out, using this icon ( ) in the upper right corner of the screen. You will now see the URL displayed at the top of the popped-out window. The guid is the piece after the “=%7b” and before the next “%” sign. You should have 36 characters including the “-“ between the letters/numbers.
https://crmname.domain.com/main.aspx?etc=10010&extraqs=formid%3d2763ed40-fad2-47e5-9117-79d9ed4ac572&id=%7b43FE4F69-6ABB-E111-A0E4-000C295A41AA%7d&pagetype=entityrecord
Once you’ve finished specifying a form field, click Save & Close, and click the “+” sign again to create another form field.
*For users on versions 7.0.9.0 or above of PowerWebForm, please follow the below steps:
If the FormField is the ‘Hidden’ field type, the user needs to enter the logical name of the Entity which is corresponding to the Field.
NOTE: when selecting the field type as hidden, then we will see the field called “Default Entity Logical Name of Field”. In this field, the user will enter the logical name of the Entity which is corresponding to the Field.
Example 1: In the below image, The field label is CustomerID, it was a hidden field, and it is mapped to customerid.
But Customer is the polymorphic lookup, so we have to enter the logical name which is either account or contact.

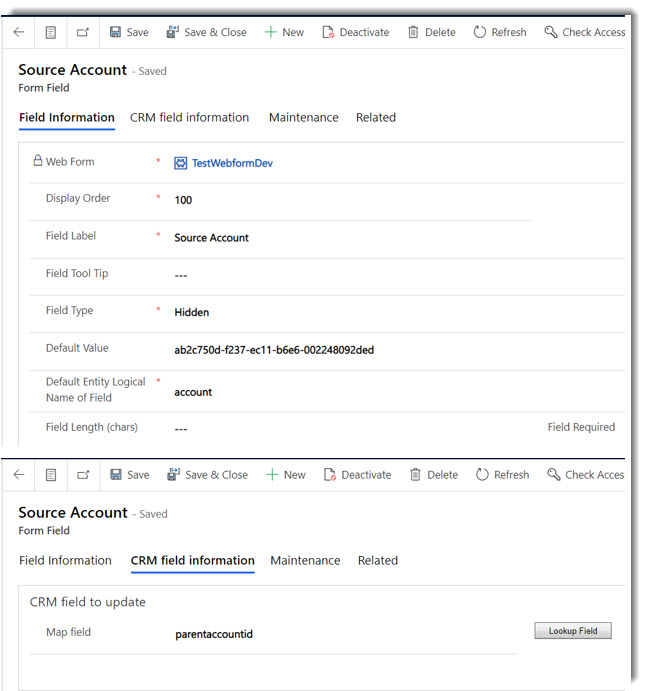
Example 2:
The second example have field name as Source Account and it is also have hidden field type and mapped with ‘parentaccountid’.So the logical name of the entity is ‘account’.
If you’d like to check more than one entity for duplicates before a new record is created (for example check leads AND contacts before creating a contact), you can set up additional duplicate checks. To do so, navigate to and open your web form, and click on “Duplicate Checks” in the navigation bar. Click Add New Duplicate Check above the grid.

Choose the entity you’d like to add additional duplicate check for (Remember, you will already be checking for duplicates on the primary entity of the web form, so no need to add that here.) and save the record. Next, click on the “+” next to the “Duplicate Check Fields” grid, and select Add New Duplicate Check Field in the ribbon.


Choose a form field, and a CRM field to check for duplicates, then click Save & Close, and click “+” again if you’d like to add another field to check duplicates for, until you are satisfied with your duplicate check. Remember, only add fields here that you want to use to check for duplicates. Not all form fields need a duplicate check mapping. If you add more than one duplicate check field here, the information being submitted must match all fields exactly in order for a duplicate to be detected.

When you are finished, click Save & Close.
Note: if a duplicate is detected, PowerWebForm will not update the information on the record with what was submitted in the form. It will simply append a web form activity to the existing CRM record, with the form information in it.
After creating your web form, you can begin creating a landing page by selecting the Landing Page Designer button and then selecting the desired template.


Then the customizable landing page will appear allowing you to add desired text and features, as well as preview your choices on in the designer.
The field running across the top of the designer help define the landing page.
Landing Page Name: This is the name of the landing page in show in in your CRM.
Theme: You can select a new theme from the dropdown box while in the designer.
Display Call to Action: Choose to show an image to urge visitors to complete the web form.
Add PowerWebTraffic: PowerWebTraffic subscribers can select this option to add their script to the landing page.
Logo Image Upload: Add your logo to the top of the landing page by either selecting the magnifying glass to upload or entering the image host URL in the text box.
Countdown Date: Enter a date and time to display a countdown clock on the landing page, this will not disable to form once the countdown has expired.

The fields running along the left side of the preview landing page display various types of text on the landing page.
Landing Page Title: This is the main title displayed on near the top of the landing page.
Landing Page Subtitle: This is smaller text that appears above the page title.
Landing Page Description: Displays multi-line text below the page title.
Bullets: These are bulleted points to be displayed on the landing page, the position varies based on the template selected.
Action Text: The text is displayed on a button and when selected jumps to the web form portion of the page.
Webform Title: The text is displayed above the web form fields.
Webform Subtitle: Additional text is displayed below the web form title.
Submit Button Text: Enter the text to be displayed on the web form submit button.
Footers: Enter text and URL to create a hyperlink in the footer of the landing page.

Once you have saved the landing page, select the Copy URL button, and copy the URL provided. This is the page you will redirect the visitors you want to see the landing page to.

After creating your form fields, you’ll probably want to see what the form looks like. If you’ve added any additional forms fields, or changed anything on the form, click Save. Then click Preview and Deploy.

Here you can see what your web form is going to look like. If you're looking to test the web form, you will need to copy the URL, paste into a browser window, and test the web form there. Depending on how you choose to deploy your web form, you can either choose to Copy URL (to start grabbing the source code) or to Copy iFrame.

If you would like to work with the source code, please copy the URL, paste into a browser, right click and go to view source. This will give you the source code of the web form. Note that there will be a piece of script you need to insert into the header of your page (this is what performs the form validation, and displays the captcha), and a piece you need to insert into the body of your page (to display the form itself). Please do not use the source code of the form, unless you are HTML savvy, and have experience with HTML and JavaScript. PowerObjects does not assist in customizing the look and feel of the web forms, or assist in using the HTML source code to put the web form on your web pages.
Note: If you use the iframe to deploy your web form and you make changes to that form in CRM, you will not need to redeploy the iframe on your webpage. The changes will automatically transfer over. If you use the source code to deploy your web form and make changes to the form within CRM, you will need to manually redeploy any changes to your web form.
PowerWebForm users are able to associate their landing page web traffic to a record in CRM using our PowerPack Add-On, PowerWebTraffic. To capture web traffic on a landing page, users will need to add a new domain in their PowerWebTraffic solution configuration that references the azure cloud they are pointing to in their PowerWebForm solution.
To do this, navigate in CRM to Settings, Solutions and Select PowerWebTraffic. Under the setup tab select "Add Domain". In the new domain field enter the URL for the Azure Cloud your PowerWebForm solution points to.

In the navigation pane of the Web Form entity, you will see an area called “Web Form Activities”. If you click here, you will see a list of all of the individual web form activities that were created for this web form.

Note: The entity that is created by PowerWebForm will be owned by the same user that owns the form.
When you navigate to a record that was created from a web form submission (or if you navigate to a record of someone who has filled out a web form), you will see a Web Form Activity in the activities section of their record. If you would like to see the exact information they filled out on the form, double click on the activity, to open it.


Note: Any CRM user you assign a web-form-created record to, must have rights to read the Web Form activity and Web Form activity detail in their security role. Also, all web form activities’ statuses are “Open” by default.
Processing Status
On the web form activity, you'll see not only the web form activity details, but also the Processing Status and Webinar Registration Status. The Processing Status field will tell you if the web form activity successfully processed (i.e. the lead was created and attachments were downloaded).
Webinar Registration Status
Webinar Registration Status field will tell you if the registrant was successfully pushed to GoToWebinar (if that integration is active in your system) or not.
Web form fields can be pre-populated with CRM data by creating a dynamic URL containing the web form ID and form field data. Users can find more information on this process in our blog post.
If for some reason the PowerWebForm solution is not able to fire properly and the “Regarding” value of the PowerWebForm Activity is not set, you can run a workflow that will start the process again as if it is a new lead so that you can ensure that an entity record was created or if it already exists that the webform activity is appended to the existing record, and that set regarding on the actual webform activity is set.
To run this workflow, please navigate to your webform and select webform activities. Once you are in the webform activities section of CRM highlight all records that do not have the regarding set, select the ellipsis and choose “Run Workflow.”

Once you select Run Workflow, a dialog box will pop open. Here you will want to select the WebForm Activity Process and select Add.

A confirmation box will open to confirm you want to run the workflow, select OK.

Please allow a few minutes for the workflow to run, you will know it has been completed once the regarding has been set for the activities.

Please note that if you only need to run the workflow for a single contact you can click into the individual record and run the workflow from there in the same method outlined above.
If you’d like to create a new web form that’s similar to a web form you’ve already created, simply navigate to the PowerWebForm section of your CRM, select the form you’d like to copy, and click on “Copy Web Form” in the ribbon. After you click on the button, give the system a chance to recreate the web form (It may seemed as if nothing happened, but it takes a minute for the system to copy all of the information from the current form, to recreate the form). The “copied” web form will pop open on your screen, and will have the exact same properties as the old web form. The word “Copy” will be appended to the original name of the web form, in the copied version.

PowerWebForm installs a few dashboards that show you an overall summary of your web form activity within the last 30 days, 90 days, 6 months or 12 months. Navigate to the dashboards area of CRM to view these.

Update double-opt in email:
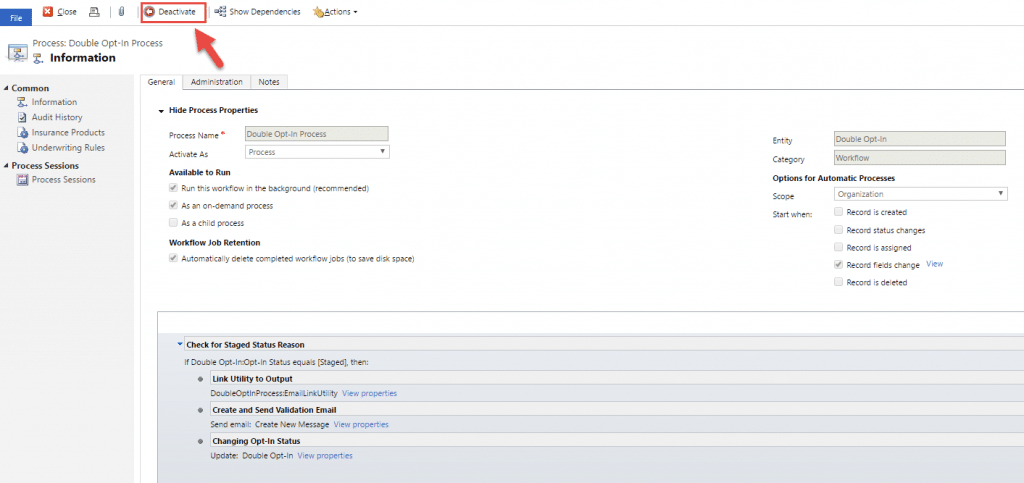
To update information for the Double Opt-In, first we need to find the Process on CRM. Settings> Process
Example:

To update, we must Deactivate the process (We can reactivate later):
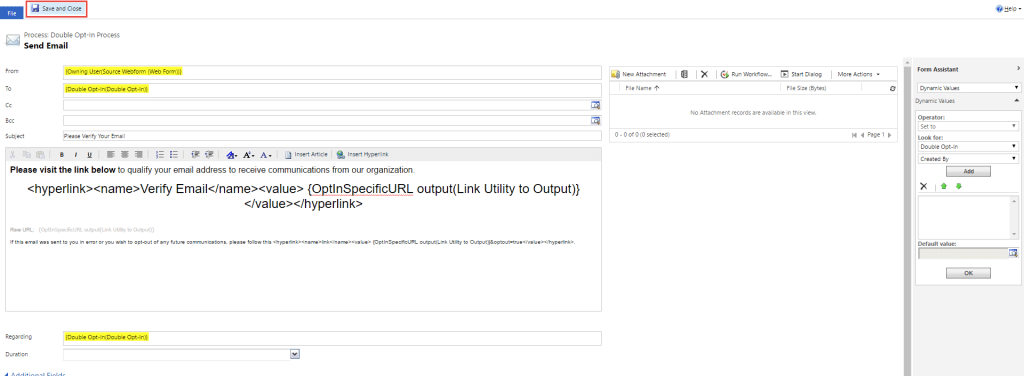
Once deactivate, we can update the properties. In this case, we click on the Email, Set Properties.
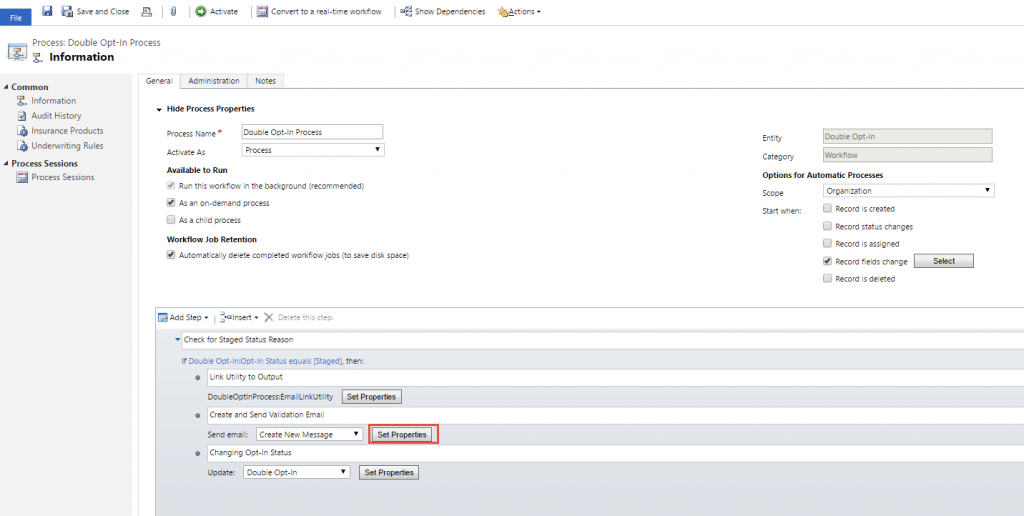
Once on this page, we can update the email. For example, the subject, message, attachments, etc. Once it’s updated, two things:
Note: Your changes will be reverted back to default, when you import a new version of the solution. To prevent this, you could recreate the workflow with a different name and deactivate the one that was imported with the solution. When you import a new version of the solution, remember to deactivate the workflow that’s re-activated when the new version is imported.
To uninstall, first delete any PowerWebForms you created. Then uninstall as usual, by deleting the solution.
Deleting the solution will remove all custom PowerWebForm activities and entities. If you wish to save those activities and records, simply unsubscribe and leave the solution in your system.
Uninstalling the solution does not unsubscribe the solution. If you're discontinuing use of the add-on, you must first unsubscribe in the solution.
Thank you for your interest in PowerWebForm, should you choose to subscribe you will be charged $1/enabled CRM user/month. If you have any questions or run into any issues with PowerWebForm, our friendly support team is here to help!

