
How Microsoft Power Platform is helping to modernize and enable...
In this webinar, our experts showcase a variety of demo use cases of how different components of the...
Microsoft Power Query for Excel is not only one the most effective ways to view and analyze data from Dynamics CRM, but it is also a flexible and easy solution to turn Excel spreadsheets into exciting Business Intelligence (BI) tools for Dynamics CRM. In today's blog, we'll be showing you how to use this cool tool!
For today's example, we will be using Dynamics CRM 2016 Online and Excel 2016. Before you can use Excel to connect to Dynamics CRM, you'll need to download and install Microsoft Power Query for Excel. You can do that here. Be sure to check if your Microsoft Office is 32 or 64 bits to make sure you are downloading the correct version of the Power Query for Excel.
Find the Correct Service URL
To be able to connect to Dynamics CRM, first you need to find out the correct Service Root URL.
1. Click on Main > Settings > Customizations.

2. Select Developer Resources.

3. Copy the URL under Instance Web API. This URL will be used in the next steps to connect to CRM.

Connect to Dynamics CRM Online
Now we need to open Excel and create a connection to Dynamics CRM Online as follows:
1. Click on Data > New Query > From Other Sources > From OData Feed.

2. On the OData Feed window, enter the URL you just copied from Developer Resources and click OK.

3. On the Access an OData feed window, click on Organization account, choose the first URL, and click on Sign-in.

4. On the login page, enter your email and password and click on Sign in.

5. Back on the Access an OData feed window, click on Connect.

Now the Fun Begins!
Once the connection is established and all the metadata is loaded, you will see the Navigator window. In this window, you can choose which entities to pull data from. You can also choose which columns to display, apply filters to, etc.
1. On the left panel, click on Accounts. You'll notice that a few records are retrieved. Click on Edit.

Once the Query Editor opens, explore the Home, Transform, Add Column and View menu options. Now let's make sure we retrieve only a few columns to make sure it is more manageable once we load data from CRM into Excel.
2. Click on Choose Columns.

3. In the Choose Columns window, check (Select All Columns) to uncheck the columns initially selected.

4. Check the following columns (use the Search Columns field to make it easier to find the fields you want to include in the result):
5. Click Ok. Drag and drop the columns horizontally if you would like to reorder them.
6. Click on Close & Load to load the data into Excel.

Once the data is displayed in Excel, it should look like this:

At this point, you can use Excel functionalities, including filtering, ordering, formatting, etc. to slice and dice the data.

Refresh Your Data in Excel
One of the best features in Power Query is that the data doesn't have to be static. If any update is made in Dynamics CRM, the data can be easily refreshed in Excel.
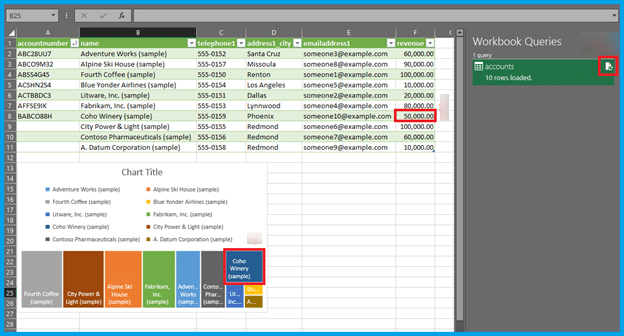
For example, say you update the Annual Revenue for one of the Accounts in CRM. We updated the Annual Revenue from $10,000.00 to $50,000.00 for Coho Winery (sample).
In Excel, under Workbook Queries, click on the refresh button for Accounts (it can take some time to refresh). You'll notice that the Annual Revenue you updated in CRM is now updated in Excel as well. The chart based on Annual Revenue was also updated accordingly.
That's all for the blog today! Want to learn more about BI? Check out our Webinar on Demand "Power BI Showcase" to get introduced to Power BI by showing you various examples of how it can be used to surface and visualize critical business metrics–providing insights that help you run your business and make decisions.
Happy CRM'ing!


What do you do on the data [Record]?? How do you get the value for that?
Hi Nelsie,
You can expand the record field using query editor or take the field as
#"Expanded new_ProjectManager" = Table.ExpandRecordColumn(#"Expanded createdby", "new_ProjectManager", {"fullname"}, {"new_ProjectManager.fullname"}),