One of the questions we always ask when starting a new Power BI project is, "Does your organization follow the calendar year or a fiscal year?" It's critical to know because it determines the outcome of the reports for the organization!
The Power BI Desktop offers two functions to create a calendar table: Calendar and Autocalendar. These functions generate a single column, Date, in a new table. Typically, we then add other columns to the table, such as Year, Month, Quarter, Month Number, etc., in order to filter and sort data. Several options exist for creating the date/calendar table; in today's blog, we'll show how to use a DAX script to create a date/calendar table and then demonstrate how to achieve sorting by a fiscal year in slicer.
Let's use an example in which a company uses a fiscal year starting in April. The leadership team likes to see estimated sales in a column chart with a month slicer sorted by fiscal year, from April to March.
The steps to achieve the goal are as follows:
- Create a date/calendar table in DAX in Power BI Desktop
- Create a fiscal year number sort column in DAX
- Create a relationship between a fact table and the date/calendar table
- Create a column chart and a slicer with month name field
- Sort the month name with the fiscal year number field
*Assumption: the steps to connect to data source(s) and importing data to Power BI Desktop are completed in advance.
1. Create a date/calendar table in DAX in Power BI Desktop
A common practice is to run either a pre-defined DAX or M script to create a custom date/calendar table in Power BI Desktop. In our example, we use a DAX script.
It is important to note that we refrain from creating relationships between the date attributes in existing fact and/or dimensional tables in data sources to take advantages of the time intelligence functions and to optimize performance in Power BI.
Steps:
Select Modeling > New Table.

- Paste the following script in the function text editor area
Date = ADDCOLUMNS(
CALENDAR("2015, 01, 01"," 2018, 12, 31"),
"Year", YEAR([Date]),
"Month Year Num", CONCATENATE(YEAR([Date]), FORMAT([Date],"MMM")),
"Month Num", Month([Date]),
"Month", FORMAT([Date], "MMM"),
"Quarter Num",FORMAT([Date], "Q"),
"Quarter", CONCATENATE("Q",FORMAT([Date], "Q")),
"Day", FORMAT([Date],"D"),
"Week", CONCATENATE("Week ",FORMAT([Date], "WW"))
)
*Note: The date range is set between 1/1/2015 and 12/31/2018 as an example
- Hit Enter to generate a date/calendar table
2. Create a fiscal year number sort column in DAX
Steps:
- Go to Modeling > New Column.
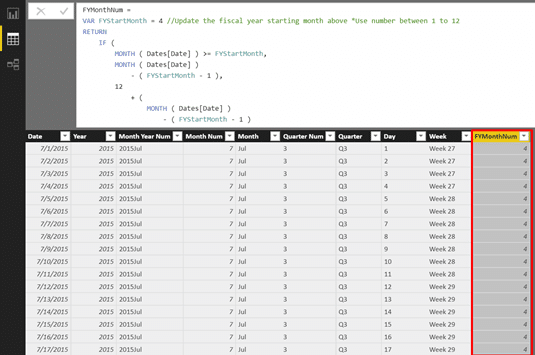
- Paste the following DAX script in the function text editor area:
FYMonthNum =
VAR FYStartMonth = 4
//Update the fiscal year starting month above *Use number between 1 to 12
RETURN
IF (
MONTH ( Dates[Date] ) >= FYStartMonth,
MONTH ( Dates[Date] )
- ( FYStartMonth - 1 ),
12
+ (
MONTH ( Dates[Date] )
- ( FYStartMonth - 1 )
)
)
A Sample Result:
If you have an M script, the following sample would help in adding a fiscal year number column in your date/calendar query:
AddFYMonthNum = Table.AddColumn(XXX, "FYMonthNum", each if
[MonthOfYear]>=FYStartMonth then [MonthOfYear]-(FYStartMonth-1) else 12+[MonthOfYear]-
(FYStartMonth-1))
Note: "FYStartMonth" is a variable to enter starting month of a fiscal year in function and XXX is a previous step name in M script
3. Create a relationship between a table and the date/calendar table
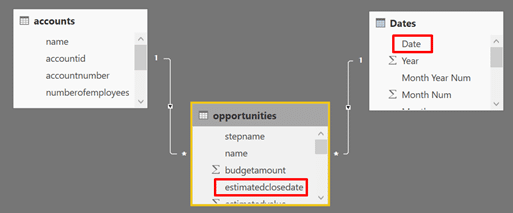
We connected Dynamics 365 Sales Online Free Trial as a data source and imported Accounts and Opportunities data. We created 1:N relationship between the Dates and opportunities tables with the Date and estimatedclosedate fields:
4. Create a column chart and a slicer with month name field
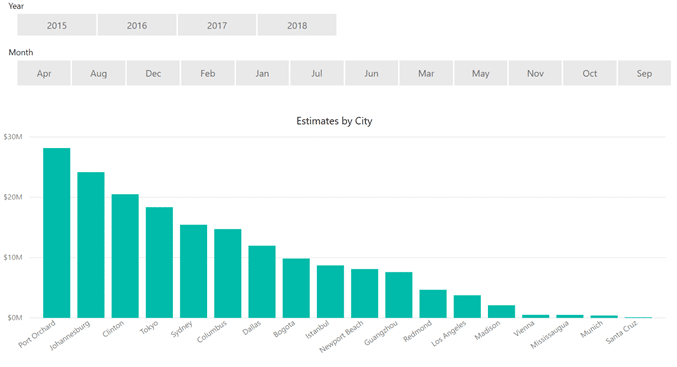
We created a sample report page with a year and a month slicer, and a column chart called, "Estimates by City."
5. Sort the month name with the fiscal year number field
As you can see above, the slicer lists Month in alphabetical order by default. We need to change the sort order to fiscal year with starting month of April.
Steps:
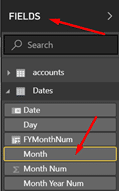
- Click Data (table icon) in the left pane to display the "Dates" table.
- Click on Dates under FIELDS pane and select Month.
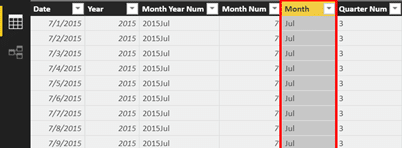
- Select Modeling > Sort by Column > FYMonthNum.

Now the month slicer sorts by fiscal year starting in April! Changing it to, say, July is as simple as amending the DAX script to say VAR FYStartMonth = 7. 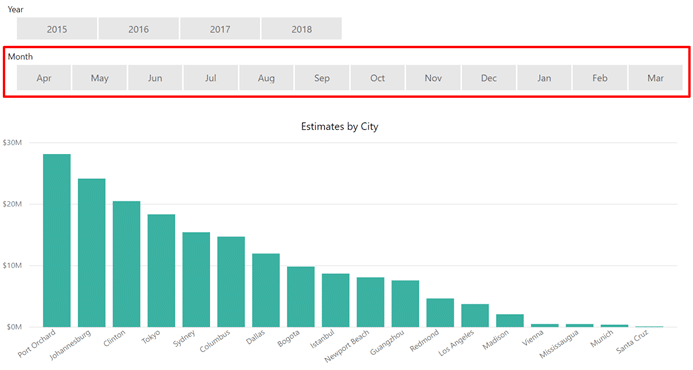
Pretty slick, right? We hope you find this useful.
To maximize your investment in Dynamics 365 and related solutions, our Power BI experts can transform your siloed data into stunning, interactive visualizations in a single view so you can make insight-driven decisions anytime, from anywhere. Learn more about our Power BI services here.
Happy Power BI'ing!
 How Microsoft Power Platform is helping to modernize and enable...
 Deliver an Extraordinary Omnichannel Experience
 Data Interoperability Key to Improving the Patient Experience


