
How Microsoft Power Platform is helping to modernize and enable...
In this webinar, our experts showcase a variety of demo use cases of how different components of the...
When using Dynamics 365 Business Central, clearing out old sales invoices is a relatively easy task. We just create a sales credit memo and apply it to the sales invoice. Or even better, in some instances we can create a corrective sales credit memo. But what is the easiest way to debit out a sales credit memo? There is no “debit memo” function like there was in some of the old Microsoft ERP platforms (SL, for instance) and creating invoices to debit out credit memos can be messy for many reasons – the main reason is that you do not want sales invoices sitting on a customer’s account history that are not true sales invoices. This can create confusion for your AR team, and more importantly, for your customers. For instance, when a customer requests an account history or when you are sending out your regular customer statements, you probably do not want these “clean up” sales invoices included. Here is a quick workaround for getting rid of these credit memos and overpayments.
1. Start by opening a general journal. To do this, search for the words “general journals” in the search bar/tell me field and click on the general journals task:

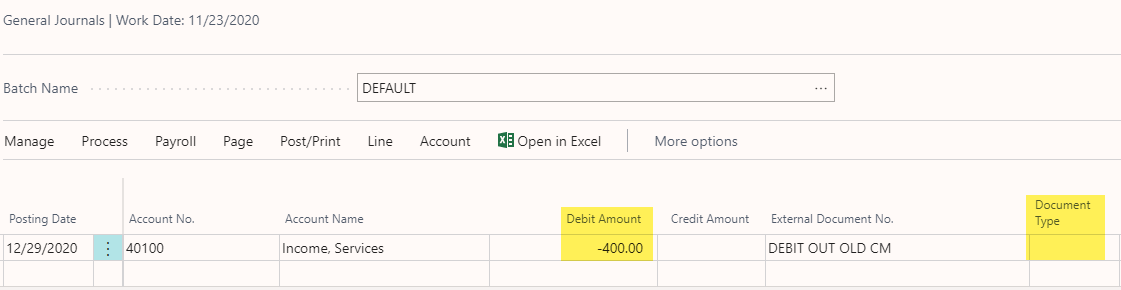
2. Enter a posting date
3. For the account type, select the “GL account” and then choose the GL account that you want the credit to hit
4. Here is where it starts to get a little different from your usual general journal entry. For the amount, you will use a negative debit (tip – if you only see an “amount” field in your entry, you might need to add the “Debit Amount” & “Credit Amount” fields via the “Personalize” tool). Also, make sure to leave the document type blank. See below:
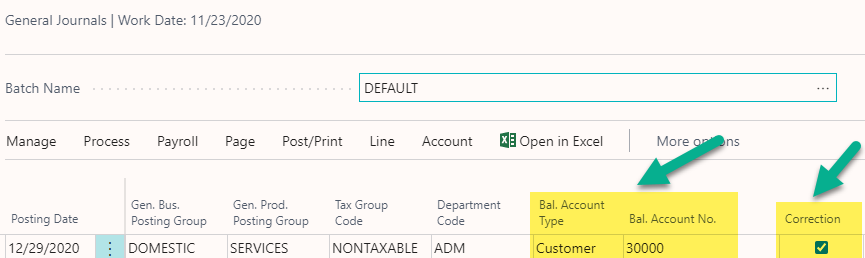
5. For the balance account type, select “Customer” and then choose the customer you will be applying this to. You will also want to make sure that the “Correction” box is checked:
6. If you would like, you can run a posting preview now. Here is what ours looks like.

If everything looks good, go ahead and post your entry
7. Finally, to apply the entry, go to the customer, select “Customer” and then “Ledger Entries” and apply it just like you would apply any other payment or sales credit memo to a sales invoice -
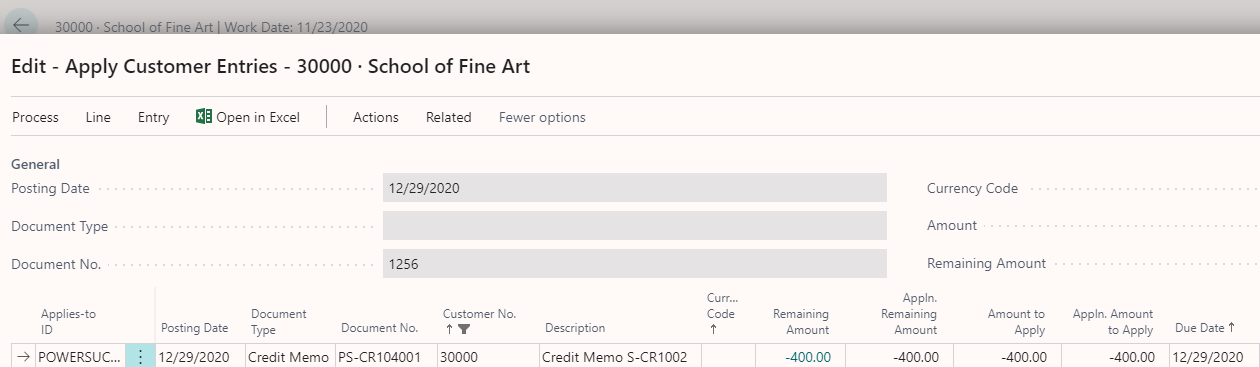
8. The sales credit memo and the entry you just created now both have $0 balances. You should be good to go!
Stay tuned for more helpful hints related to Dynamics 365 for Business Central in our blog.


