
How Microsoft Power Platform is helping to modernize and enable...
In this webinar, our experts showcase a variety of demo use cases of how different components of the...
Configuration keys allow administrators to enable or disable features in the application for all users. When deploying a new environment, all configuration keys are enabled OOB. Best practice is to disable those keys that are not needed in the life of the project scope. However, depending on long term goals and project methodology, this may not be the first activity on the agenda. As the project progresses, this may later be suggested as a result of system slowness, where enhancing performance in a specific area may be the driver. This could also be a suggestion in order to reduce the availability of menu items for each user and therefore have a more concise representation of the F&O offering by the client. Irrespective of the timing or reason, configuration keys are a topic that deserves your attention.
Deactivating configuration keys should be a decision carefully made while considering all potential uses for Dynamics 365 F&O in both current and future implementations. Throughout the AOT, there will be many elements within the F&O environment that are controlled by configuration keys. It is essential to ensure both technical and functional resources are involved in discussions about both current and future state of the Dynamics 365 landscape. Additionally, any updates to these configurations require downtime related to the environment, involving both a technical and functional resource to complete the tasks. A combined approach will be required in order to successfully achieve all tasks at hand.
There are specific recommendations that should be followed when disabling configuration keys. We will review them more in depth further along in this article, but it is important that the client perform their due diligence in all areas as required to ensure appropriate steps are followed and required actions are taken. From a high level, let’s walk through the steps:
1. Start our processes in a TEST environment – As always, complete all requirements initially in a TEST environment.
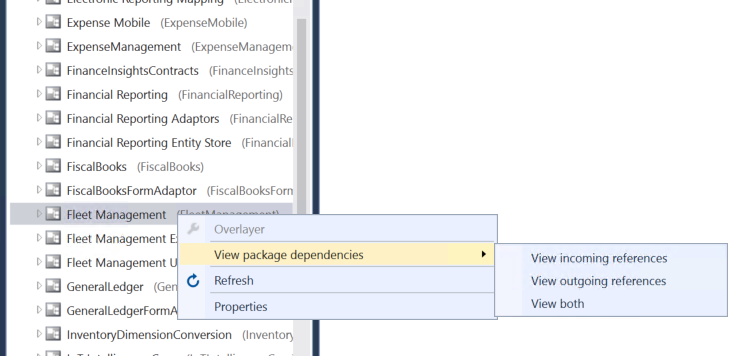
2. View package dependencies – This view needs to be done from a technical aspect through Visual Studio prior to any configuration keys being considered for deactivation.
3. Deactivating configuration keys – This process should be done sequentially:
4. Regression Testing – Run a full round of regression testing prior to any updates in Production environment.
5. Production Updates – Once all configuration keys and their disablement are tested, repeat Step 3 in Production environment
The great thing about the configuration keys is that even if you decide today to turn them off, they are always available for reinstatement whenever your project approach varies, or errors are seen as a result of disablement.
Now let’s dig into some of the more extensive steps described above.
There are three paths in which a technical resource can view dependencies of configuration keys within the Dynamics 365 F&O VM. All options are fairly time consuming, reiterating the fact that this decision should be made wisely and with careful consideration. This can be done through 1) the AOT Model view 2) AOT Configuration VM or 3) AOT Menus.
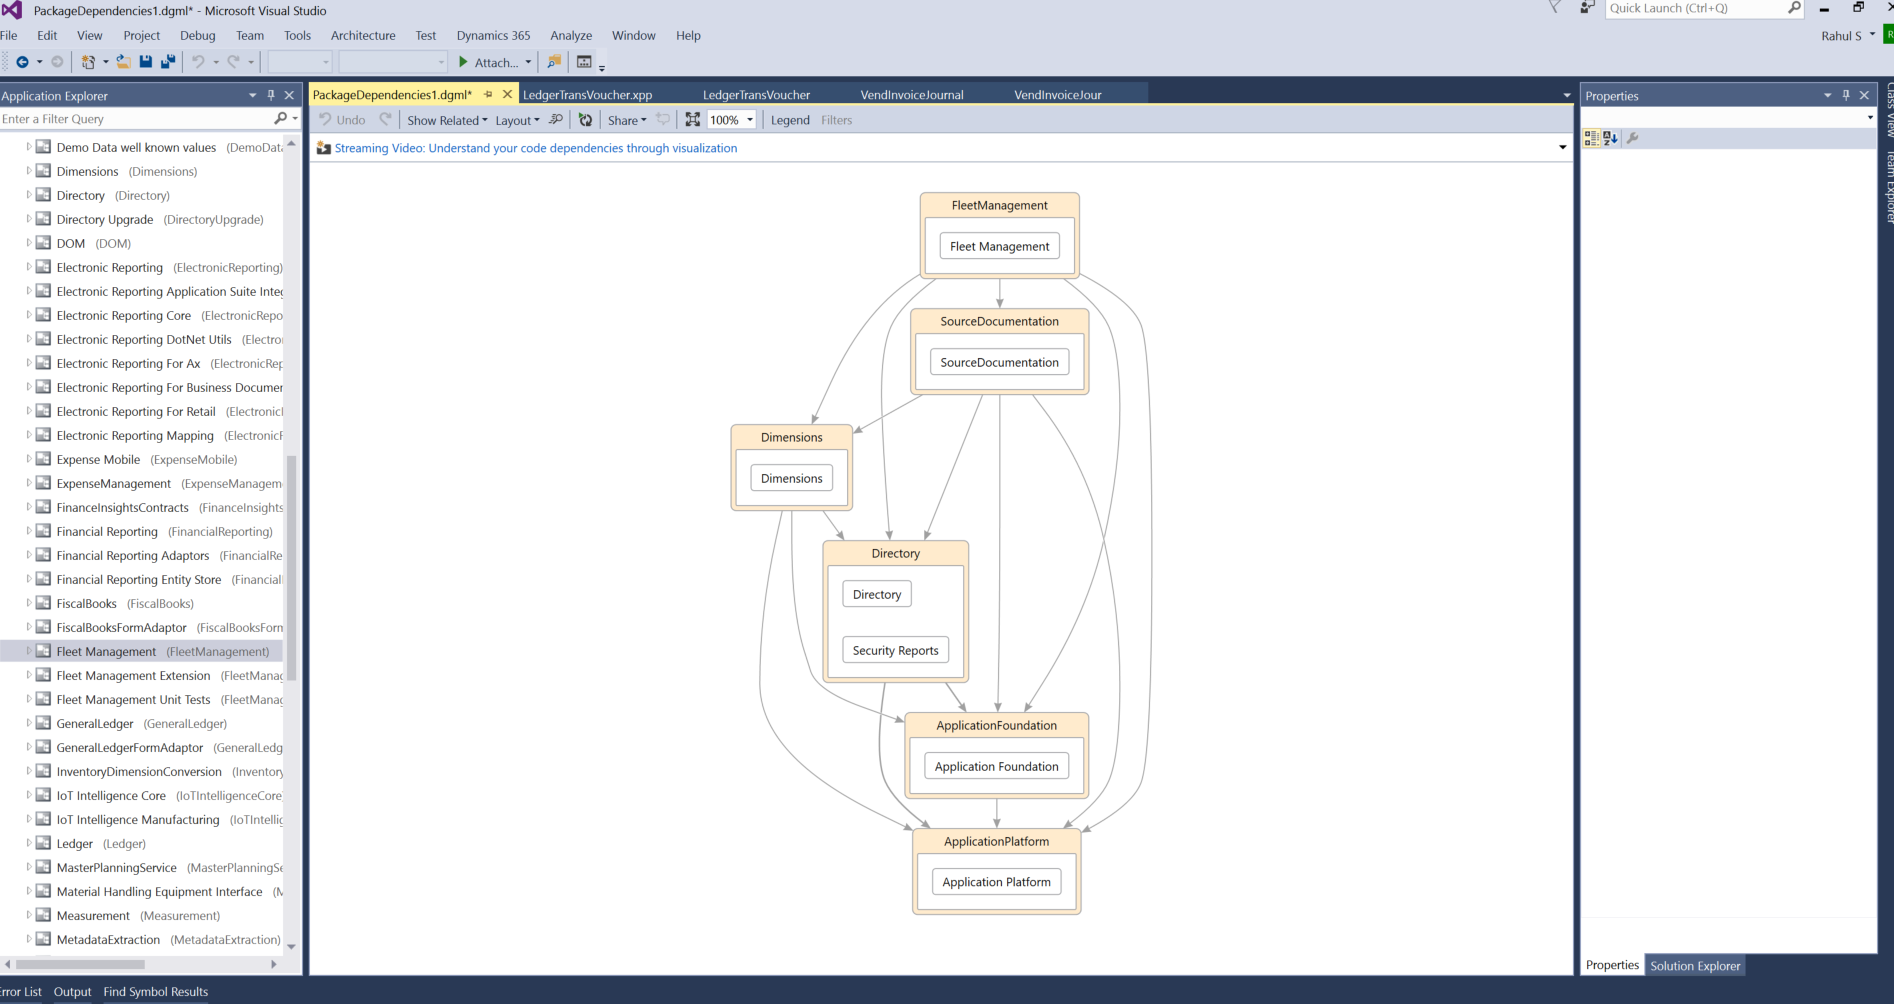
The Model View
You can create a graphical representation that shows which packages and their models have dependencies on other packages through the Model view.
1. Make sure the Application Explorer is in Model view: Right-click the AOT node and select Model view.
2. Right-click on any model and select View package dependencies > View outgoing references.
A Directed Graph Markup Language (DGML) diagram will be generated for the current packages and their models. This diagram is a collection of interdependent nodes, each of which represents a package. Each node lists all the models that belong to that package. By clicking on the line between the nodes, you will be able to decipher both the source node and its dependency (target node).
The Configuration View
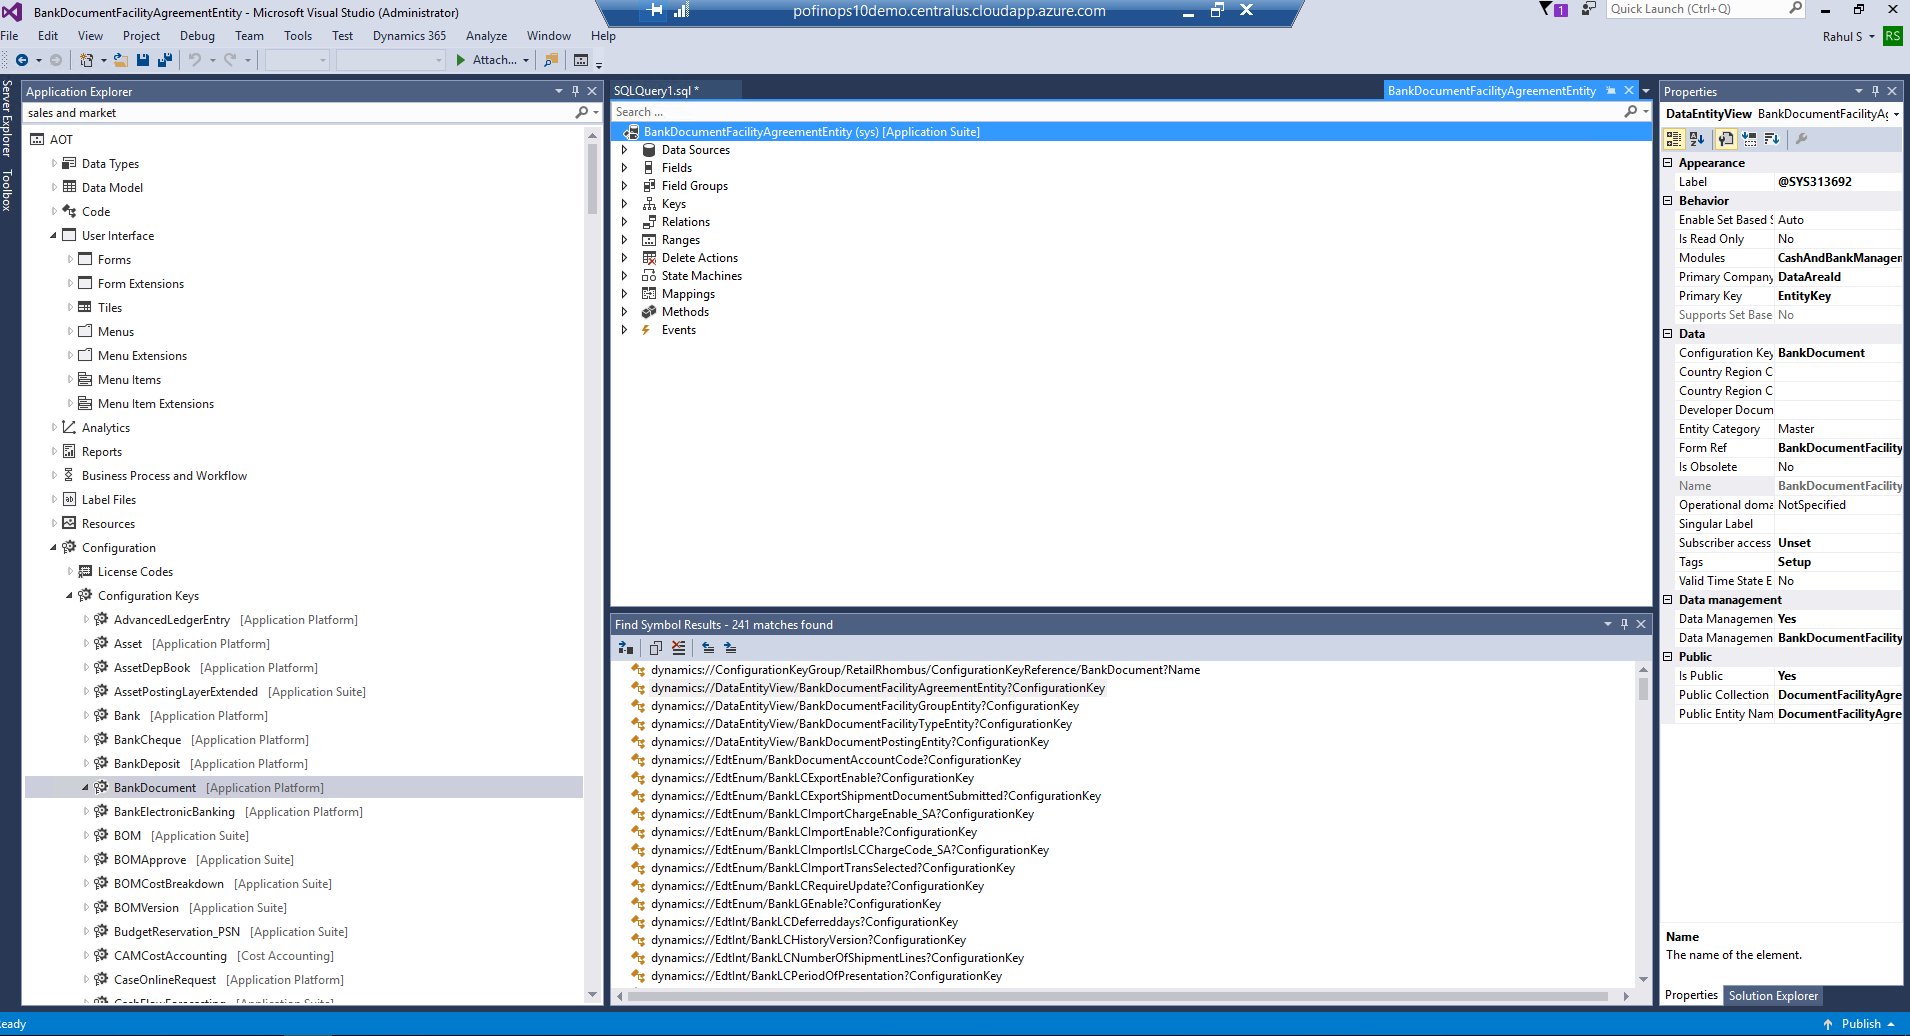
You can also view package dependencies of a single configuration by following these steps:
1. Make sure the Application Explorer is in Classic view and follow this path: AOT > Configuration > Configuration Keys > BankDocument [Application Platform]
2. Right-click on Find References.
3. In the output window, you will see listed all the dependencies. Select any of the classes displayed and right-click Go to Reference.
4. In Properties window, you will see the reference to the configuration key.
The Menu View
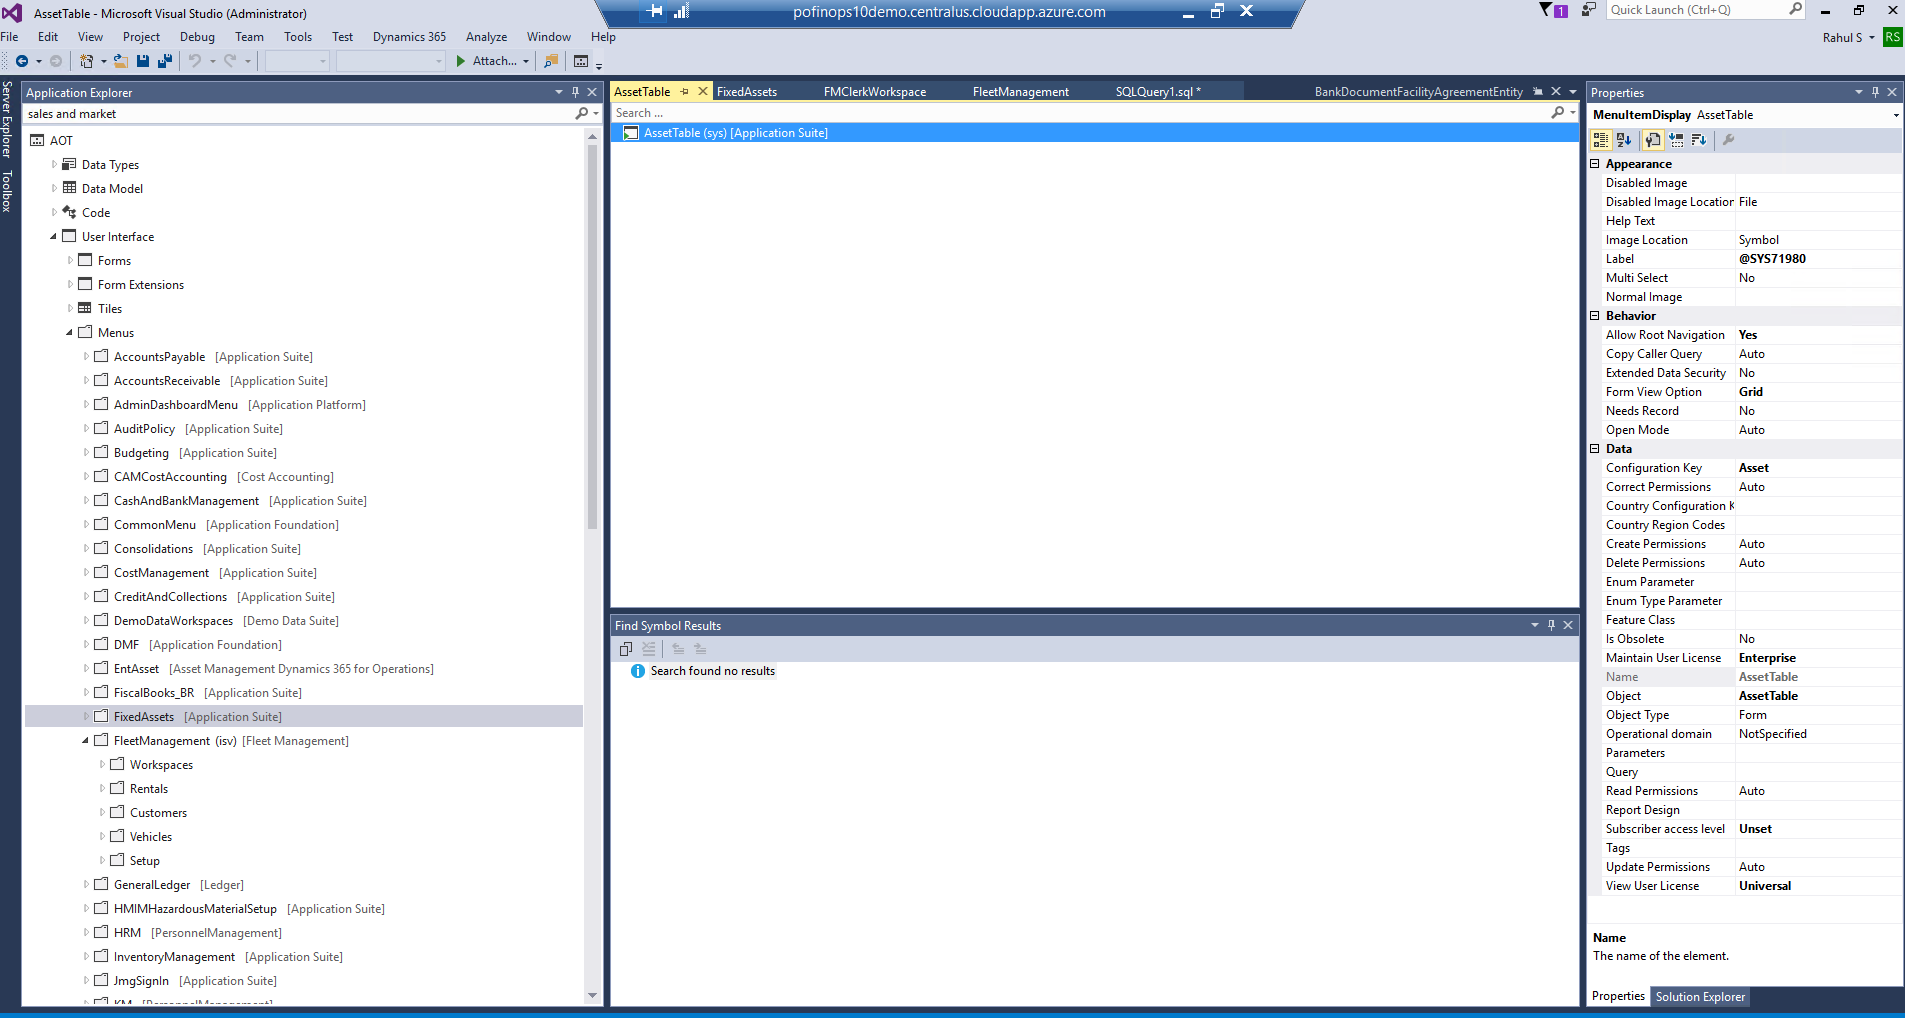
Lastly, you can view package dependencies of a single configuration by following these steps:
1. Make sure the Application Explorer is in Classic view and follow this path: AOT User Interface Menus > FixedAssets [Application Suite]
2. Then right-click on Open designer.
3. In the Designer Explorer you will see listed all the Display Menu items.
4. If you open those sections, the Tables associated with the menu selection will be presented.
5. Right-click on Go to Menu Item Display.
6. In Properties window, you will see the reference to the Configuration Key.
Note that while none of these processes provide a cut-and-dry list for every functionality associated with each configuration key. This document is meant to guide you in your decision making. If a configuration key is deactivated and you receive an error associated with that change, no fear! Always remember reactivation is just a few steps away.
As stated previously, there is a sequential process to deactivating configuration keys:
1. Place environment in maintenance mode
2. Deactivate configuration keys
3. Run system sync
4. Remove environment from maintenance mode
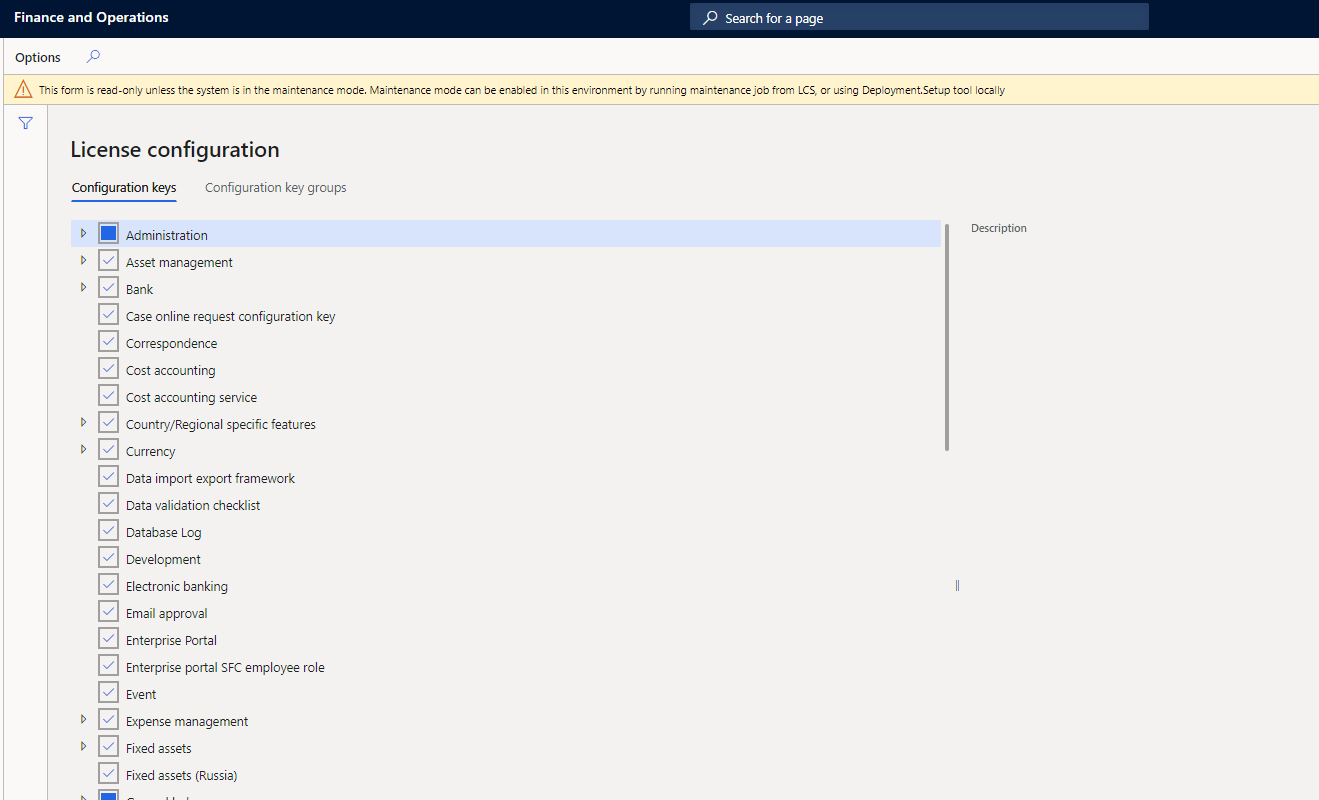
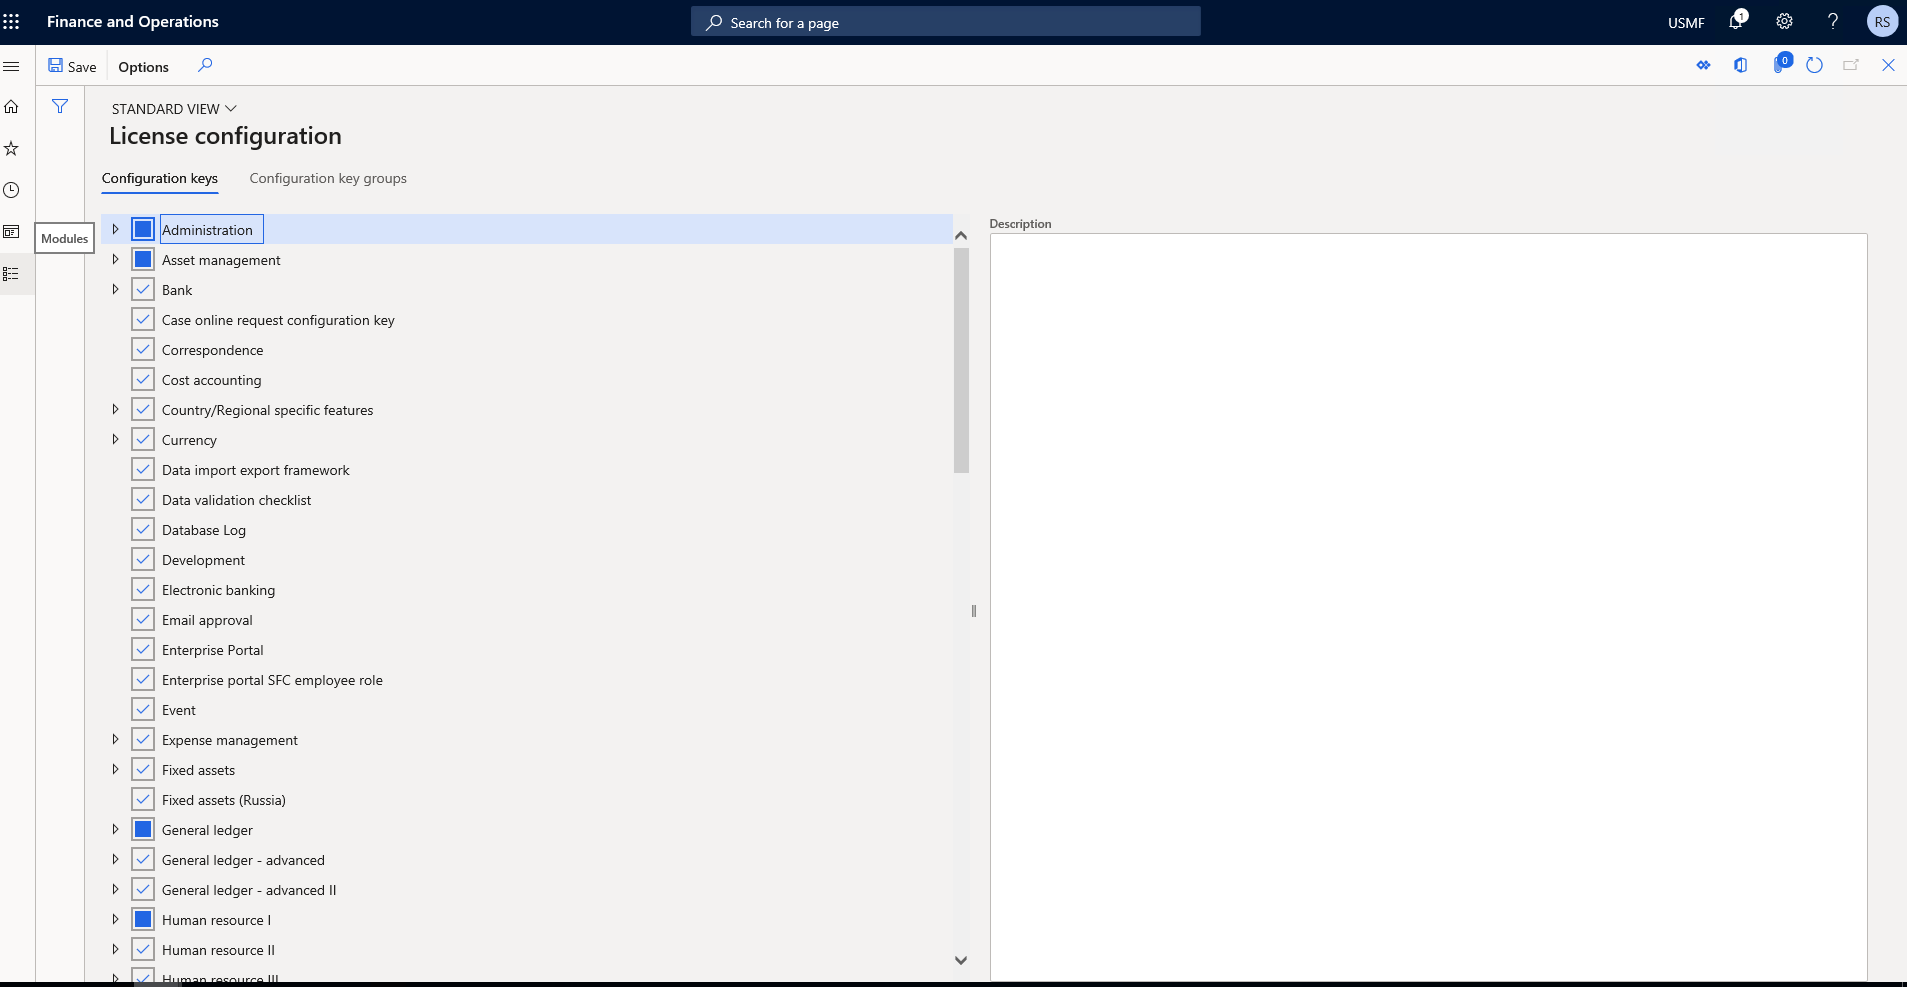
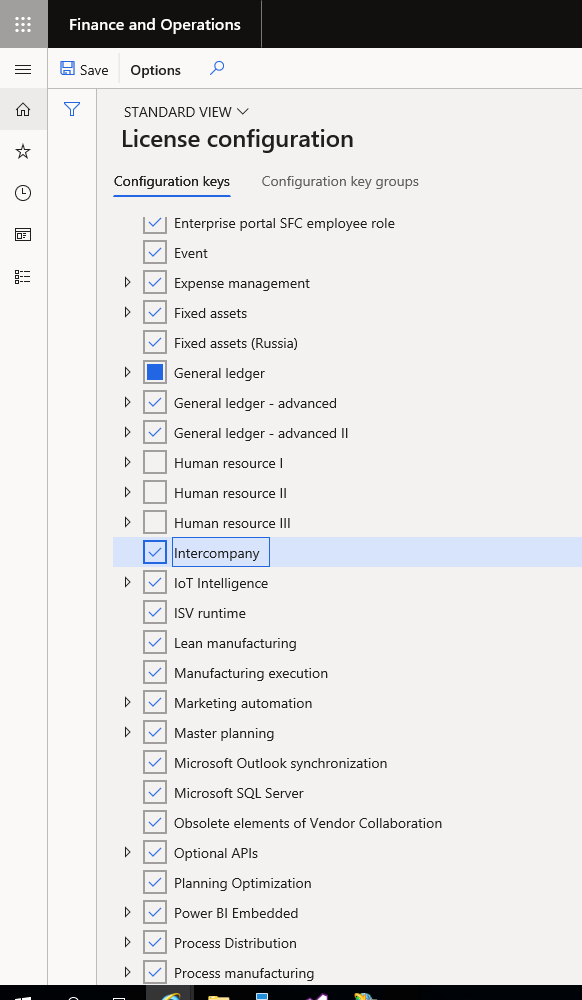
Immediately upon entering the configuration key form, System Administration -> Setup -> License Configuration, you may receive a D365 message stating “This form is read-only unless the system is in the maintenance mode. Maintenance mode can be enabled in this environment by running maintenance job from LCS or using Deployment.Setup tool locally.”

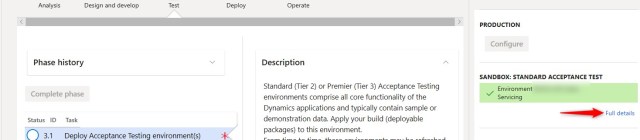
Prior to placing any environment into maintenance mode, it is suggested an email notification be sent to all users regarding date and timeframe of system downtime. This can be done as far in advance as desired and repeated as many times as necessary based on the business’ internal processes. To place the system into Maintenance mode you will need to login in to https://lcs.dynamics.com/ and select the project (from ALL PROJECTS list) for which you are trying to update configuration keys. To do this, you should have been provided user access in LCS to the Dynamics 365 F&O project. The default home page of the project in LCS opens where you can see the phase history of the project. To the right, you will see all the F&O environments that have been set up for your project. Click Full details on the appropriate environment to open the environment details page.
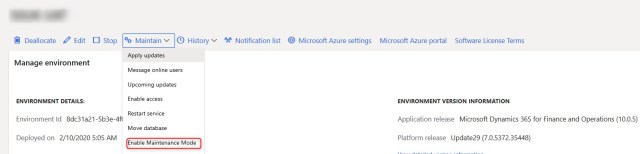
From the maintain menu, select Maintain > Enable maintenance mode.
During this process, users will not be able to access Dynamics 365 F&O environment. The admin users will get email notifications updating them on the maintenance mode steps being processed. The progress of this maintenance mode enabling will also be shown on the screen and once this process completes, you will be able to deactivate the configuration keys.

Disabling the configuration keys is as simple as unchecking the checkbox associated with each key. Repeat as necessary for as many configuration keys as you wish. However, if you are unsure of the related dependencies, limit deactivation to one at a time until you have fully assessed the impact of your update.
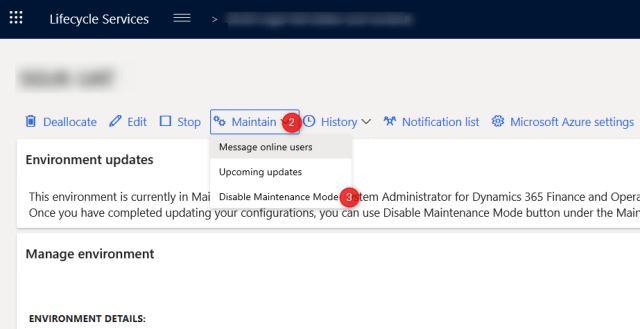
Once configuration keys have been deactivated, maintenance mode can be disabled. From the maintenance menu, select Maintain > Disable maintenance mode.
The process of switching on and off the maintenance mode can take anywhere from 1-2 hours. Be patient as you wait for this process to complete.
Note: If maintenance mode option is not available under the maintain menu of your environment, you may need to perform this process with an RDP connection instead. We will walk through the steps below or you can also refer to the steps at https://docs.microsoft.com/en-us/dynamics365/fin-ops-core/dev-itpro/sysadmin/maintenance-mode.
How to Enable / Disable Maintenance mode Using SQL query in Dynamics 365 Finance & Operations:
You can enable or disable maintenance mode using SQL query as well as command prompt. We are performing this operation using the SQL query.
The following are steps to enabling/disabling maintenance mode:
1. Open SSMS (Microsoft SQL Server Management Studio) in your server.
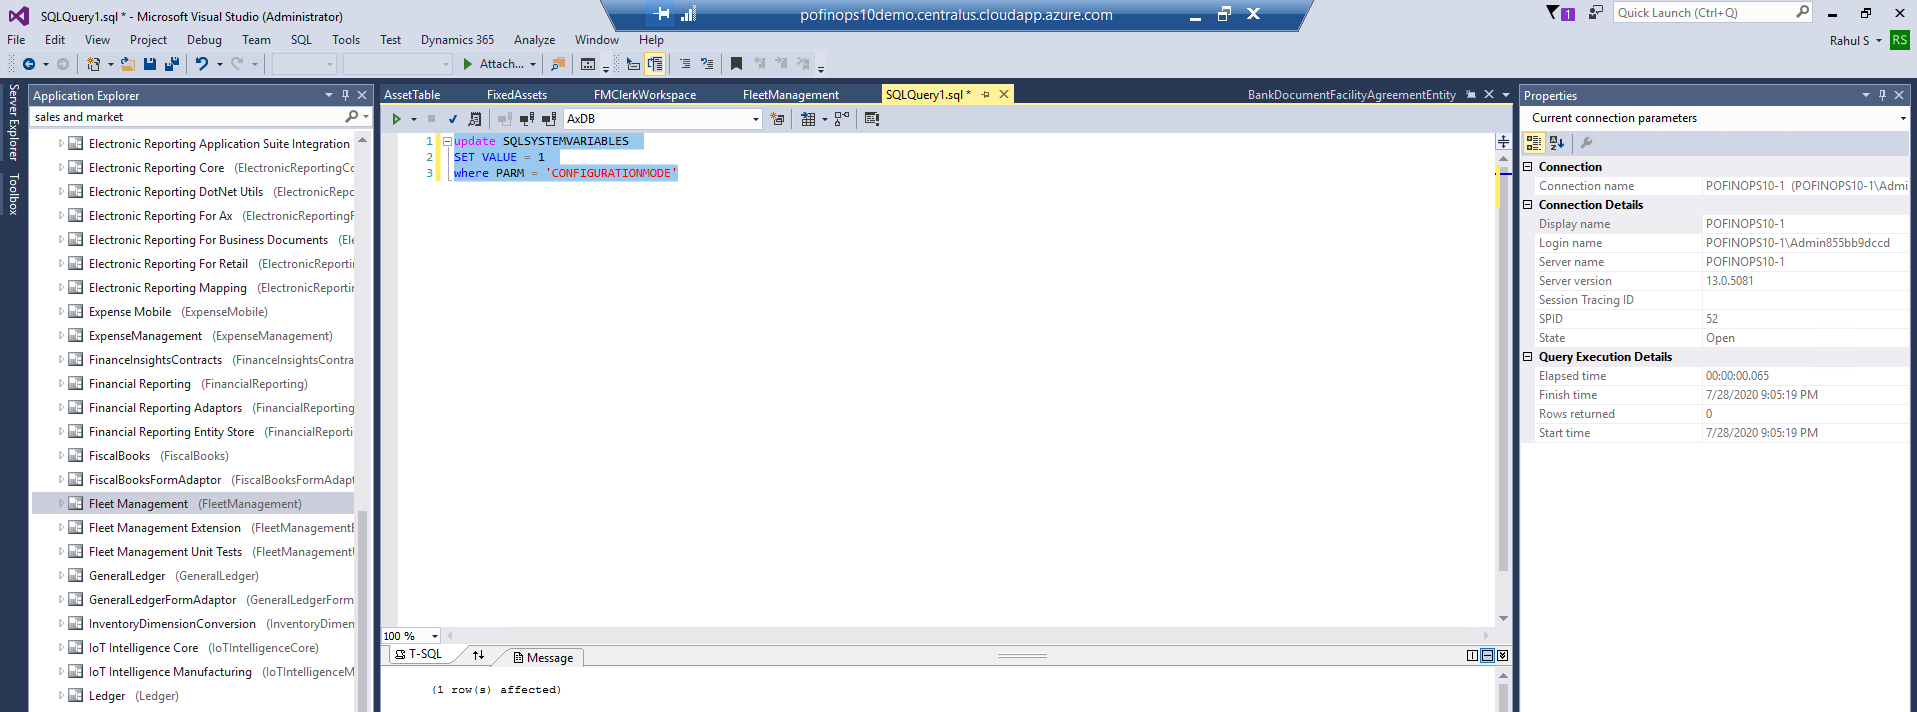
2. Click on New Query and enter the following query to Enable Maintenance Mode:
update dbo.SQLSYSTEMVARIABLES
set dbo.SQLSYSTEMVARIABLES.VALUE =1
where dbo.SQLSYSTEMVARIABLES.PARM = ‘CONFIGURATIONMODE’
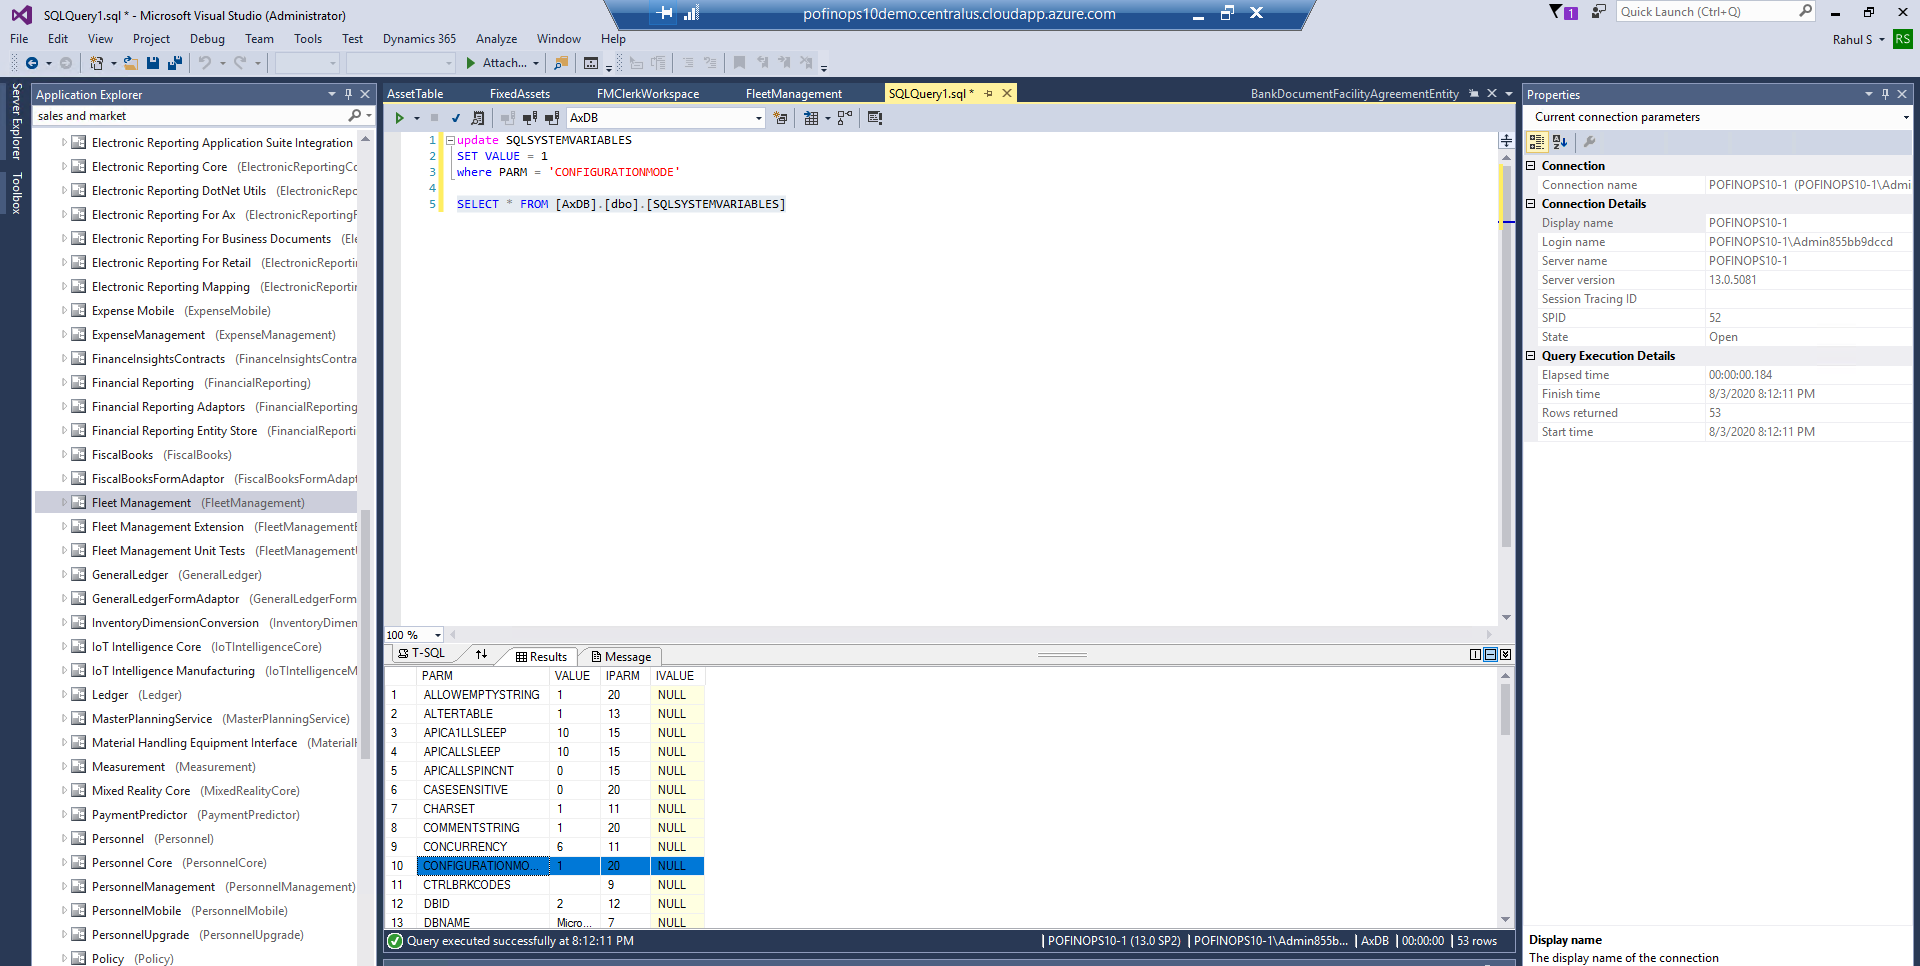
3. You can verify status using following command:
SELECT * FROM [AxDB].[dbo].[SQLSYSTEMVARIABLES]
4. After this restart IIS services in some cases, you need to restart the server to perform your changes to the License configuration form.
5. Here you would make your updates to the configuration key selections. You will see there is no warning message now when entering the form through the UI.
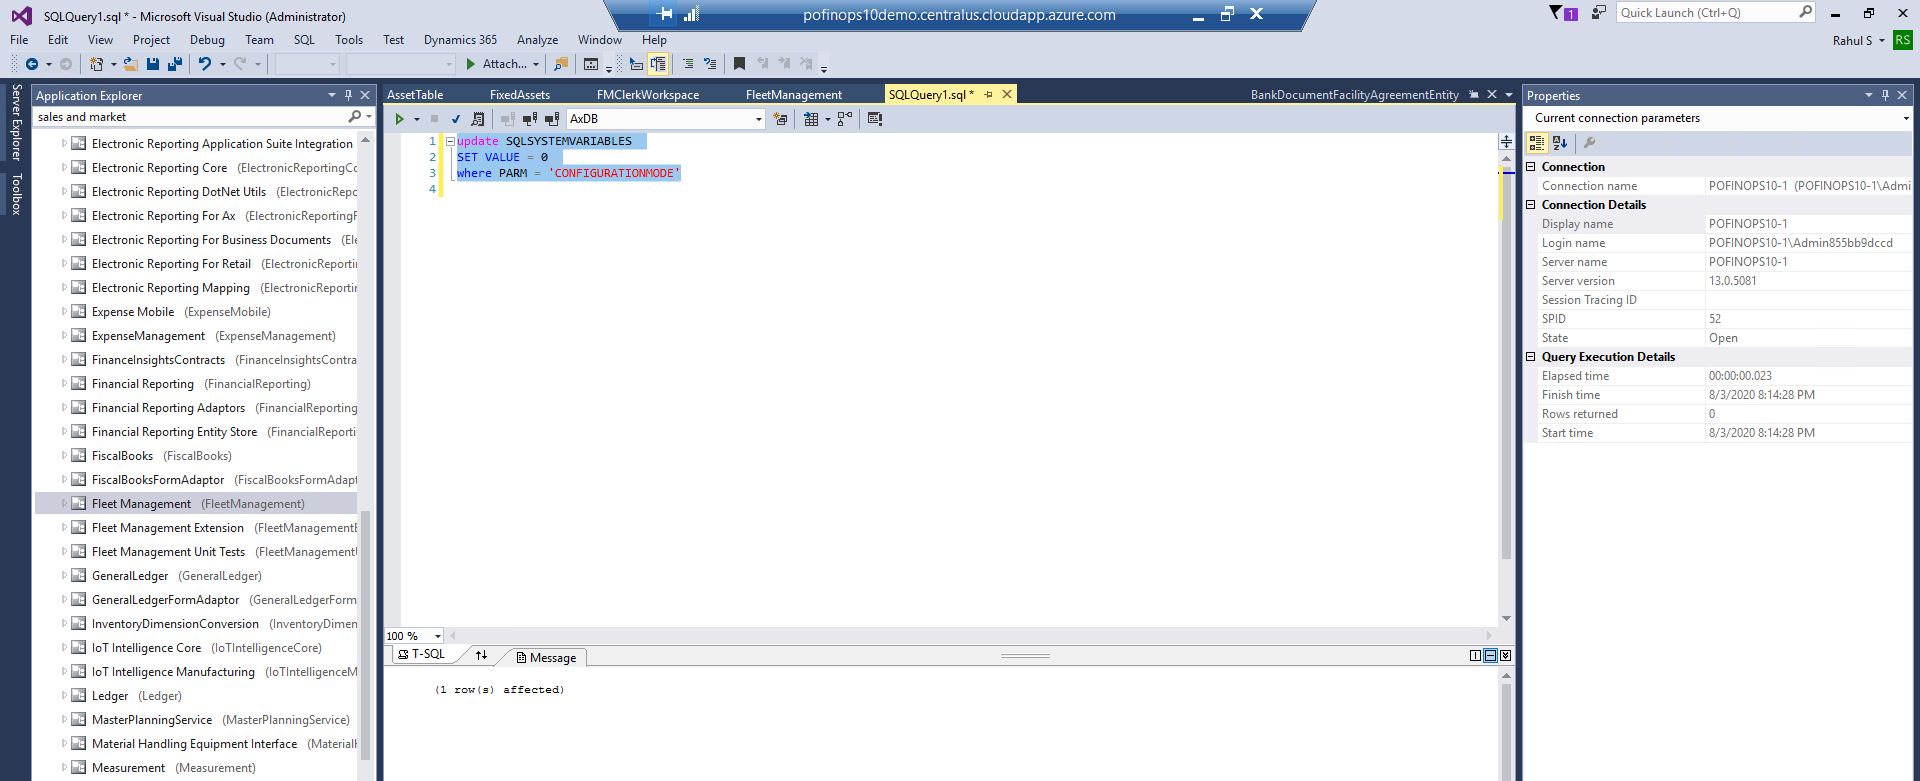
6. After desired changes are made you can disable maintenance mode using the following command:
update dbo.SQLSYSTEMVARIABLES
set dbo.SQLSYSTEMVARIABLES.VALUE =0
where dbo.SQLSYSTEMVARIABLES.PARM = ‘CONFIGURATIONMODE’
7. Now again you can verify status using the same query in step 3 and again repeat step 4 to do restart to IIS services.
After you disable Maintenance mode, you need to Full Compile and Synchronize Database.
Steps:
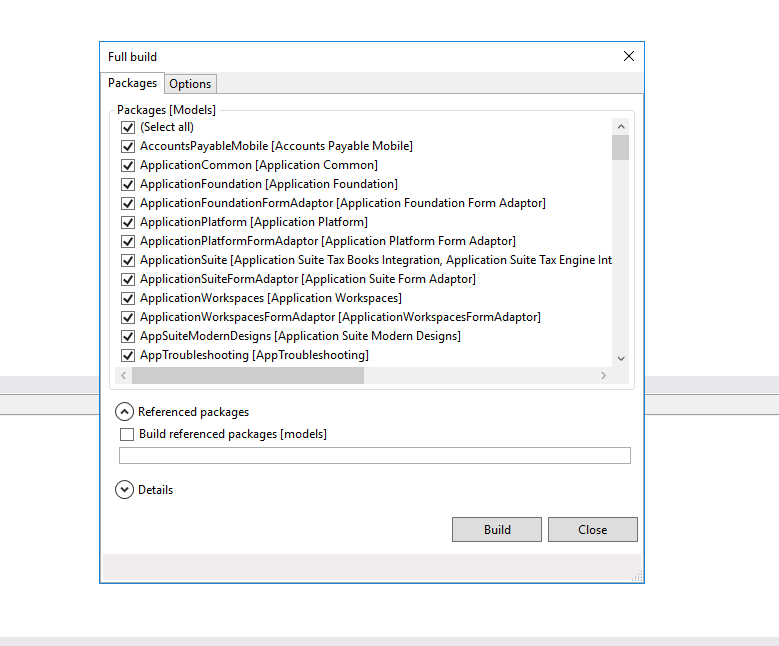
Go to VM > Dynamics 365 > Build models…
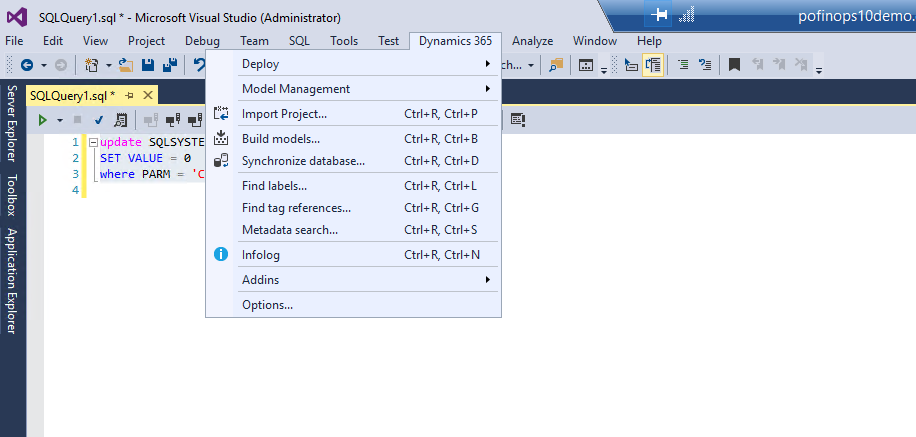
1. Check the (Select all) checkbox in the Packages tab under the Packages [Models].
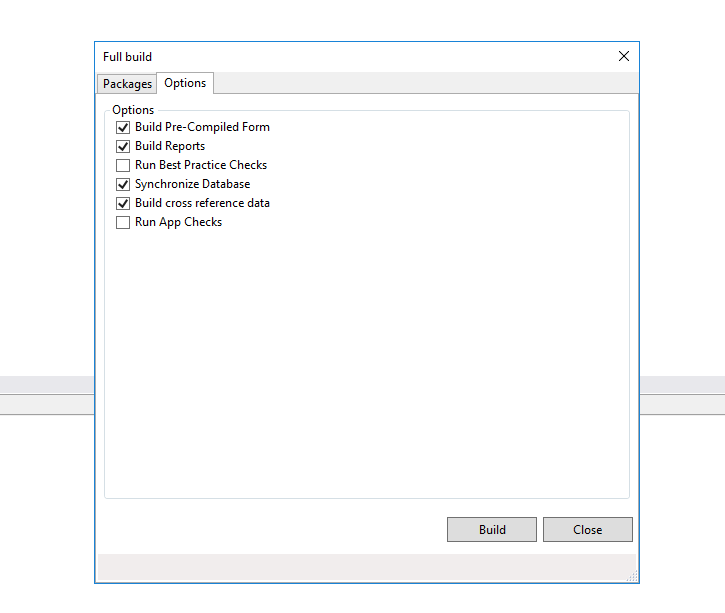
2. Click on Options tab.
3. Check Synchronize Database checkbox.
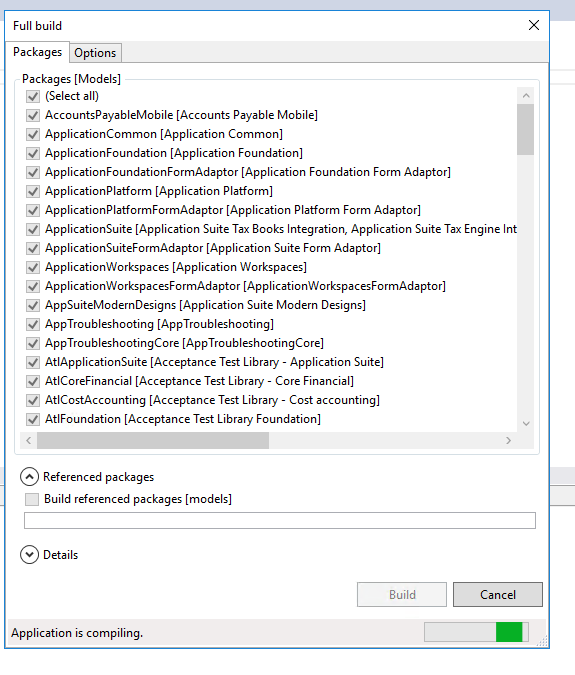
4. Click Build.
Full Compile and Synchronize Database can take around 1 – 2 hours to complete and status will be displayed in system as it progresses.
Once completed, the system is ready for use with desired configuration keys disabled.
When regression testing, you may receive error messages during the process. An example of an error that might be seen is below. If this error is reported, these are the steps to research.
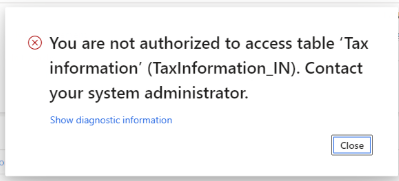
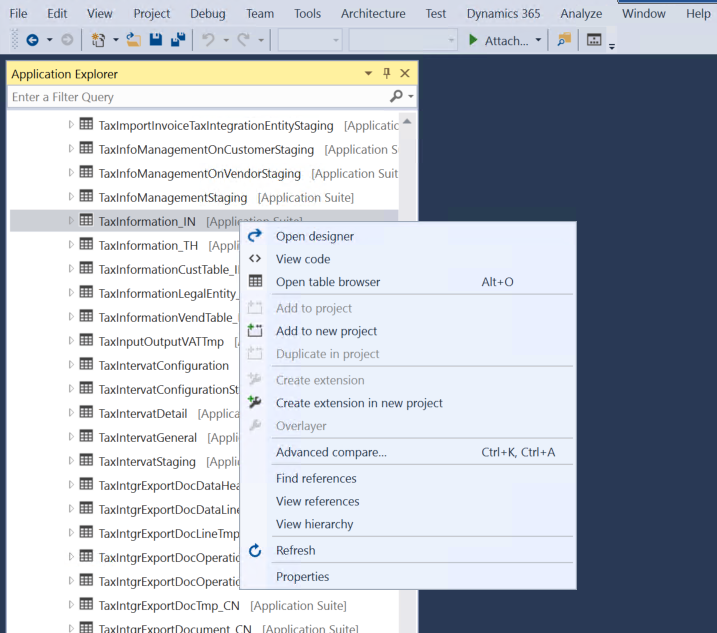
1. Follow this path : AOT > Data Model > Tables TaxInformation_IN (sys) [Application Suite]
2. Right-click on the table and select Open designer
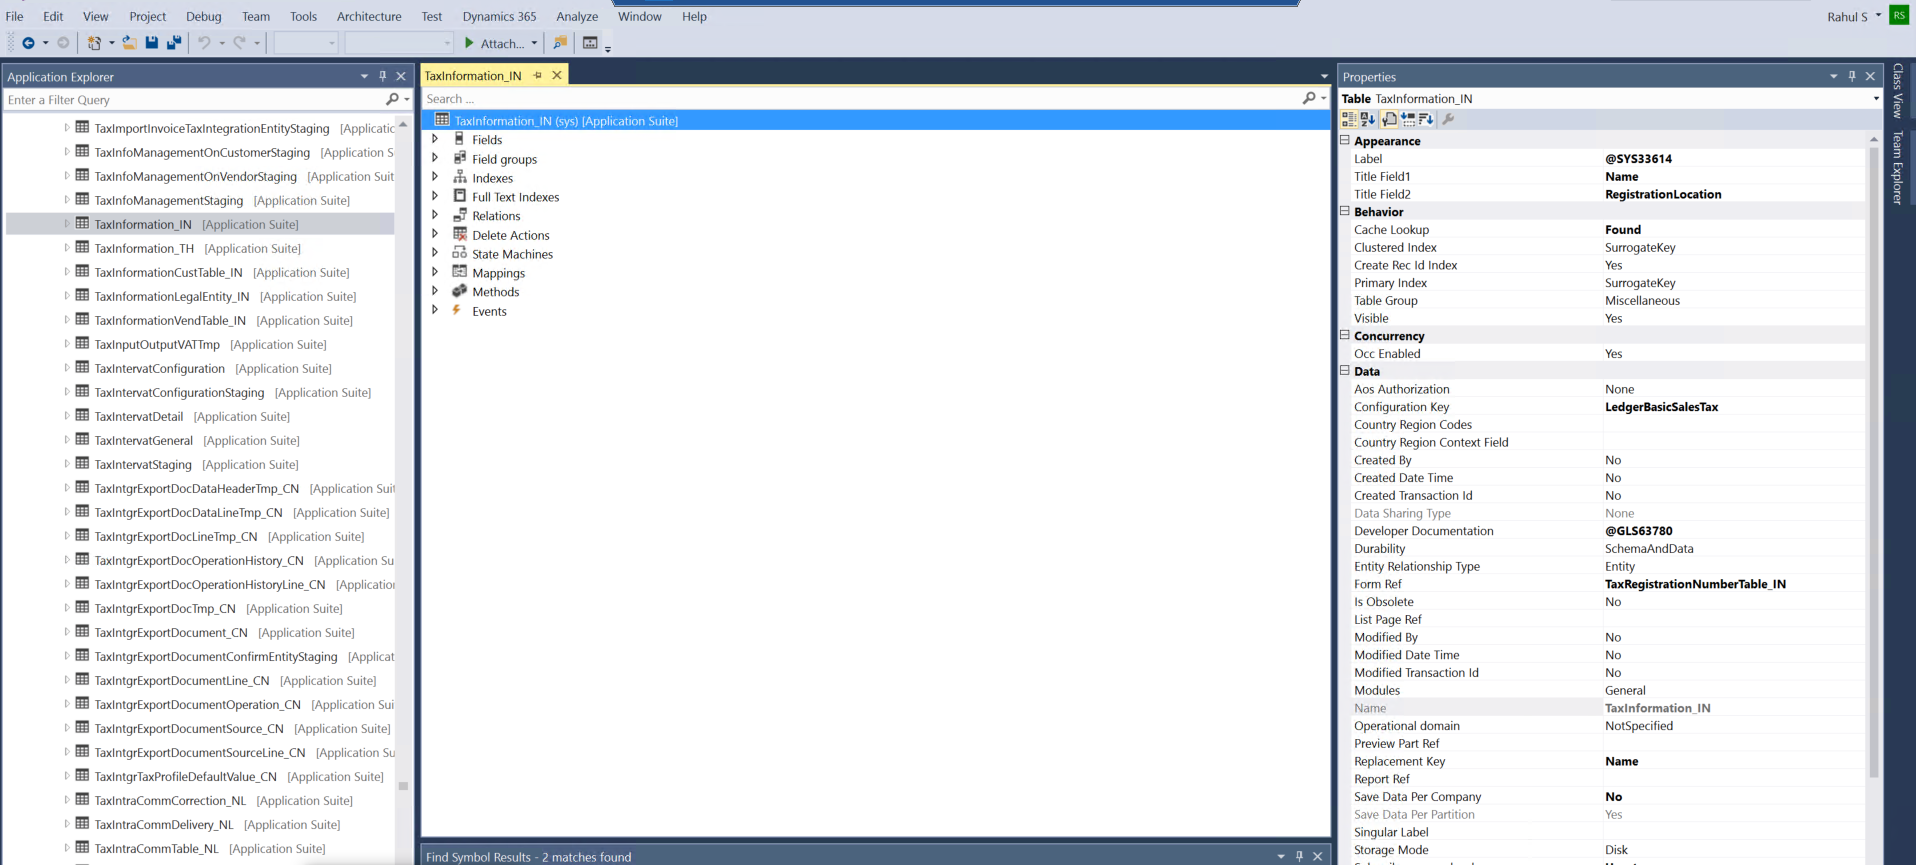
3. Click on Table in Designer Explorer
4. Click on Properties Tab
5. Review the field Configuration Key to find your reference, here LedgerBasicSalesTax. This will guide you to better understand the relationship between the error and the configuration key you disabled. If the functionality is required, reenable the configuration key by following the same process when disabling.
NOTE: If you are unsure whether to deactivate a specific configuration key, the best practice is to disable one configuration key at a time and run regression testing on your processes. Then you can easily track the configuration key associated with any unforeseen errors.
Example of disabling configuration keys Human resource I, Human resource II, Human resource III:
Click on Save.
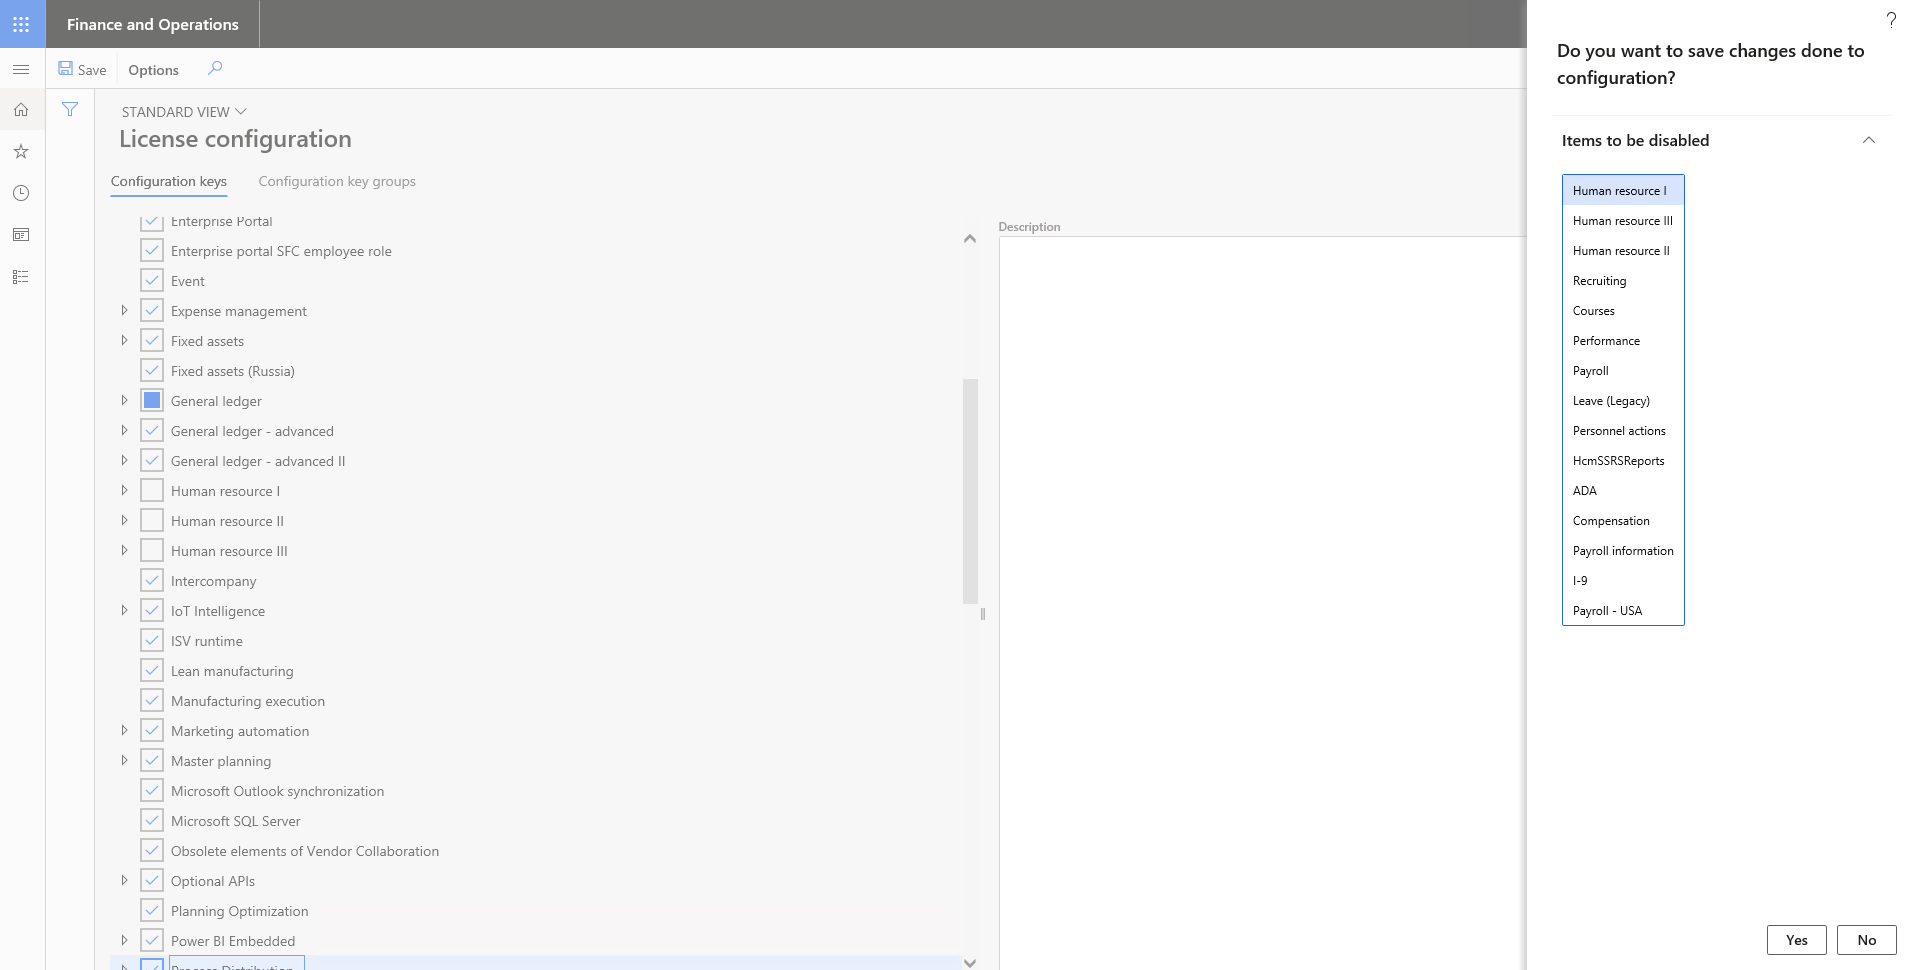
Click on Yes.
The module displays as follows via the UI before disabling keys:
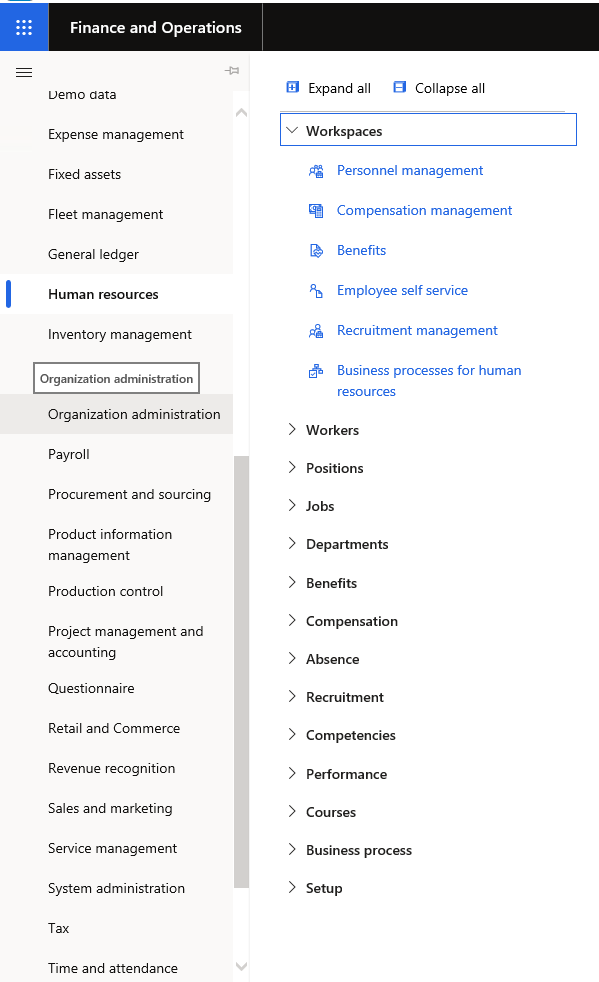
Note the presence of Absence, Competencies, Performance, and Courses menu items.
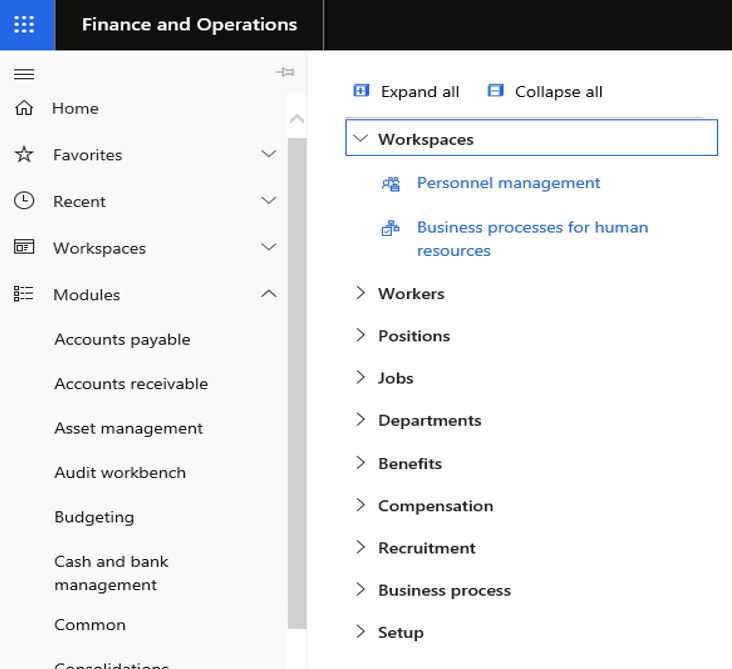
The module displays as follows after disabling keys. Note that it is no longer displaying those same menu items:
There you have it! Click here for more information about HCL-PowerObjects' services for Dynamics 365 F&O.


