Looking for PowerObjects? Don’t worry, you’re in the right place! We’ve been part of HCL for several years, and we’ve now taken the final step in our acquisition journey: moving our website to the HCL domain. Nothing else is changing – we are still fanatically focused on Microsoft Business Applications!

PowerObjects Blog 

for Microsoft Business Applications


Electronic Reporting Explained

Post Author: Costin Boldisor |

In this post we’ll be looking at a classical data export scenario and showing how it can be implemented using the Electronic Reporting (ER) feature in Dynamics 365 for Finance and Supply Chain Management (D365F&SCM).

  1. Introduction
  2. Minimal Configuration of ER Parameters
  3. Defining the Data Model
  4. Mapping from Database to Data Model
  5. Mapping from Data Model to XML Format
  6. Starting the Export
  7. Conclusion

Introduction

As Microsoft mentioned, the ER framework replaces 20 or so existing frameworks, so it’s expected that the complexity of its configuration is high and the learning curve is steep. Others have covered the advanced setup in depth. What we’re trying to achieve here is to add some clarity and show how a simple export is done using ER by linking the concepts specific to ER with more familiar terms used in the power-user and development worlds like data selection, serialization or transformation.

The scenario we’ll be looking at is very simple: exporting some info about a given purchase order (PO), as well as all its lines. In other words, the input is the PO number (e.g. 0000042) and the output is an XML file in the format shown below. Of course, there are many ways of achieving the same result, such as using the data management workspace, OData, Logic Apps, etc. We’ll be addressing the benefits of ER in the last section.

Finance 
General led get 
H Ming 
Human r. 
Master planning 
Cygani%tion &dministration 
n t a nd Icing 
info mation 
ma 
n tro 
Proj«t 
Project ma and 
account i 
Property deve m ent 
ledger 
re 
Retail and Commerce 
SalE 
Sal % 
Service ma 
J Delete Mder 
All Orders 
Retail 
CROSS DOCKING DATES 
date 
p 
x 
00000042 : US-ill 
Purchase order header 
Iota I 
Purchase order lines 
-F Add Add 
- Contoso office supply 
REPLENISHMENT 
Lines 
PRO DUCT/ORDER CREATON 
REAL OWNING ENTITY 
Header 
Open order 
App roved 
Add 
o & r v and wppw v 
ADVERTISING 
details

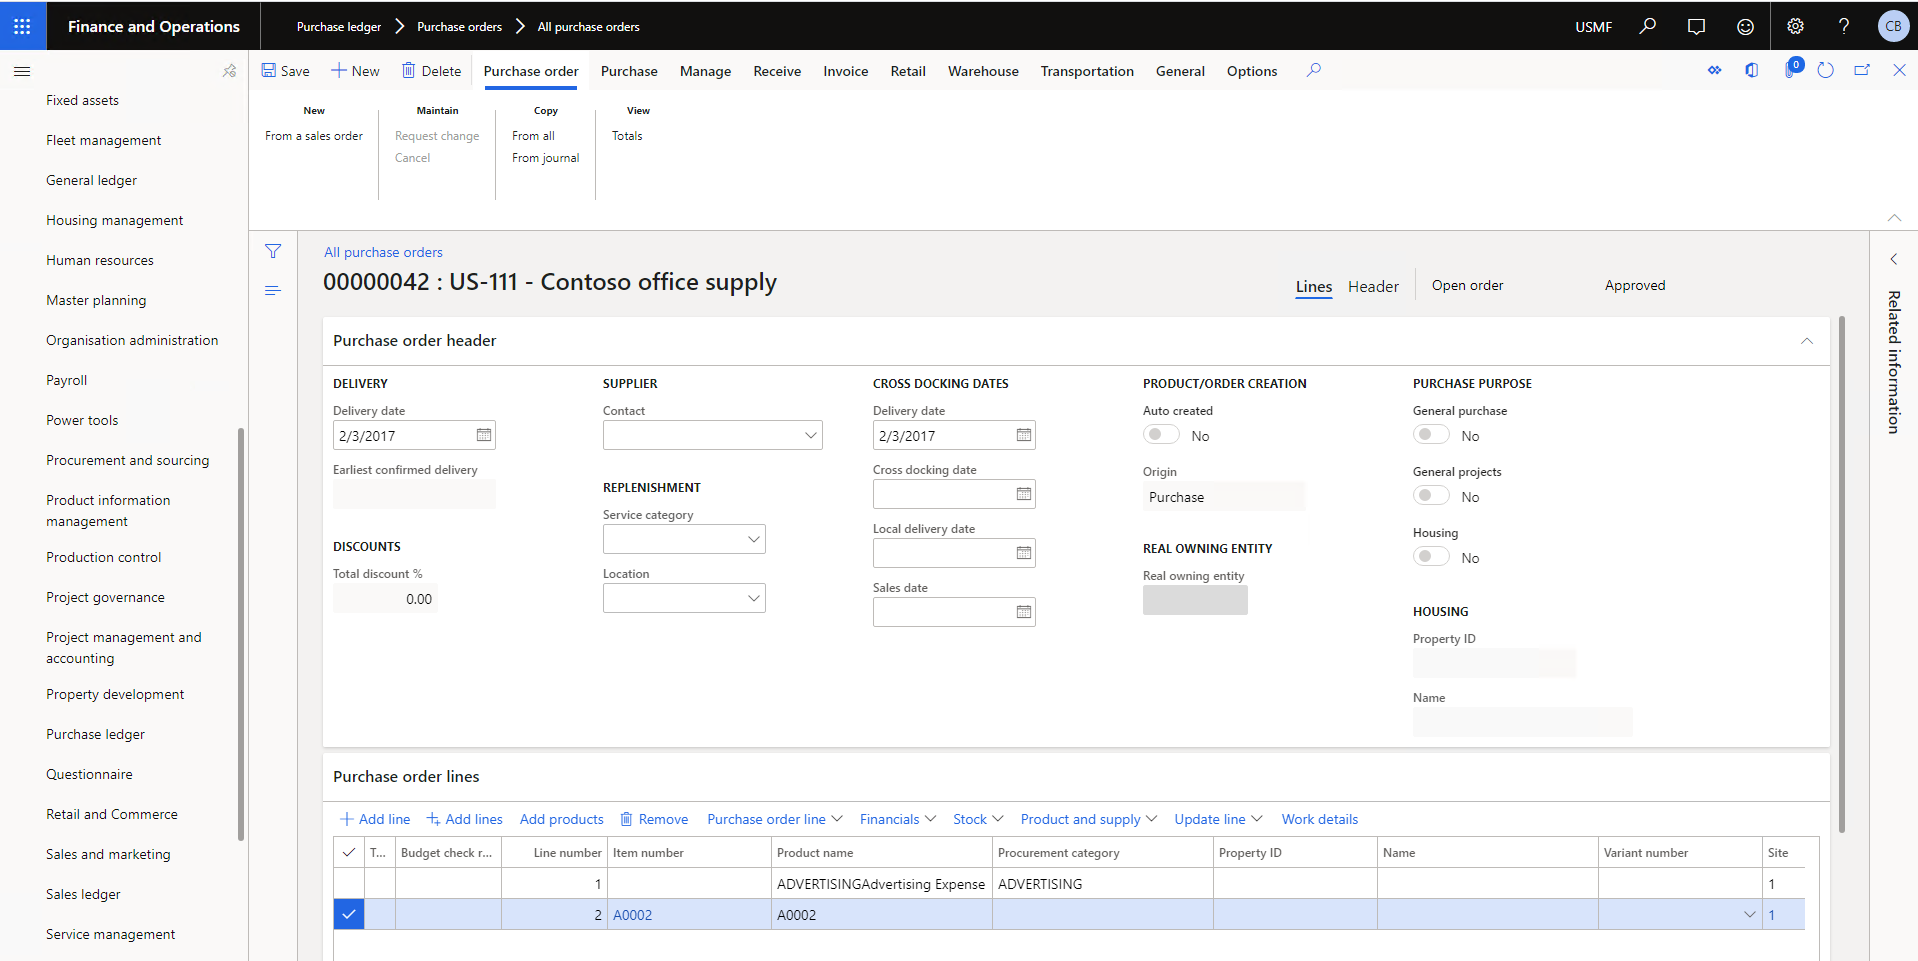
Figure 1. Input data - Purchase order with two lines

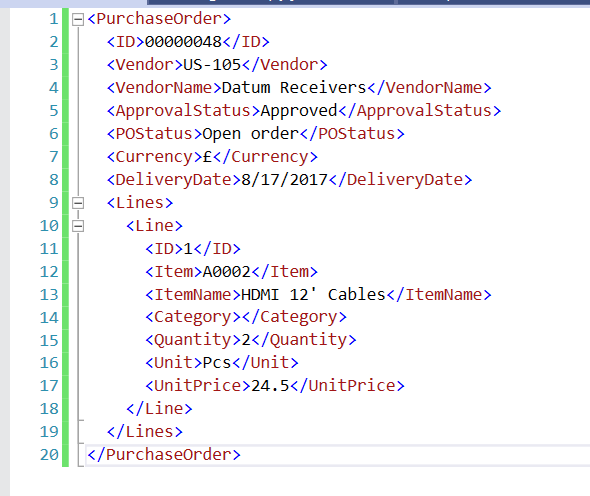
Figure 2. Desired output in XML format

From a user’s perspective, they would just open up the Purchase Order form, select a PO and press a button labelled “ER export”. This will trigger the export and produce an XML file. The file can then either be downloaded or sent to downstream integrations, like a Logic App that would orchestrate the link to another system.

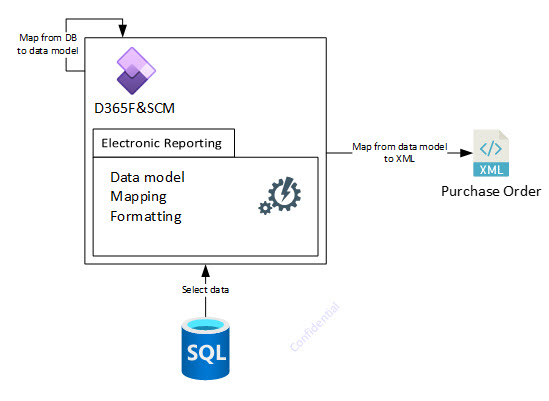
Figure 3. System-level view of the Electronic Reporting export scenario

The following sections will go through each step of the process depicted below.

In case you’re wondering what “data model” means in the world of ER, you can think of it as a class definition. It includes fields of various data types. Data from the PurchTable and its related tables will be selected by D365FO and saved as an intermediate object in the format specified by the data model. Then, similar to how an object gets serialised, the data model will be converted into a target format, in our case XML.

Minimal configuration of ER parameters

To get started, we need to set up a few parameters. The minimum configuration to enable our simple export scenario includes:

  • Creating a new Configuration provider
  • Creating a new Reporting configuration

We won’t discuss the topic of Configuration providers or the Application Lifecycle Management (ALM) story for ER reports in this post. We’ll cover the versioning and deployment using LCS in a future post. Microsoft provides all this info in their documentation.

In ER parlance, what we need to do to reach our goal of exporting POs to XML is to create a Reporting configuration, which holds the data model and all the mapping rules, as well as versioning information for each.

The first operation is creating a configuration provider and setting it active, which is done through the Electronic reporting workspace (under the Organisation administration module). The reason we’ve included this setup in the Minimal configuration section is because you can't create the Reporting configuration unless there's an active Configuration provider.

Finance and 
bank 
Cwt 
Credit and 
De data 
General ledger 
*Ming 
Human r. 
Master planning 
Orga ni 
GBSI 
Options 
Localisation configurations 
Configu rations 
rat 
x 
Configuration providers 
Microsoft 
Reposito nes 
power 
Related links 
App links 
Leg.' entity filte for formats 
Con 'gun t") n 
reg«ting 
Ü«tronic n u rce 
Electronic parametets 
aræ tags 
Indwtry tags 
Business document type tags 
updates 
External Links

Figure 4. Electronic Reporting workspace – link Configuration providers

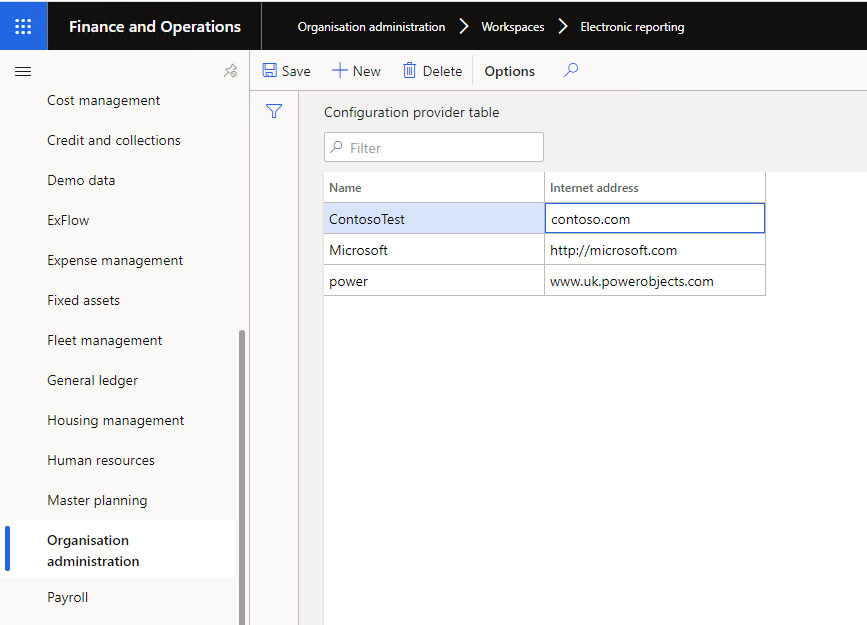
Figure 5. Creating a new configuration provider

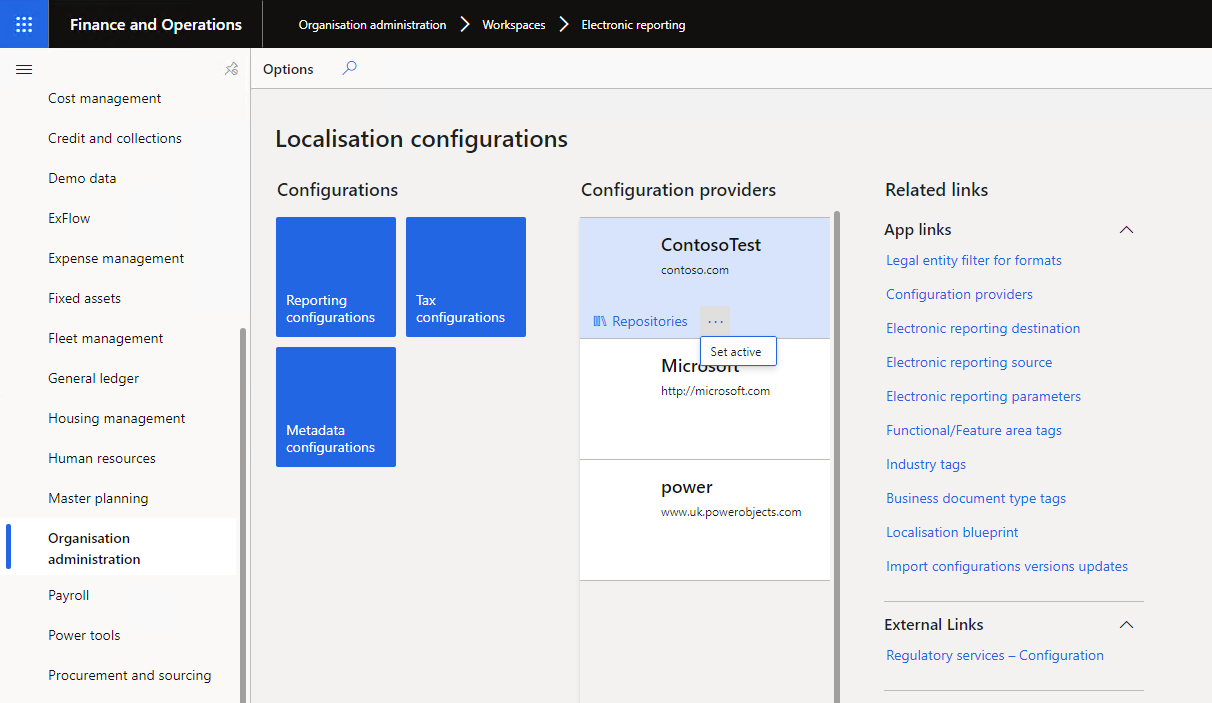
Figure 6. Setting a provider as active

Configuration providers 
C ontosoTest

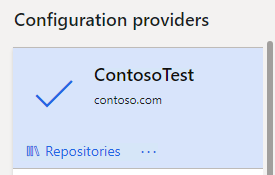
Now that we’ve got an active configuration provider, we can create the reporting configuration:

  • In the Electronic Reporting workspace, select Reporting configurations
  • Click + Create configuration and choose Root
  • Provide a name and a description
  • Notice that the active Configuration provider was selected automatically (ContosoTest)
  • Press Create configuration

Finance and Operations 
Cost manage ment 
and 
management 
ledger 
p I a ming 
on 
Edit co nf.g Delete 
Y - Create configuration 
V. li%te 
op 
@ Rmt 
Z this veßion 
C) 
Derive Name: Electronic 
l€gæ model MN 
gormat based on data model 
ELA_MX 
Vapping data 
model ELA_MX 
status 
Delete 
XML 
C sorest 
ISO Country/region codes 
Co u ration components

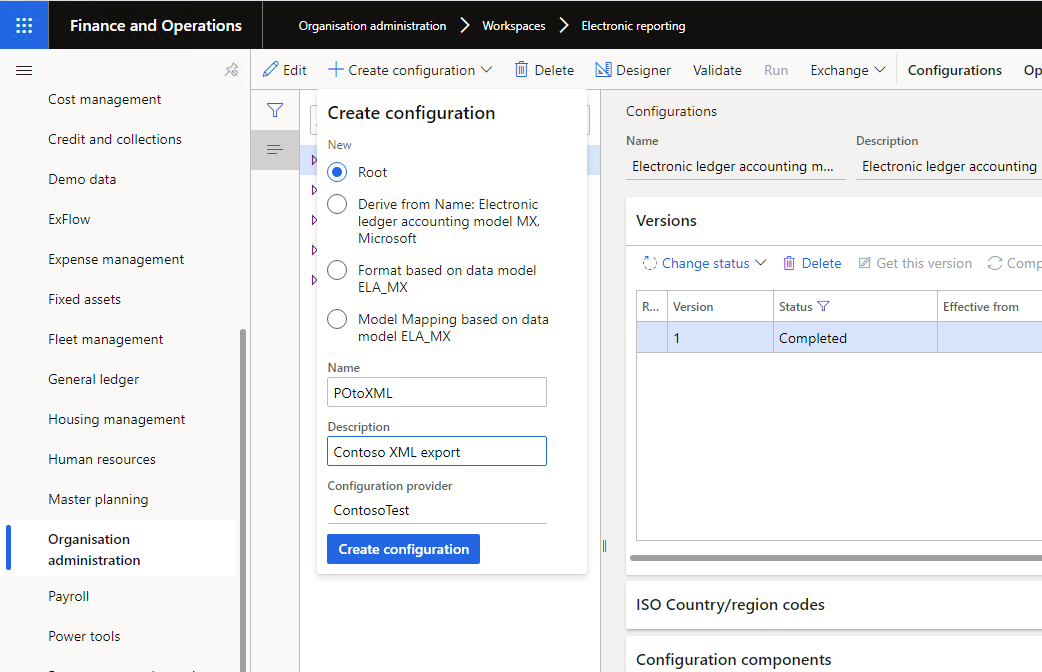
Figure 7. Creating a new Reporting configuration

Defining the data model

Now that we’ve created the Reporting configuration, we can start defining the data model. Remember that the data model is like a class definition for the intermediary format used in ER. In other words, after data is selected from PurchTable, PurchLine, etc., it needs to be put in this format. This is why even for this simple data export scenario we’ll need to define two mappings:

  1. Mapping from database to data model
  2. Mapping from data model to XML file

Defining the data model is similar to creating a class in standard development (e.g. C# or X++). You need to define member fields, with names and data types. Some of these fields are themselves objects of other classes or arrays of objects.

To define the data model, we need to select the root Reporting configuration we’ve just created and press the Designer button, which opens the data model designer.

We’ll be creating the fields with names and types that will enable a close to 1:1 mapping to the target XML format.

Finance and Operations 
am' dl«tions 
Oe,mo data 
Fix ed assets 
Housing management 
*ming 
Organisation 
admire s t' ation 
payroll 
P wcing 
Sue 
mcdel 
Com*re Map model to 
info 
Ira nslate 
+ New V @ Delete 
Create node 
@ Mod 
potoXML 
Data model 
p OtoXML 
Cmtow XML

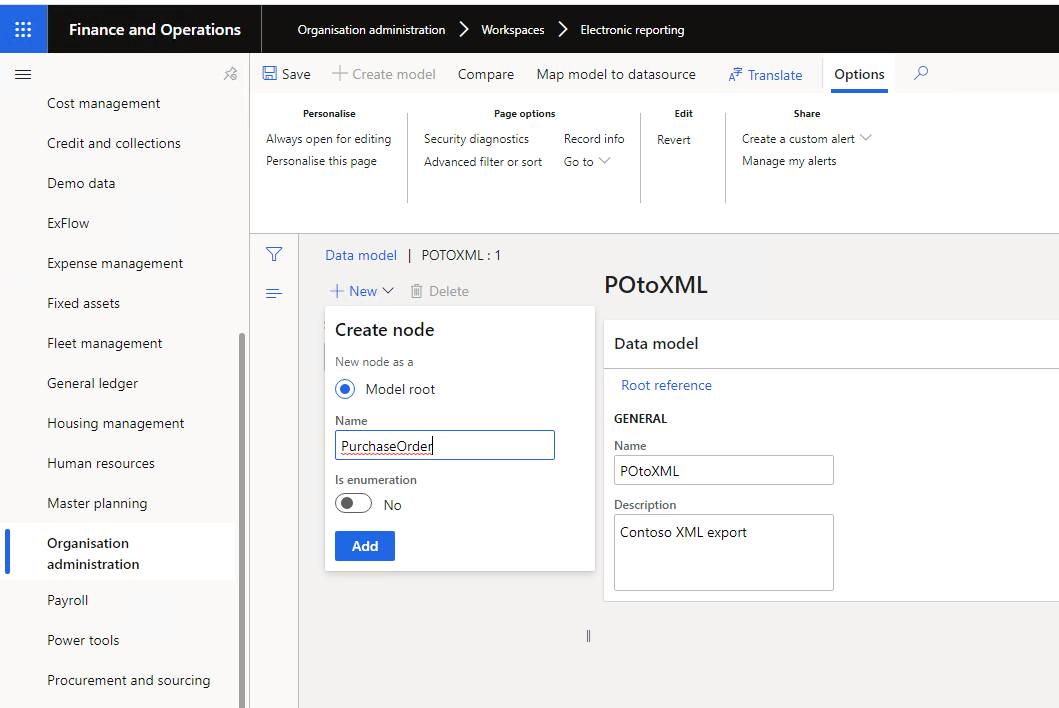
Figure 8. Creating the first node

! 0 
L 
r05 」 、 ㄆ 050 凵 
a 凵 」 1003 
凵 L'N × 010d 
一 11 ~ e6 」 0 
凹 001 」 08

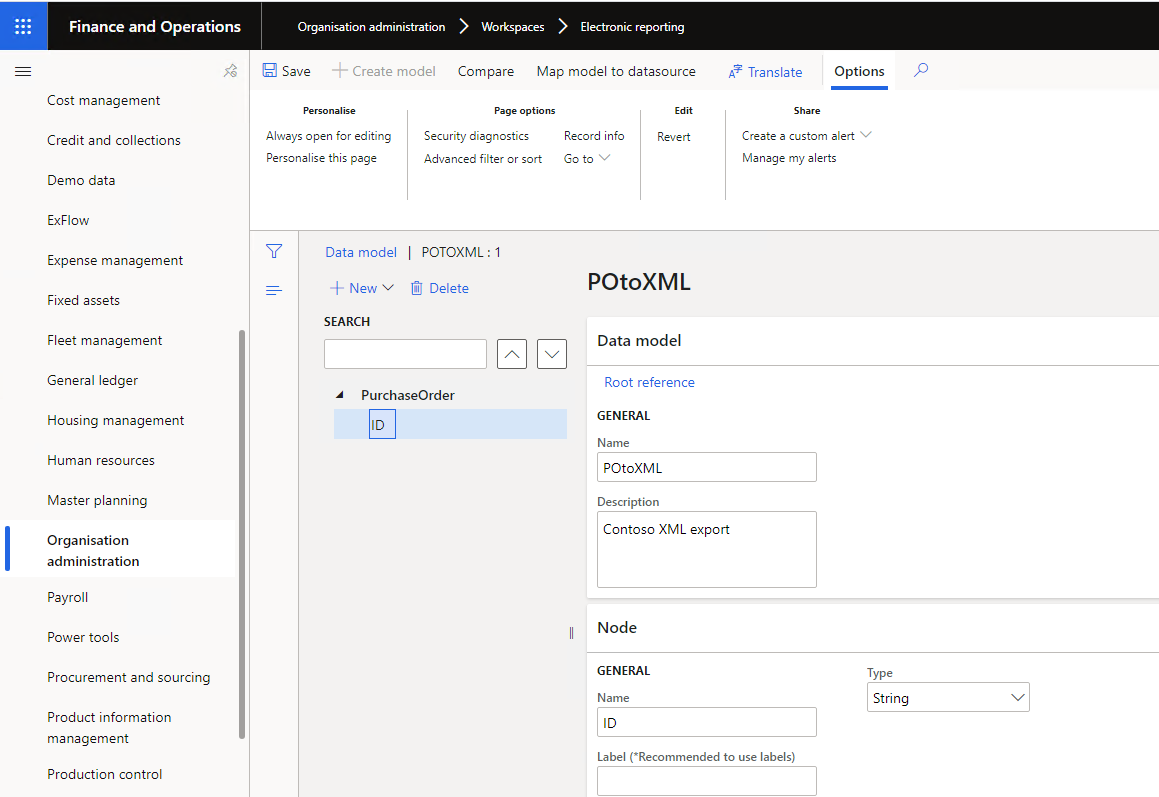
Figure 9. Adding a String child node

A tricky part is how to define arrays. In the ER data model designer, this is done through the Record list and Record types. So, as a Purchase order contains a Lines element with zero or more Line elements, we’ll create:

  • Lines as Record list
  • Line as Record
  • Properties of each PO line under the Line record

Mapping from data source to data model will then address data selection and create the array automatically.

Finance and Operations 
am' dl«tions 
o data 
Flæt 
Housing management 
Master planning 
Pasrol 
p and so 
ProdÆt 
P rod n 
Sue 
-+- m cdel Com*re Map model 
info 
Mnge my 
-F- New v @ Delete 
Create node 
C) Mod root 
@ Child of 
Lin 
rd list 
potoXML 
potoXML 
XML 
P u rch

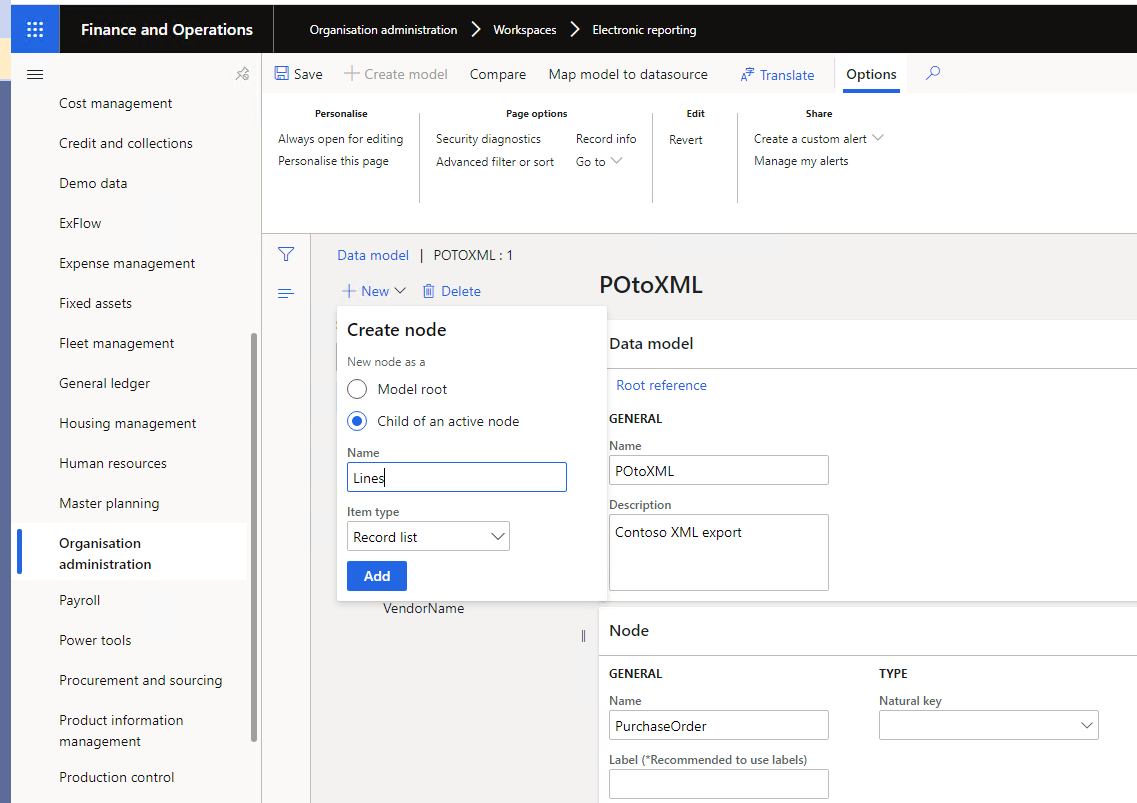
Figure 10. Create Lines Record list

am' dl«tions 
and 
Map m cdel to data. 
to 
rransVate 
Switch 
Optio 
Dem o data 
Y 
Genera I 
Ho using managem ent 
Master planning 
PMOI 
P and so 
P rod n 
P roj 
project and 
*Count. n g 
Data model I 
-+- New v @ Delete 
Create node 
C) Model root 
@ C h i 'd of 
C) of node 
info 
potoXML 
Data model 
Rwt refe 
potoXML 
XML expM 
Lines 
list

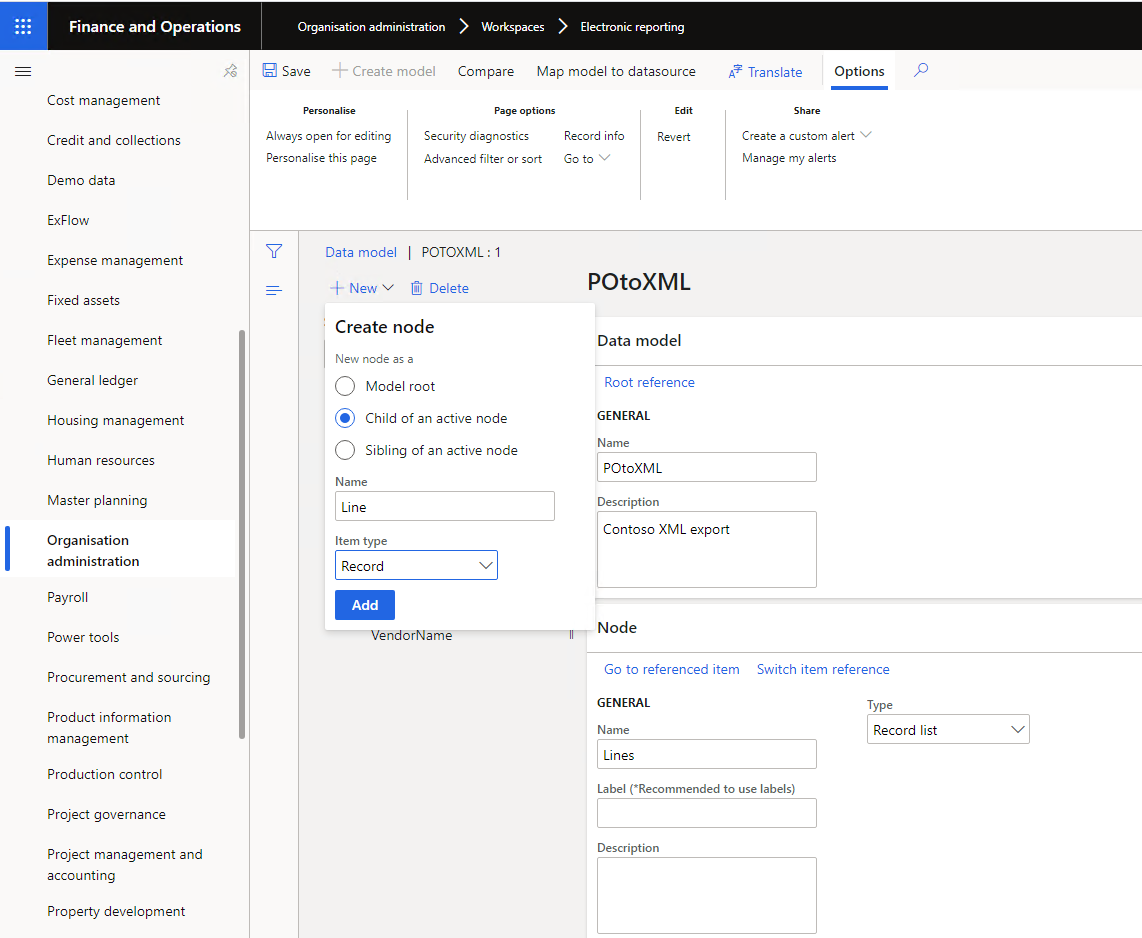
Figure 11. Create Line record

and 
Vis ed assets 
Fl—t 
Ho using managem ent 
Hum æ7 
Master *Ming 
admi 
P and so 
P rod n 
P roj 
Project management and 
*Count. n g 
Retail and 
Save -T- Comp-are Map model to 
editing 
C.ta 
I FOTOXML:I 
Delete 
App Status 
Cu frenzy 
C ategorv 
P&Yd info 
POtoXML 
Data model 
Rmt 
GENERAL 
potoXML 
Cont%0 XML export 
Node 
GENERAL

Figure 12. Defining properties of Line record and remaining fields

Mapping from database to data model

Until now, we've created a data model, which means we've defined how data is stored when extracted from the database. The next step is to define which data we’re selecting from the database. This is accomplished using a model to data source mapping. In the data model form where we’ve defined the data model, select “Map model to datasource”. Then:

  • Press +New to create a new entry
  • Under Definition, select the root node of the data model we’ve just created, “PurchaseOrder”
  • Provide a name and description
  • Ensure Direction is “To model”. This means that the output is an object of the class defined by the data model.

Finance and 
Fixed assets 
g I eet manage ment 
"Ming 
Human 
Mute planning 
Orga ni 
Save -f Designer Run Options 
Model to mapping I POTOXML 
Pu rchaseOrde r 
Pwchase order 0B to Model 
O To model

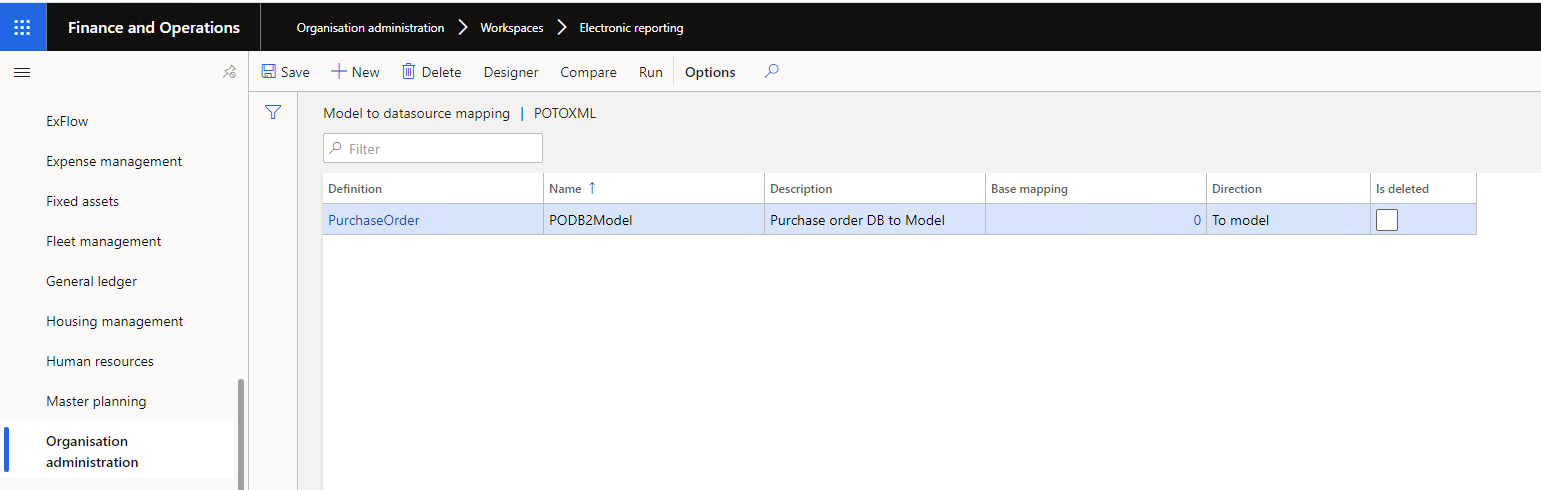
Figure 13. Creating a new datasource mapping

and 
'Sgt:' 
using 
Hum n resources 
Organisation 
tools 
P rod Ætion 
P@ect 
P v _«haæ 
Save d 
She"' name 
Group 
co Start 
Gasl 
p Seareh 
p 
X 
7 
POTOXML POTOXML : PURCHASE ORDER 08 TO MODEL 
Model mapping designer 
Validatiors 
DATA SOURCE TYPES 
Data 
model 
365 for Operations 
Class 
ect 
rds 
for Retail 
mat 
Import format 
Calculated field 
knar •rial dimensx'ns details 
Group by 
DATA SOURCES 
4- Add 
2 Edit 
Sea rch 
Edit 
defi 
De I i veryoate 
rNa me

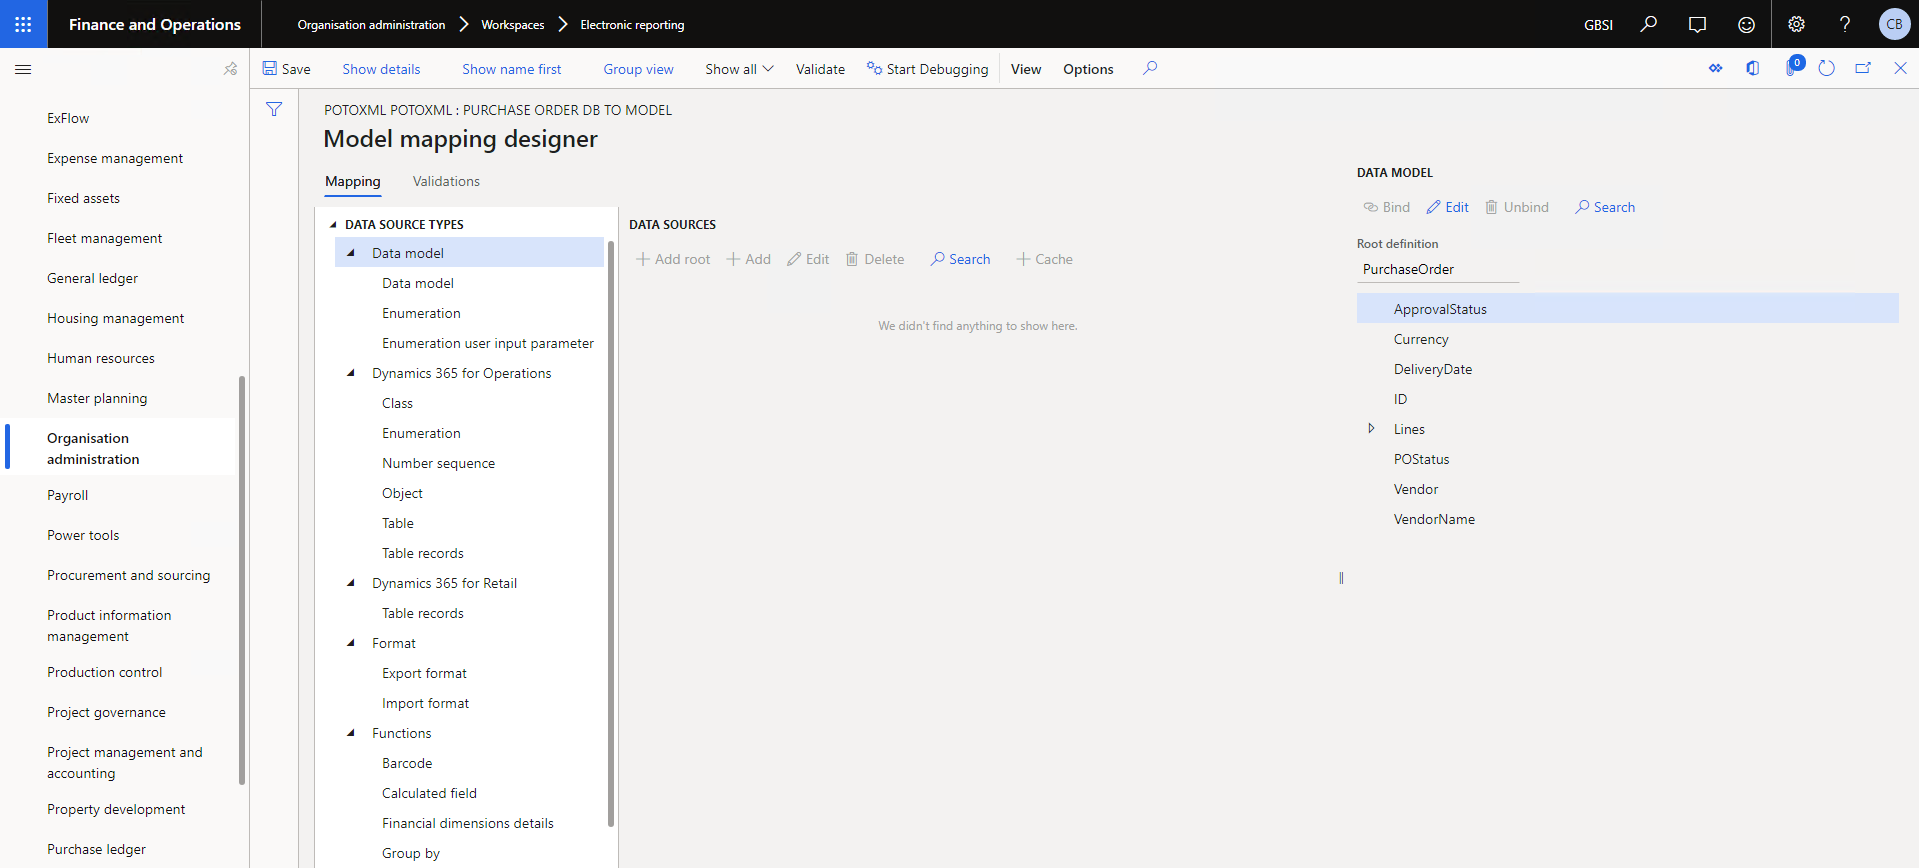
Figure 14. Model mapping designer - so many options

Hitting Designer brings up one of the most complex screens in ER. It’s understandable if you feel a bit overwhelmed at this point and think that there are too many options. So, let’s remember our purpose for this step - we need to:

  • Select data from PurchTable
  • Join with PurchLine and other related tables
  • Filter on one given PO number
  • Match fields from input tables to fields from data model

 To achieve that, we’ll take the following steps:

  • Add a Table records data source pointing to PurchTable
  • Create a User input parameter of type PurchaseOrderId, which will hold the filtered PO number
  • Create a Calculated field, which in fact will be a record list by applying the FILTER function against the PurchTable data source

'Table records' data source properties 
POTOXML POTOXML PURCHASE ORDER TO 
Model mapping designer 
Mapping 
• DATA SOURCE TYPES 
model 
Dara model 
parameter 
3öS 
Class 
Number sequence 
3öS 
got mat 
format 
Calculated 
details 
dimensions details 
metadata 
P u rchT.b 
DATA SOURCES 
management 
HæÆing 
Human 
planning 
Orga n 
gewer 
en an r Cing 
Product infomation 
mntrol 
Proj"t and 
aæou Ming 
Pro*rtv 
ledger 
Retail ard CommeQ 
P u rchT.b 
Ask

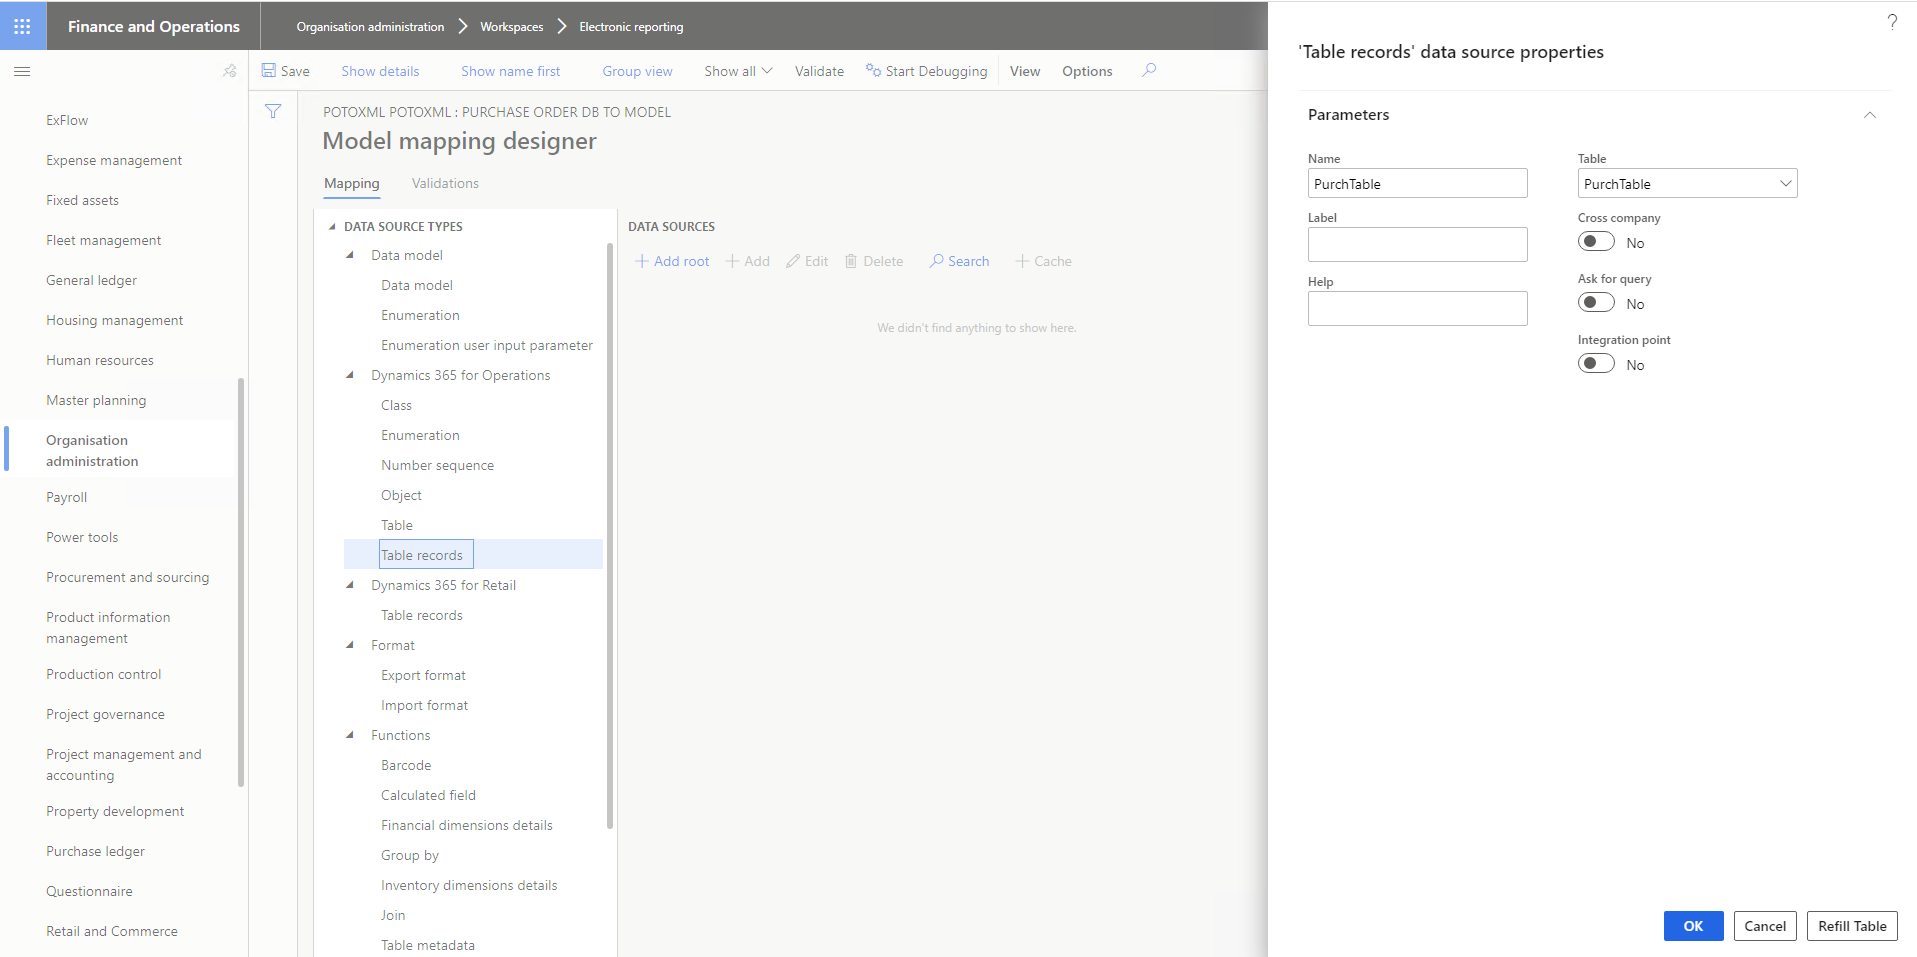
Figure 15. Creating the Table records data source linked to table PurchTable

Finance and 
Hum an 
Organisation 
adm 
Power tools 
P n wcing 
Product information 
management 
Production control 
purchase led get 
G8Sl 
p 
O 
o 
Group 
: PURCHASE ORDER DB TO uooe_ 
all 
ate 
00 
x 
7 
Model mapping designer 
Map-Fing V. I idaticms 
DATA SOURCE TYPES 
model 
Data model 
user parameter 
for Operations 
Class 
Number seque»ce 
Obj 
records 
Dyname 365 for Reta I 
Table rds 
Import 
CalQlated field 
details 
by 
In details 
DATA SOURCES 
•E Add root -i' 
Table • rds 
p search 
+ Cache 
IntÆ (String _postingProflle_RLl) 
A'æting dateCA«untingDate): 
Azæting e C.te 
A'æting Date 
(String 
Activate chnge 
Agræment Int" 
String O 
O: Int" O 
ag—7tlsLinkedO: NOYE O 
amNntCw2MSTC; O 
Real O 
Edit 
String 
String 
10; Strirg 
Lirm; Record list 
PO Stat•ß St ring 
WndOr String 
String

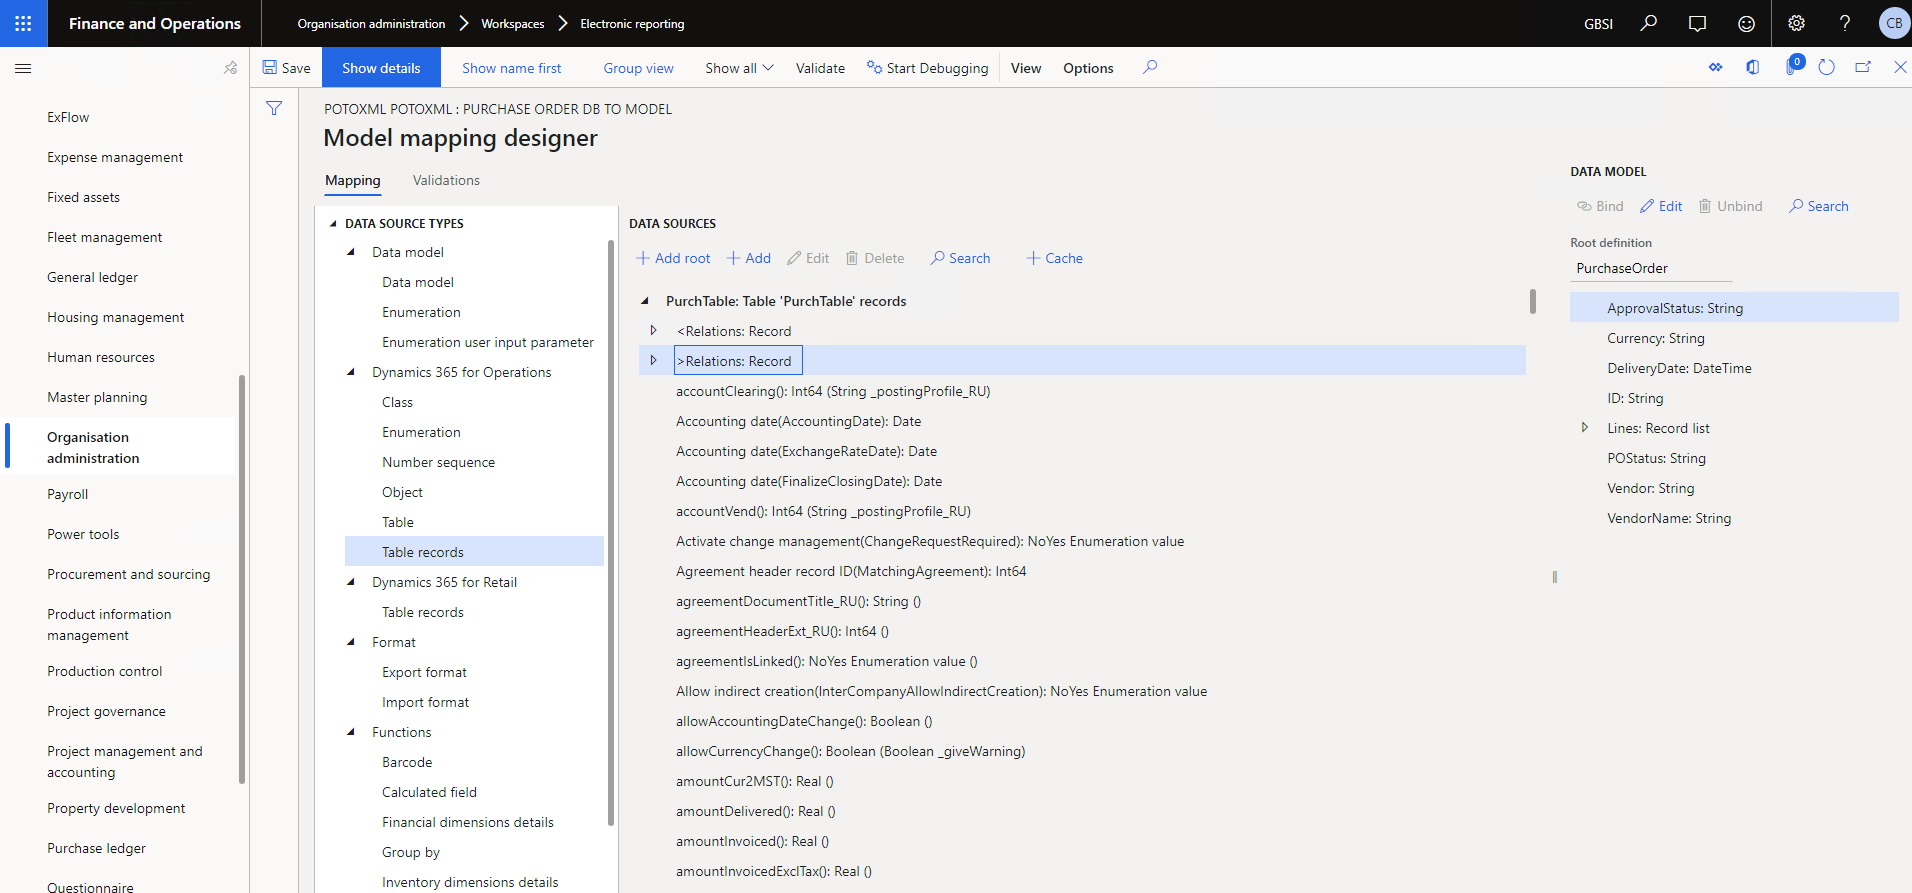
Figure 16. Press Show details to see field types

Fimce 
Options 
7 
Grouo v. 
POTOXVL POTOXML puRCHASE ORDER TO 
Model mapping designer 
DATA SOURCES 
"o SWt Det%gging 
Table 
'User input parameter' data source properties 
data 
management 
•eger 
Housing msn.gement 
Human resources 
Master 
tools 
and 
Prod•.Æt 
m.n.gement 
Project 
and 
Pwchaæ 
Questonnalte 
Retail and 
DATA SOURCE TYPES 
Class 
Operations 
Number 
records 
records 
Calculated field 
dimensions details 
details 
metadata 
General 
Empty

Figure 17. Create the User input parameter

7 
apense 
age'S 
and 
m aion user input paramet 
•Calculated field' data source properties 
-o Star: 
options 
A3TOXMl_ paroxMl_ PURCHASE De Ta MODEL 
Model mapping designer 
Val 
• OMA SOURCt TYPES 
Data 
Data model 
385 at 
"port 
Import 
Sarco de 
feld 
dimensions 
Group by 
dimensions details 
metadata 
DATA SOURCES 
mwchTabl€. Table 'PurchT*le r«mds 
Housing management 
Mister planning 
on 
payroll 
and nun:ing 
antrol 
gcuem,ance 
Prcj«t 
Questionnaire 
Retail

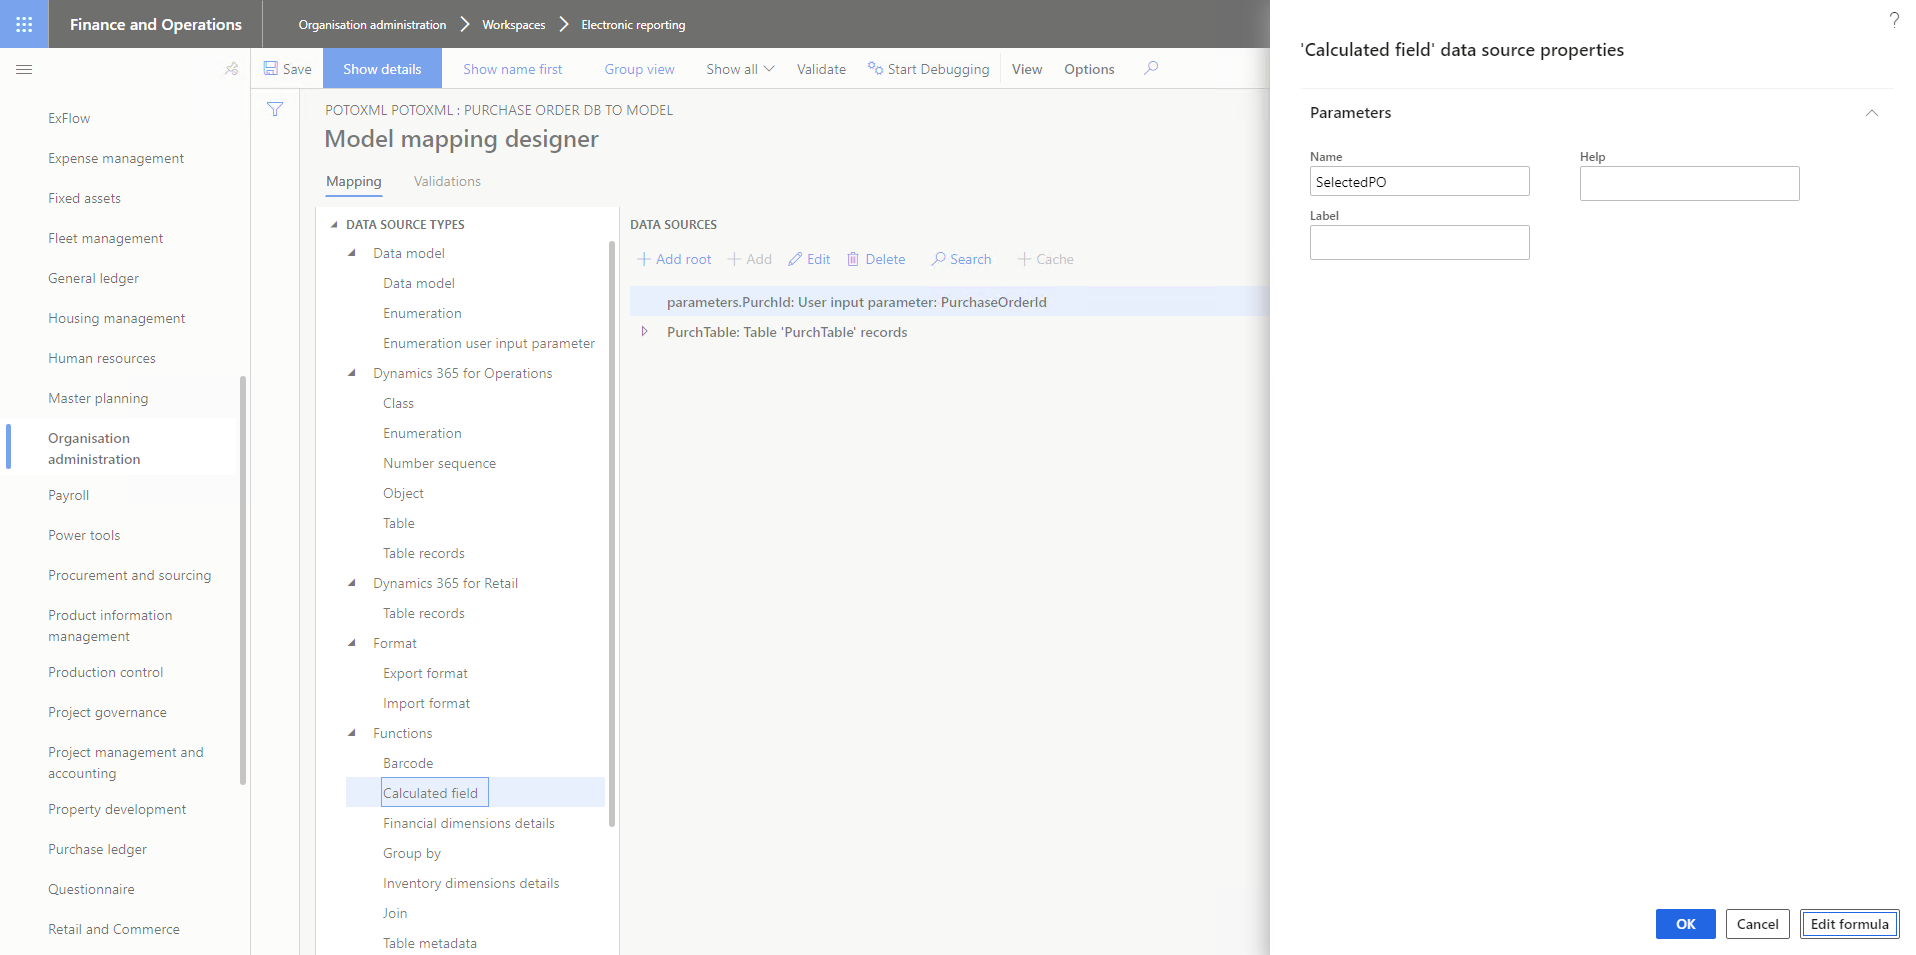
Figure 18. Create Calculated field, press Edit formula

Finance and Operations 
Expen Se m 
General Jed get 
H owing 
Human r. 
Master planning 
Orga ni 
re wcing 
Product information 
m *ment 
Ptoduction 
Pmj«t 
Proj«t 
Purchase ledger 
details 
GIO up 
Formula designer 
DAVA SC"JRCt 
Add data 
rch 
P wch Ta 
FORM u LA 
Oven•iew 
Tra 
lest result 
Opti 
parameters pu "h Id 
Add 
CN_G BT_Additi O 
CONVERTCLIRRENCY 
cuRCredRef 
A-BALANCE 
GetC u m 
dCh 
MO 0_97 
NUMSEQVALUE 
NUMSEQVALUE 
NUMSEQVALUE 
RouNDAMouNT 
TAELENAME210 
Data fuxteu 
COLLECTEDLIST 
couNTlF

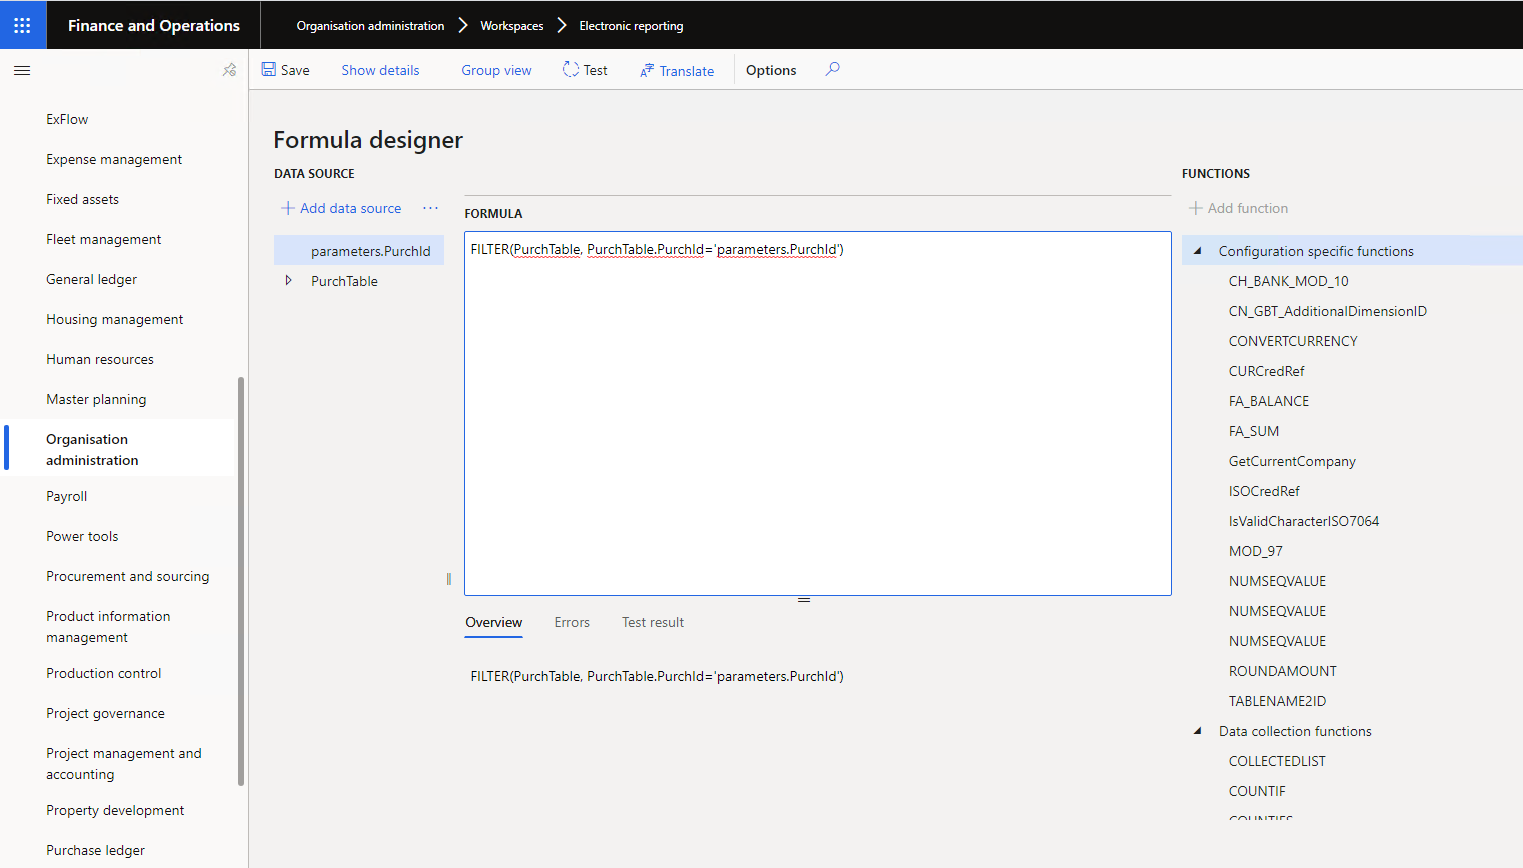
Figure 19. Editing formula to filter PurchTable datasource based on user input parameter

Notice that the Calculated field we’ve just created, SelectedPO, is now a Record list. We can start field mapping now. What this involves is going through the fields from the data model one by one and finding the corresponding field from the SelectedPO filtered data source. If the types are also identical, the Bind button is enabled and should be used. Otherwise, if some conversion is needed the Edit button can be used.

Finance and Operations 
Expense 
Hmßing 
Hum "I 
Master punning 
and so 
P rodÆt 
P rod n 
P roj 
project managernent and 
xceunt.ng 
name 
Croup 
Val Zate 
Stut 
23 
p 
DAVA XOOEL 
Q, / Edit 
o 
unbind 
p 
x 
PuRCHASE DE '0 MODEL 
Model mapping designer 
DATA rms 
Data 
model 
365 for 
Cla" 
Obj 
Table 
365 for 
Table 
Import fomat 
rude 
details 
I wtUy d i —SOS d.t3As 
Sea rch 
DATA SOURCES 
-+- Add -F Add Edit 
include valæ 
I DCProjld): String 
update) 
ID(HCLP String 
statÆ(PurchStatus): value 
String 
n String 
Real wing String 
nTa Int" 
String 
DateTime 
ID: String 
REffd list 
String 
VemSor. String 
VemSorName String

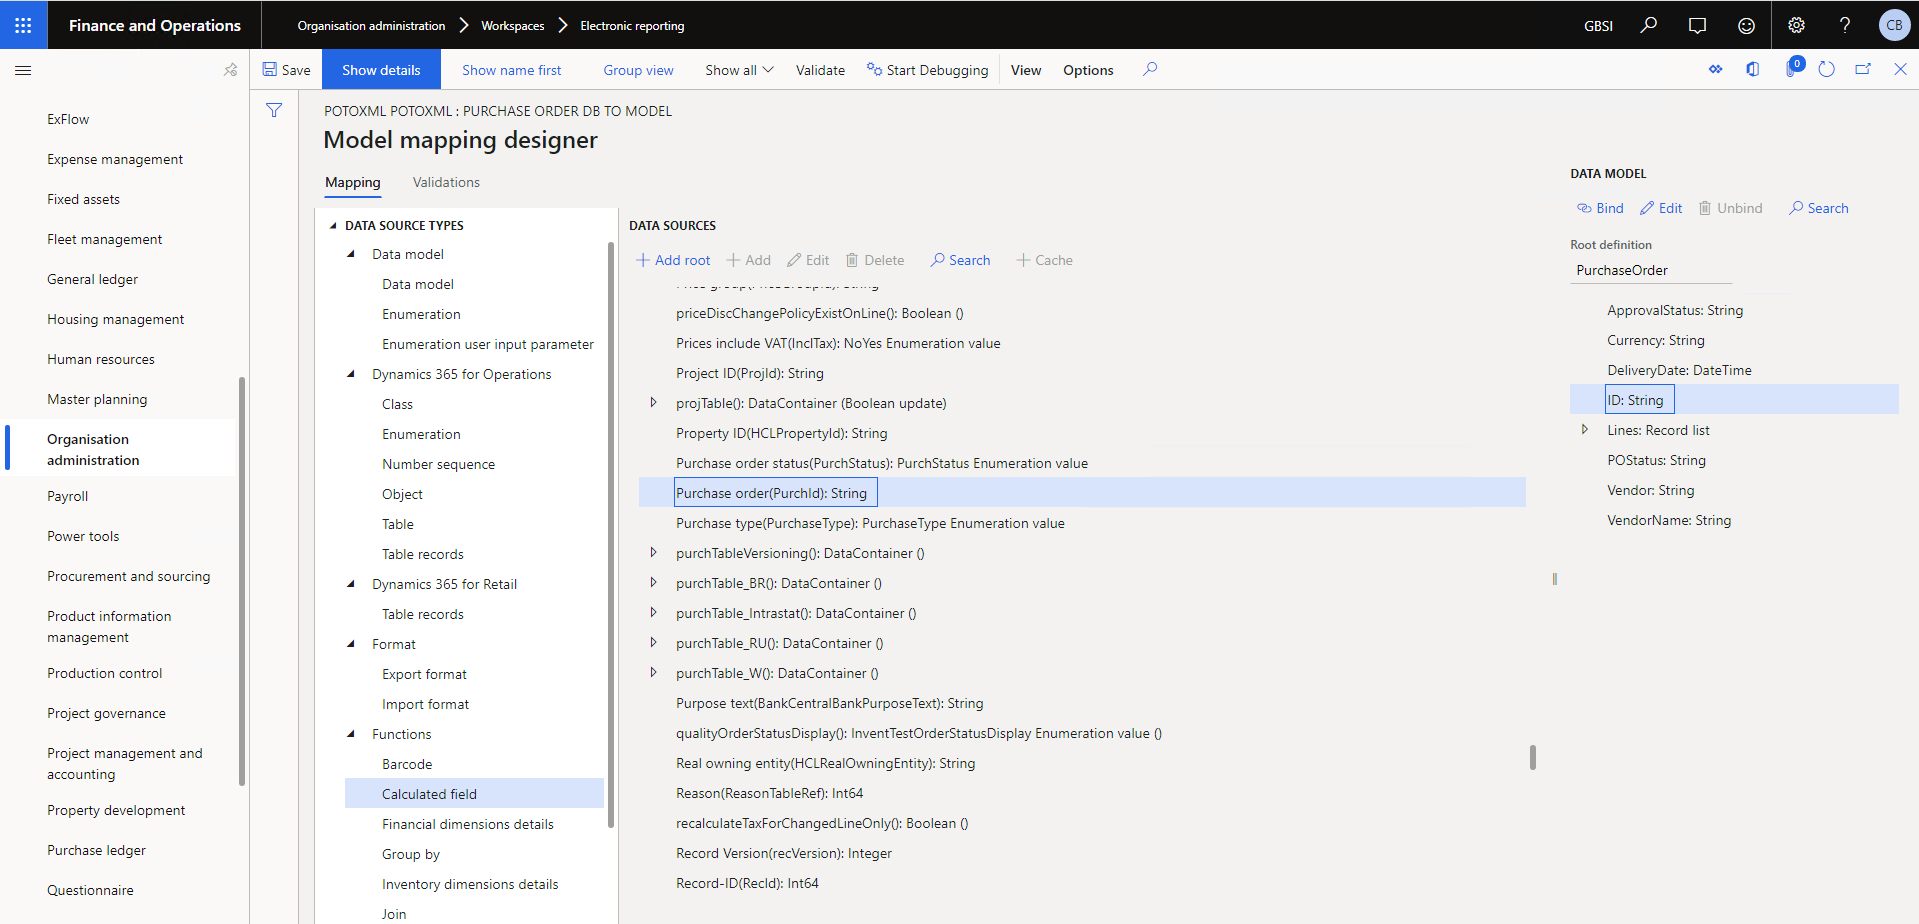
Figure 20. Matching PurchId field from PurchTable to ID field from data model - press Bind button

pu!fiun 
s naeîSOd 
;saun 
u aov•

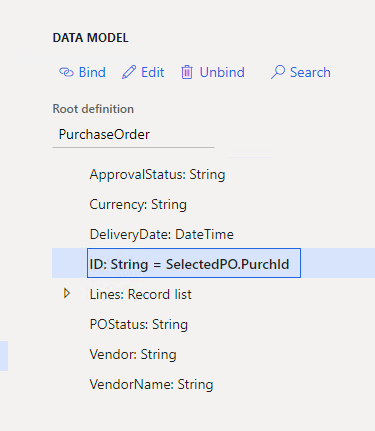
Figure 21. Bound fields are shown in the data model

For field Approval status, the Bind button is not active because the types are different. We’ve defined it as a string in the data model but it’s an enum in the data source. So, we need to convert enum to string – we’ll use the TEXT() function for now, although better options exist. The same applies for field POStatus.

8 ind Edit 
unbind 
String 
String 
Date 
ID: String = 
list 
string = 
Strir» =

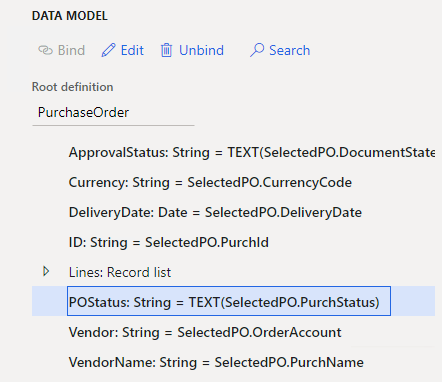
Figure 22. Binding fields that need conversion

Now the tricky part: how to include PO lines? We’ll need to bind the Lines record list from the data model to the PurchLine record list relation of the SelectedPO datasource.

Finance and 
g i xed assets 
Flæt 
General ledger 
H ousima management 
Master p I and ng 
sati on 
ad mi 
procurement and sourcing 
Save 
de t alb 
name 
Valid ate 
00 Stan Oebuggtng 
o puons 
Gasl 
Bind Edit 
p 
X 
POTOXML POTOXML PURCHASE ORDER TO MODEL 
Model mapping designer 
@ unbind 
Search 
DMA SOURCE TYPES 
Data 
input 
365 for 
Table rd' 
365 for Reta 
Table rd' 
DATA SOURCES 
-4- Add root -F Add Edit @ Delete 
Record list 
P ResponseHeader_ Record list 
list 
list 
list 
list 
hst 
PurchLastV«siomPurchld: list 
list 
list 
APINøvalStatus_• Suing = 
String = C —yCode 
De iwyDate Date = 
ID•_ String = 
list = 
string = 
String = 
String =

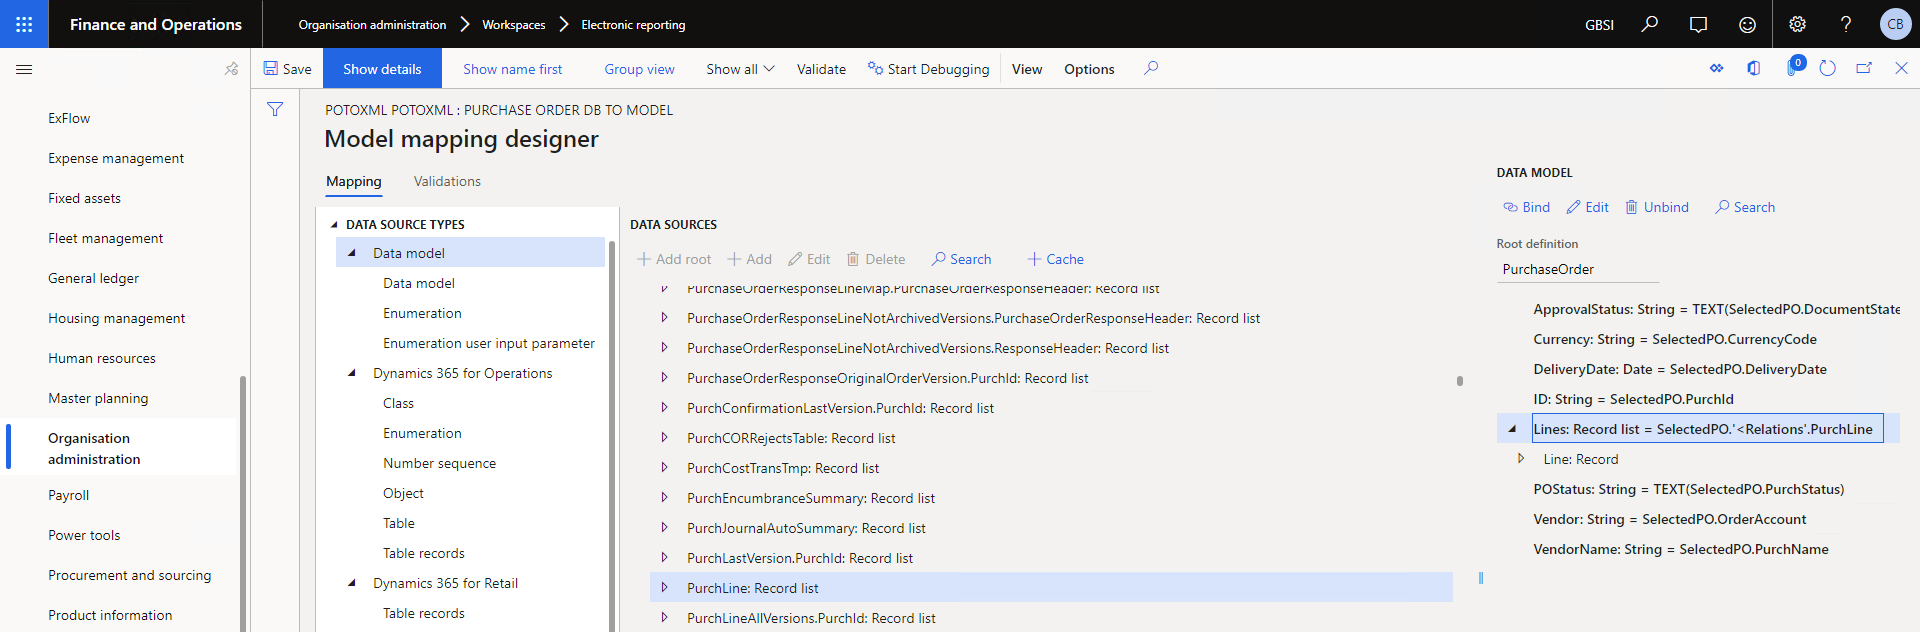
Figure 23. Mapping PurchLine relation to Lines Record list

Finance and Operations 
Expense m an agernent 
ledger 
Hmßing 
du m M resources 
Master puming 
power tool S 
ProdÆt 
P rod Ætion 
p roject 
and 
P v _«haæ 
Questionnaire 
p 
C] 
o 
name 
POTOXML DE 
Model mapping designer 
Valid* tiorw 
DATA 
Data model 
model 
input 
Dynamics 365 for 
Croup 
DATA SOURCES 
Valiate 
Stut 
DATA 
Q, 2 Edit 
p 
Sea rch 
x 
@ unbind 
Class 
Obj 
ence 
records 
Dynamics 365 for Retail 
records 
mat 
Export format 
Import format 
Calculated field 
details 
by 
dimensions detaas 
list 
P list 
Record list 
P u RhJoum*AutoSummary; Rwd list 
P wchLaStVeTSion.PurhId; Record list 
PurchLine; list 
1099 
1099 099FieldsJ; 
1099 State Real 
< Relations; Record 
> Record<br />
Int64<br />
ReceiptO: String O<br />
Activity String<br />
withholding<br />
line record IO(MatchingAgreementLine);<br />
ink O: O<br />
Boolean O<br />
alJowEditScrap(): O<br />
_i rwentACCOu ntTy pe)<br />
AmmlStatw String = T EXT<br />
Cu.y String =<br />
Date =<br />
ID:<br />
list = Sel«tedPO. •<br />
rd<br />
o rye.<br />
Int64<br />
String<br />
Q'_Æntitv: Re I<br />
unit:<br />
unitPriæ Real<br />
POStatw.• TEXT(SeQtedPO.PurchStatus)<br />
String •

Figure 24. Mapping Purchase line fields

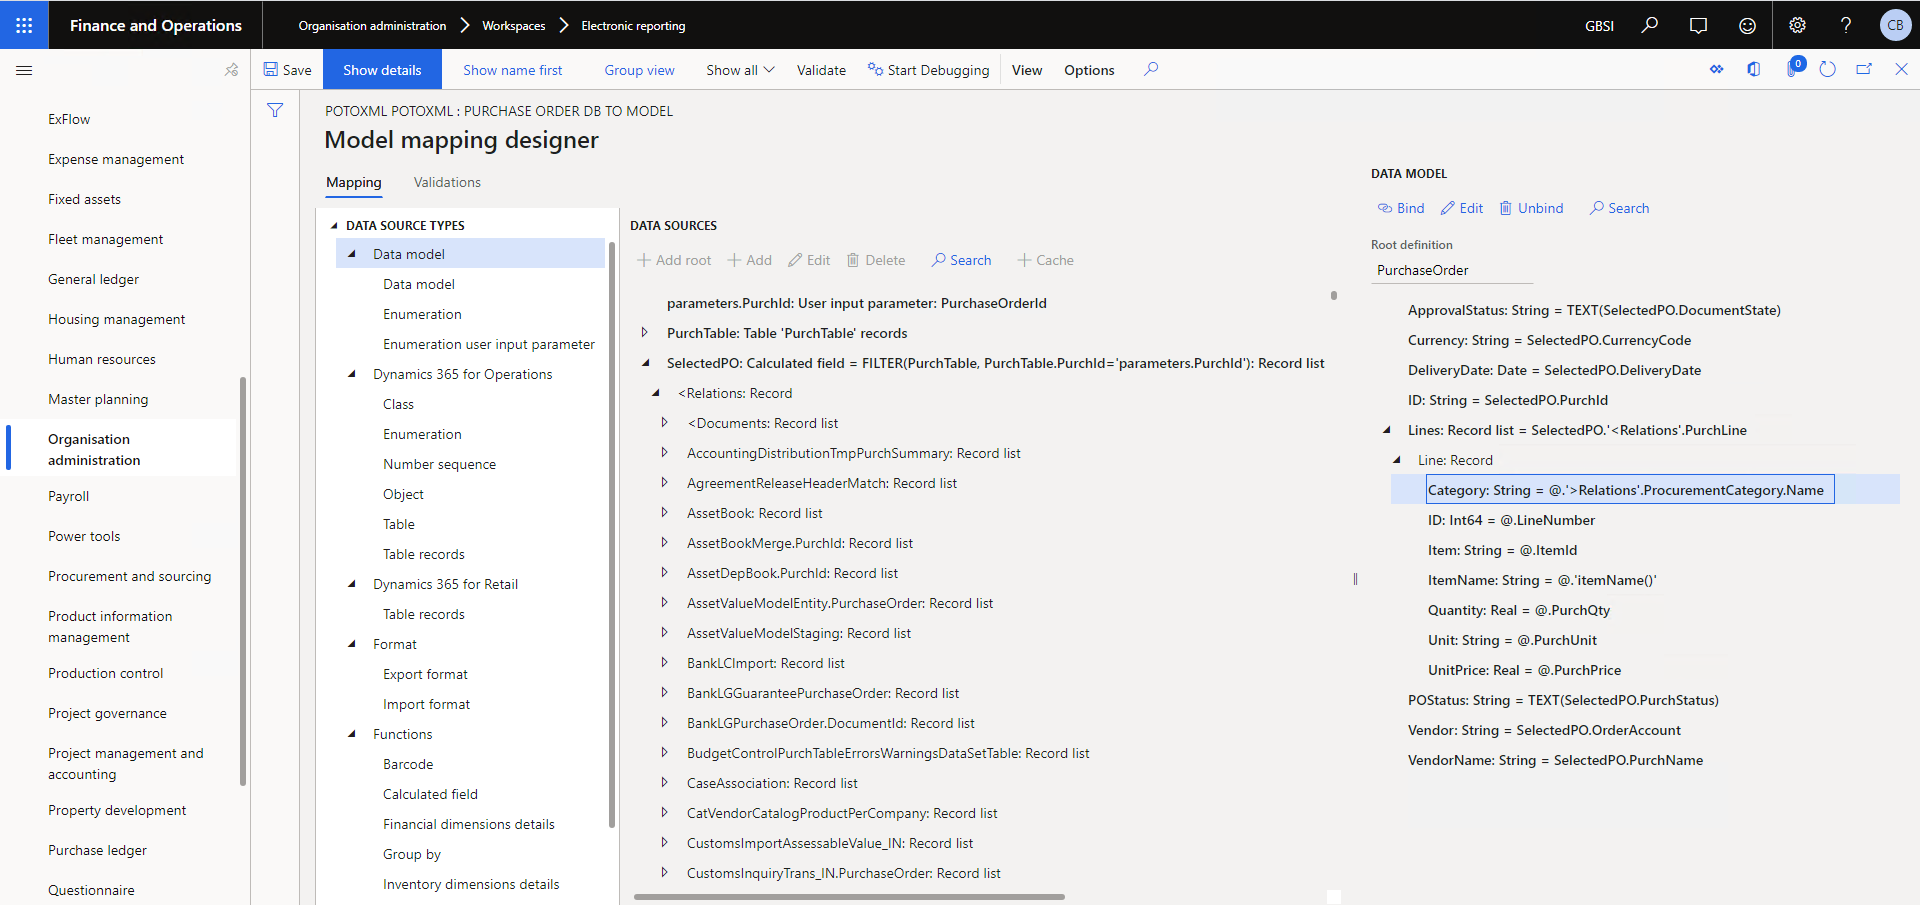
Figure 25. Full mapping

At this point we can just run the export and it will produce an XML file. Just that the format is not what we need. To see the output, we can press Run in the Model to datasource mapping form and provide the PO number in the input parameter.

Finance 
assets 
Human 
n Edministration 
Product infonmation 
ma 
antrol 
governance 
Proj"t 
accou Ming 
Pro*'tv S..•elopment 
ledger 
Retail ard CommeQ 
Sne New Delete 
Camp. f e Run 
Model to mapping I POTOXML 
POOB2Model 
Base mavping 
PLÆhaÆ ord€08 to Model 
Electronic report parameters 
Parameters 
C To

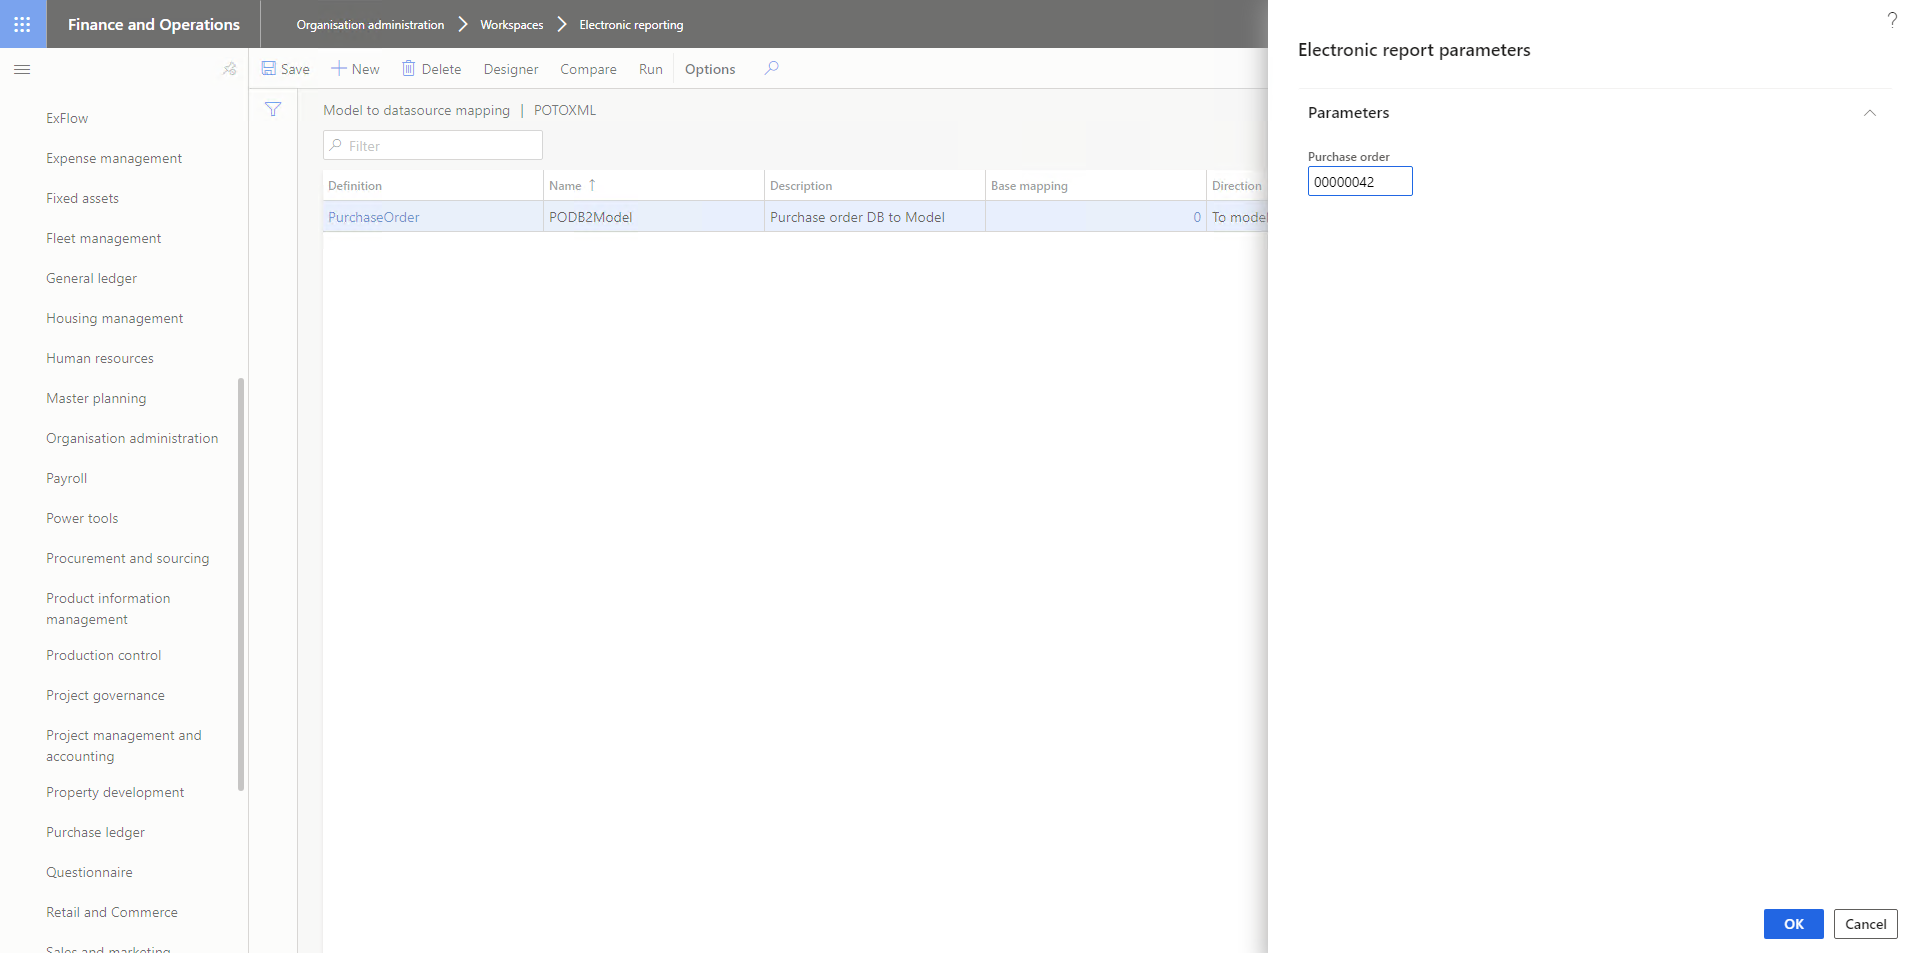
Figure 26. Exporting without formatting

—stringe 
Type. 
Name: 
- Type• Name•• 
- <ttem 
.:ltern 
<ltern 
<ttem Type • 'String" 
.:ltern Name- 
<ttem 
.:ltern 
- < Iteml><br />
- <ttem 
.:ltern 
<ltem String" Nam — 
c/ltem><br />
<ttem 
.:ltern Name- 
<ttem 
.:lterr, 
"String' Name• 
• Name

Figure 27. XML output without formatting

Mapping from data model to XML format

Now that we’ve defined the temporary format (aka the data model) and we’ve also given the mapping rules (datasource to model mapping), we'll be defining the output format.

To achieve this in ER, we need to create a new child configuration, as a Format based on the model we’ve just defined. Before we do that, we need to mark the parent reporting configuration as not draft anymore by pressing – Change status – Complete.

Edit te v 
[i] Delete 
Electronic ledger accounting model MX 
Electron i c model 
VAT 
Validate 
potoXML 
Delete 
XML 
Z set this 
draft v 
Into v 
version

Figure 28. Marking parent model as complete

Finance and 
C s OTes1 
USW 
"'t Create v Oesvgnet Vabdate 
ach ange v 
Contigu ons 
ent 
F i xe•d a SSetS 
ledger 
Housing management 
Master plaming 
tion 
Payroll 
and 
Product 
management 
Production control 
P d ælopm 
7 - Create configuration 
O Root 
C) CViÆfmm Name POtoXML 
based data 
potoXML 
(D Model Mapping data 
POtOXML 
forma t 
Data 
Create configuratio 
Options 
Cornpue with draft Run 
3/30/2021 
status 
ISO Country/region codes 
Configuration components 
Oat. model 
ContOSO XML export 
Get this 
POtoXML 
FOOB2Mcdel 
v Upload into 
Initial

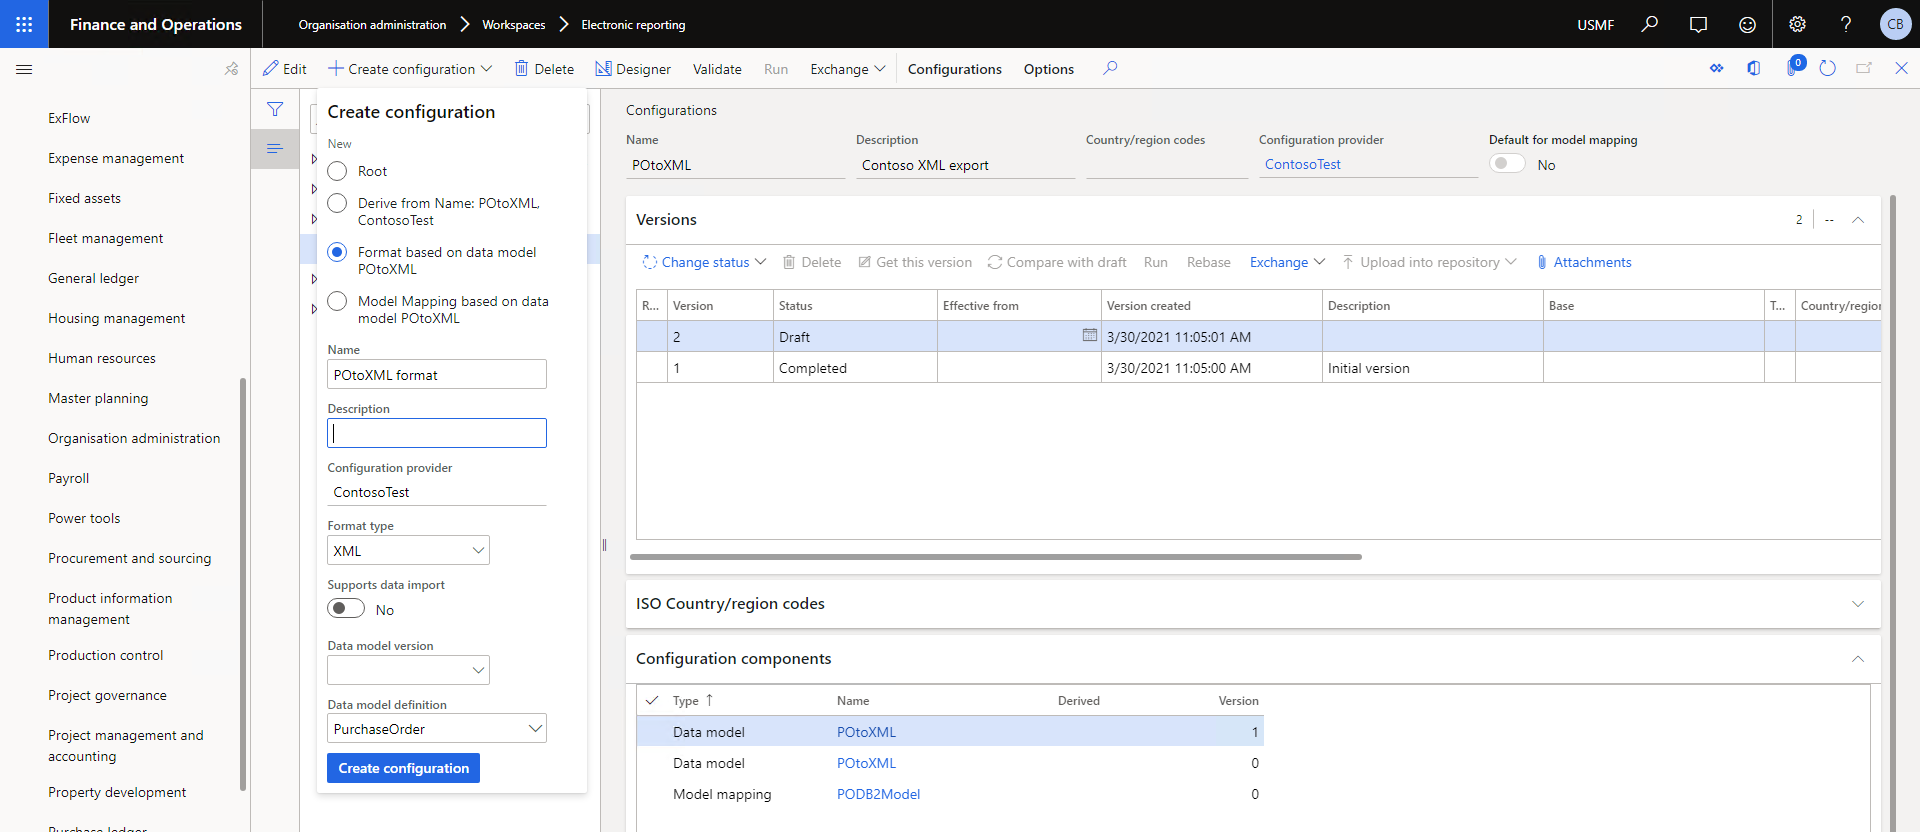
Figure 29. Creating new format based on existing model – format type = XML

Now, if we press Design on the new format, we’ll see the Format designer form. This is where we’ll define the XML element structure (parent-child relationships) and data types.

Machine generated alternative text:
save 
Show details 
(9 
Finance and Operations 
Home 
Favourites 
Favourites created 
using the navigation 
pane will show up 
here. 
Recent 
Workspaces 
Modules 
Show all v 
Format enumerations 
Map format to model 
Validate 
Run 
Performance trace 
Cut 
% Start Debugging 
Import 
Format 
View 
Y 
POTOXM FORMAT : 1 
Format designer 
•F Add root v •E Add v 
Add 
Common 
Case 
File 
File attachment 
Folder 
Data source 
Item 
Text 
DateTime 
Numeric 
Sequence 
String 
XML 
Element 
Add 
Delete 
Make root 
Options 
Mapping 
Transformations 
USMF 
Validations 
Move up V Move down Copy 
We didn't find anything to shaw here.

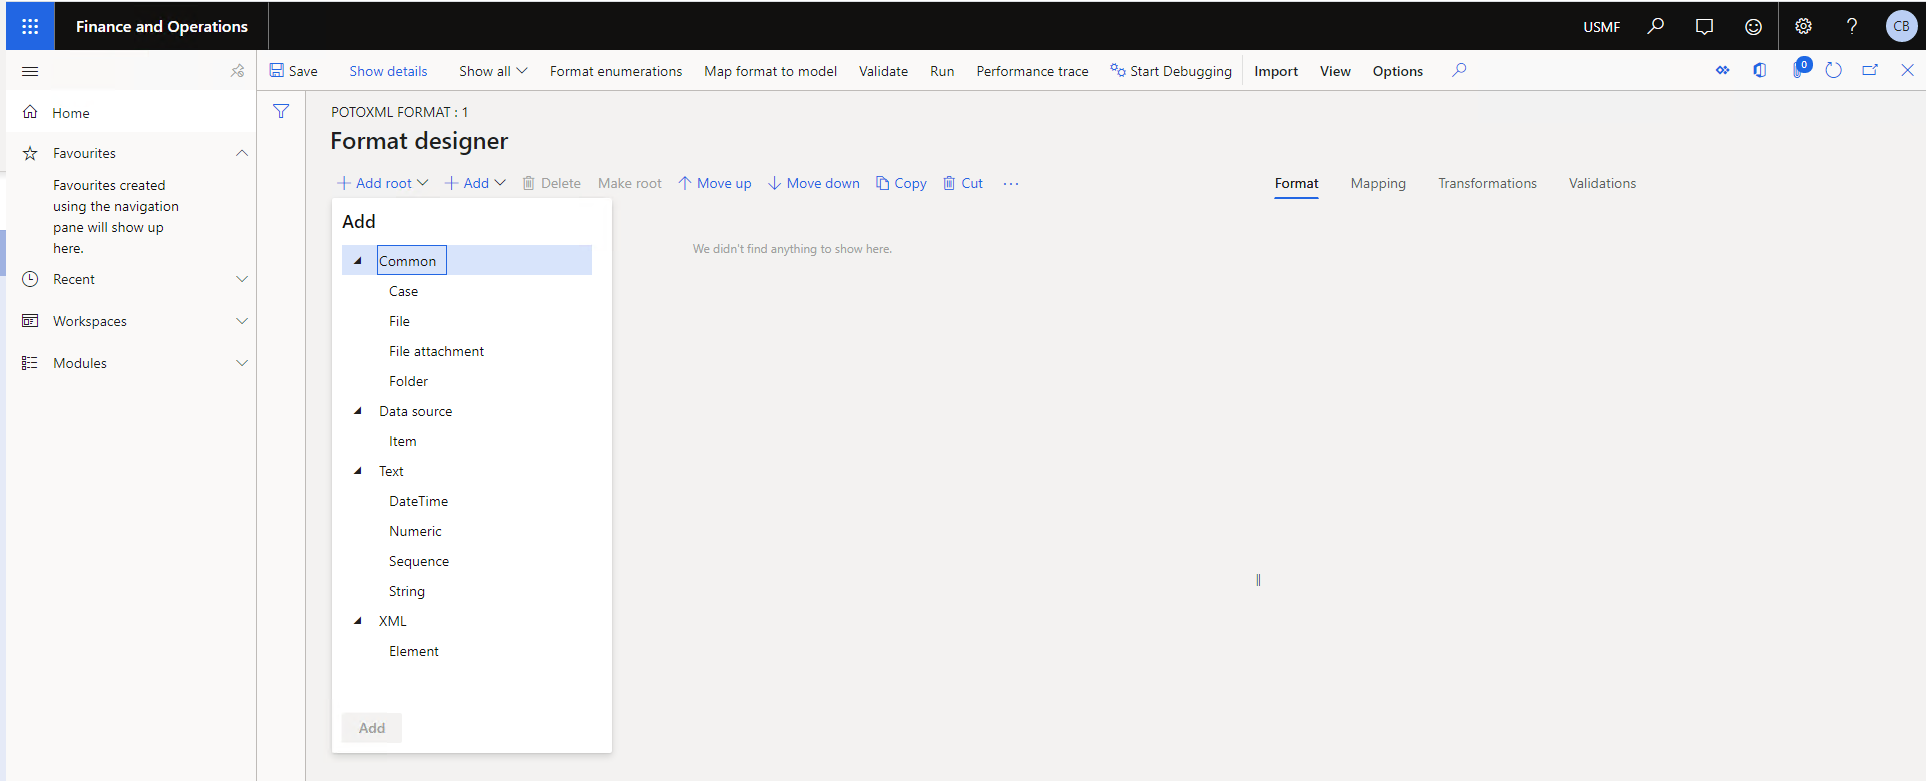
Figure 30. Format designer form

Machine generated alternative text:
save 
Show details 
(9 
Finance and Operations 
Home 
Favourites 
Favourites created 
using the navigation 
pane will show up 
here. 
Recent 
Workspaces 
Modules 
Show all v 
Format enumerations 
Map format to model 
Validate 
Copy 
Run 
Performance trace 
Cut 
% Start Debugging 
Import 
Format 
Type 
View 
Y 
POTOXM FORMAT : 1 
Format designer 
•F Add root v •E Add v 
PurchaseOrder 
Delete 
Make root 
Move up 
Move down 
Options 
Mapping 
Transformations 
USMF 
Validations 
XML Element 
Name 
PurchaseOrder 
Mandatory 
Deferred execution 
DATA SOURCE 
Name 
Excluded 
Multiplicity 
IMPORT FORMAT 
Parsing order of nested elements 
As in format

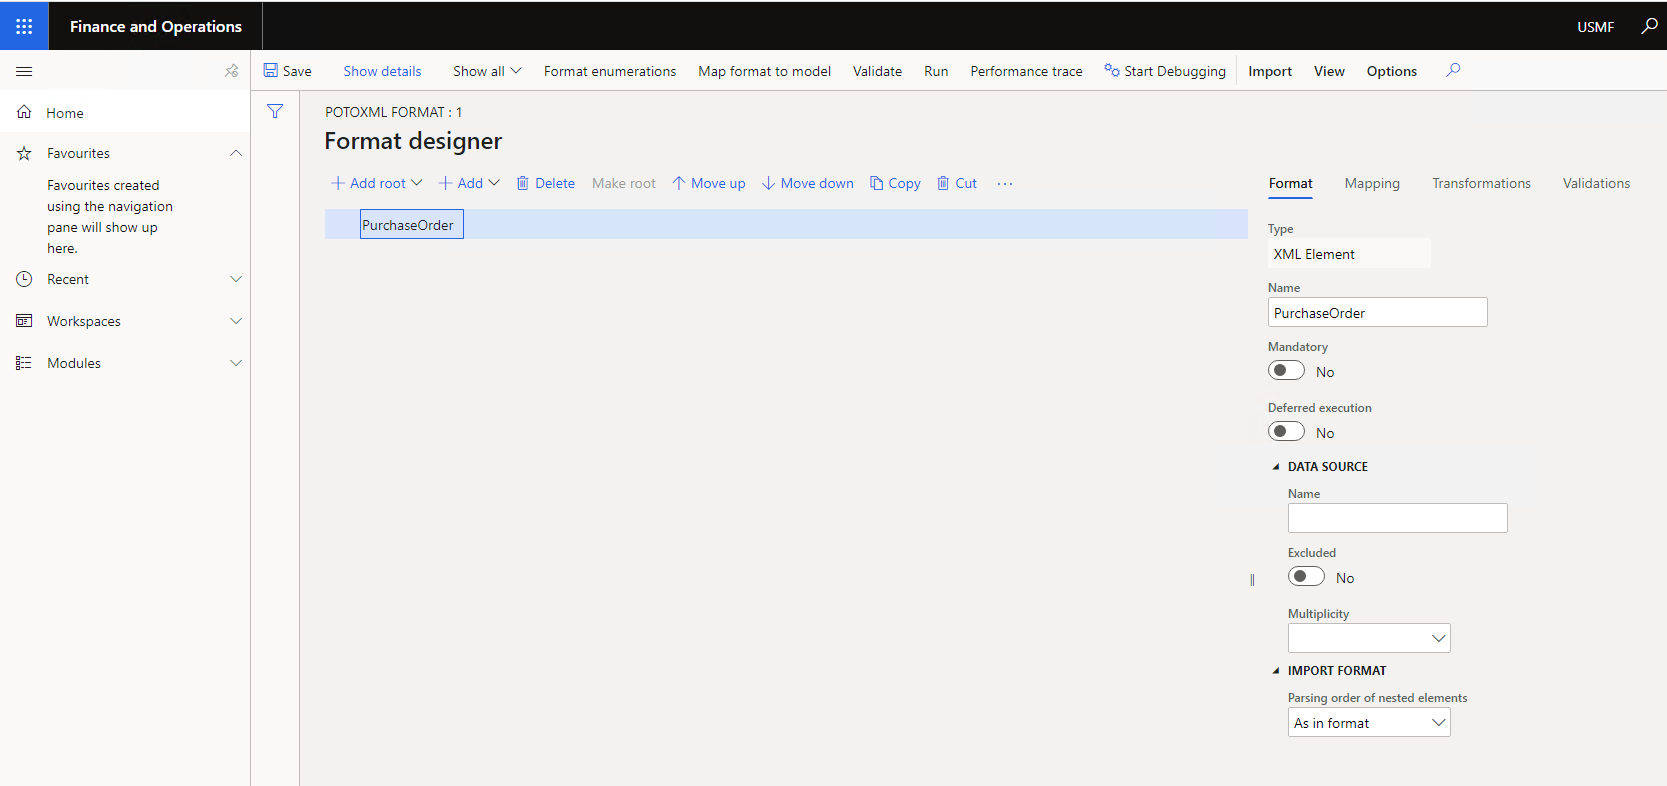
Figure 31. Creating root XML element

Machine generated alternative text:
save 
Show details 
(9 
Finance and Operations 
Home 
Favourites 
Favourites created 
using the navigation 
pane will show up 
here. 
Recent 
Workspaces 
Modules 
Show all v 
Format enumerations 
Map format to model 
Validate 
Run 
Performance trace 
% Start Debugging 
Import 
Format 
Type 
String 
Name 
ID val 
View 
Options 
Y 
POTOXM FORMAT : 1 
Format designer 
•F Add root v I Add 
PurchaseOrder 
ID val 
+ Add String 
Delete 
Make root 
'TN Move up 
Move down 
Mapping 
Transformations 
USMF 
Validations 
Ma n datory 
Value 
Truncate to maximum length order 
After transformation 
Minimum length 
Maximum length 
Alignment

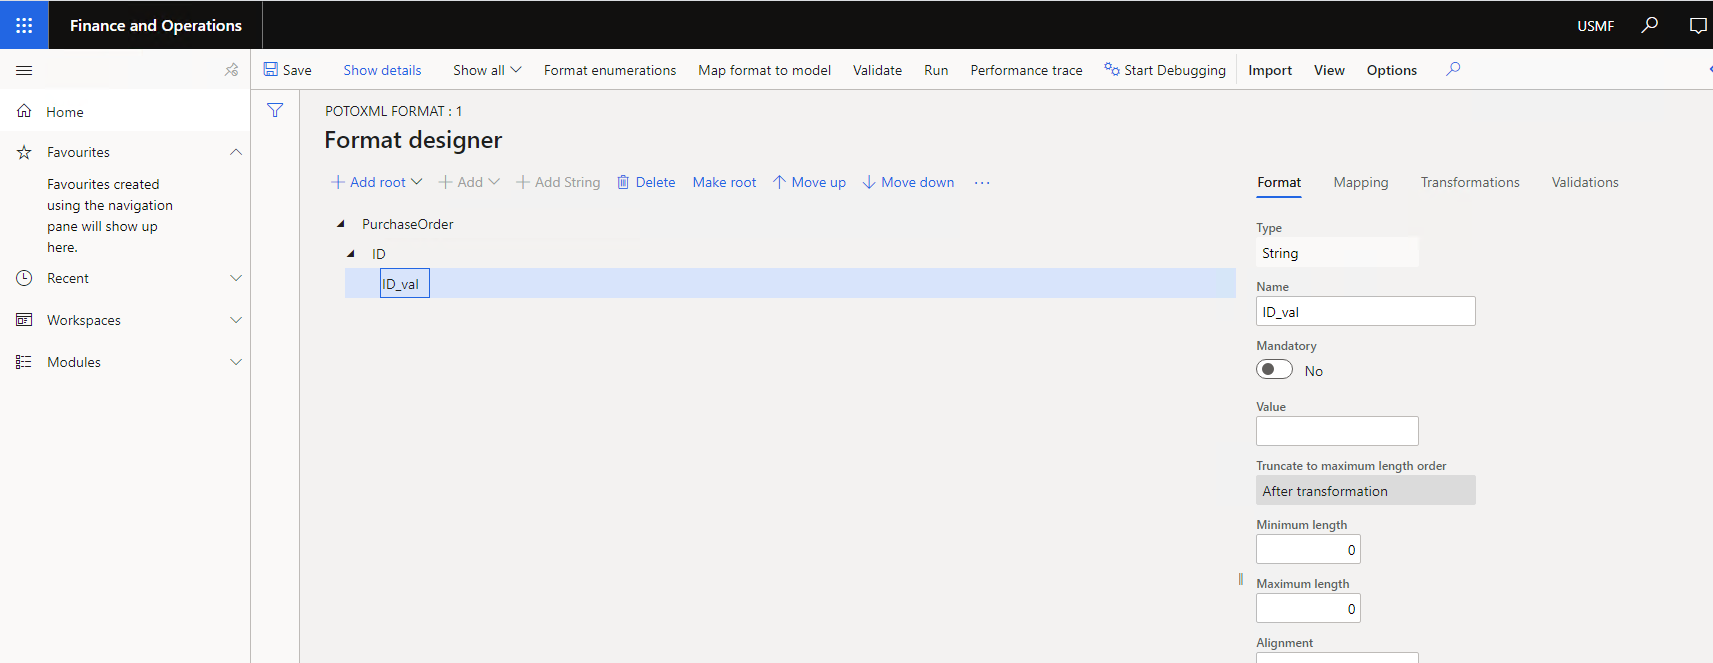
Figure 32. Adding child element and string value under element

Machine generated alternative text:
save 
Show details 
(9 
Finance and Operations 
Home 
Favourites 
Favourites created 
using the navigation 
pane will show up 
here. 
Recent 
Workspaces 
Modules 
Show all v 
Format enumerations 
Map format to model 
Validate 
Run 
Performance trace 
% Start Debugging 
Import 
View 
Options 
Y 
POTOXM FORMAT : 1 
Format designer 
•F Add root v I Add 
PurchaseOrder 
ID val 
Vendor 
Vendor val 
Lines 
Line 
ID val 
Item 
Item val 
Quantity 
Quantity_val 
Add Numeric 
Delete 
Make root 
Move up 
Move down 
Copy 
Cut 
+ paste 
¯ Expand/collapse 
USMF 
Transformations 
Format 
Type 
Numeric 
Name 
Mapping 
Validations 
Quantity_val 
Mandatory 
Numeric type 
Real 
Numeric format 
Minimum length 
Maximum length 
Alignment 
Left 
Padding character 
DATA SOURCE 
Name 
Excluded 
Multiplicity

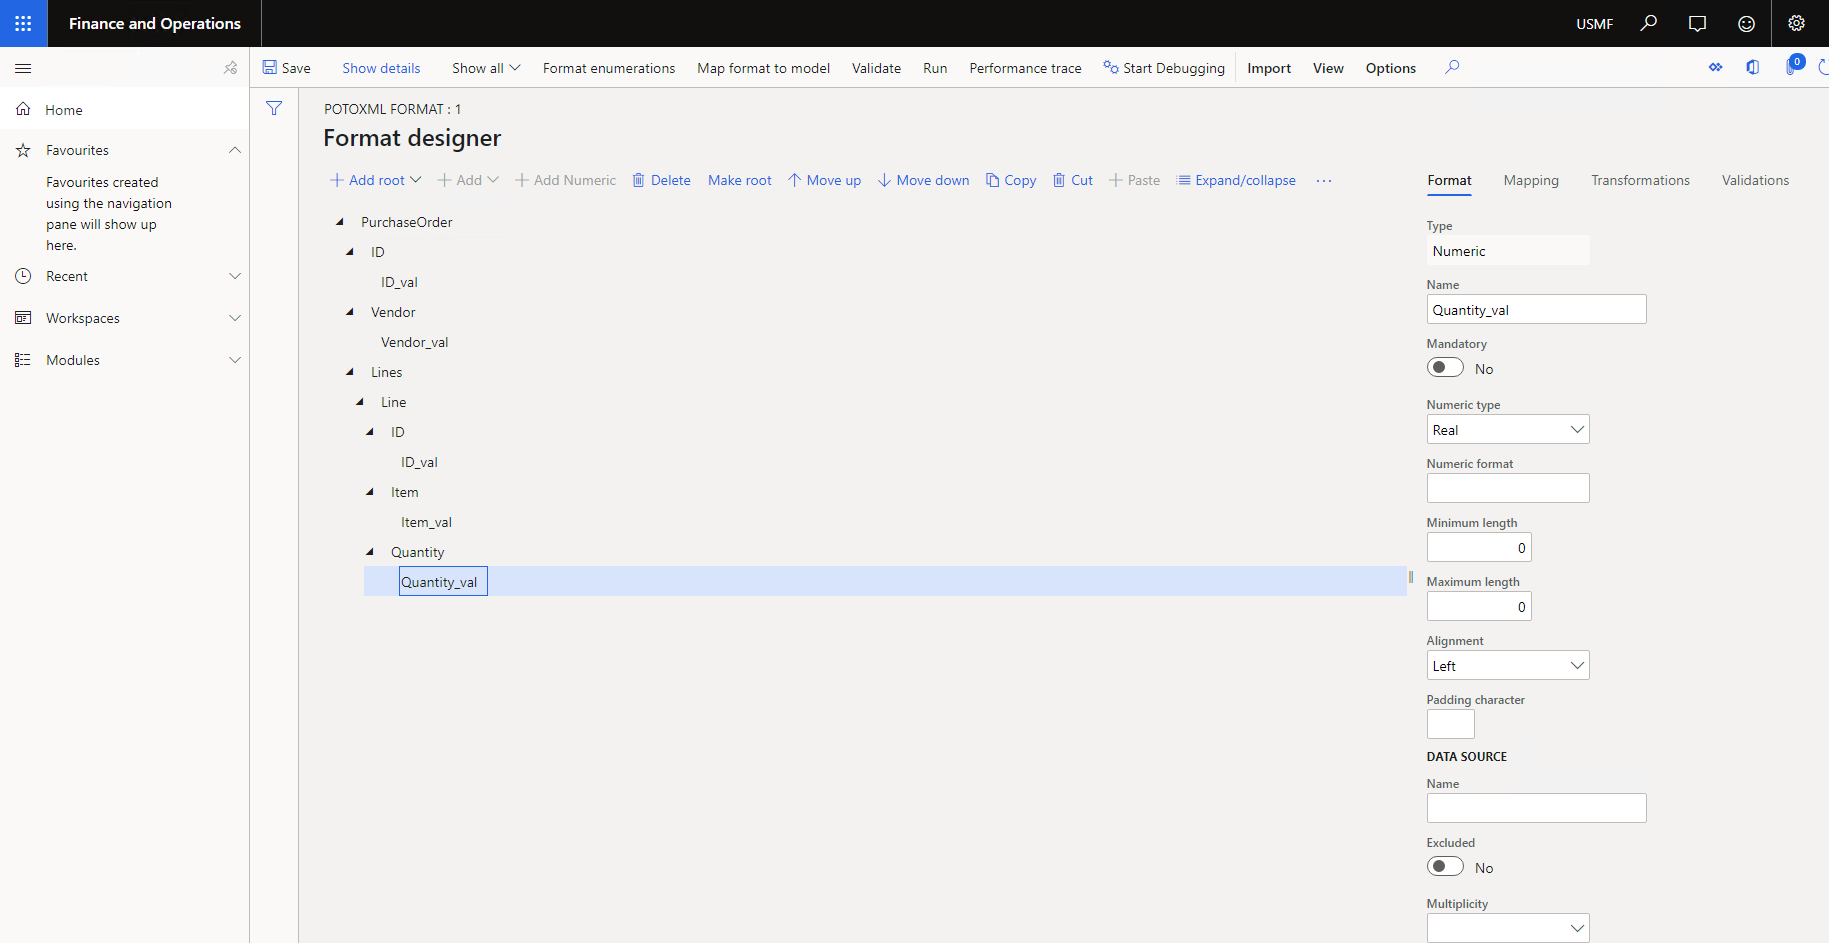
Figure 33. Adding remaining XML elements and values

Machine generated alternative text:
o 
save 
Show details 
(9 
Finance and Operations 
Home 
Favourites 
Favourites created 
using the navigation 
pane will show up 
here. 
Recent 
Workspaces 
Modules 
Show all v 
Format enumerations 
Map format to model 
Validate 
Run 
Performance trace 
Format 
Bind 
% Start Debugging 
Import 
View 
Options 
Y 
POTOXM FORMAT : 1 
Format designer 
Q) Bind @ Unbind Edit formula 
PurchaseOrder 
ID val 
Vendor 
Vendor val 
Lines 
Line 
ID val 
Item 
Item val 
Quantity 
Quantity_val 
¯ Expand/collapse 
p Search 
Mapping 
Transformations 
Validations 
Add root v 
-F Add V Edit Delete 
Show name first 
USMF 
Group view 
model 
ApprovalStatus 
Currency 
DeliveryDate 
ID 
Lines 
POStatus 
Vendor 
VendorName

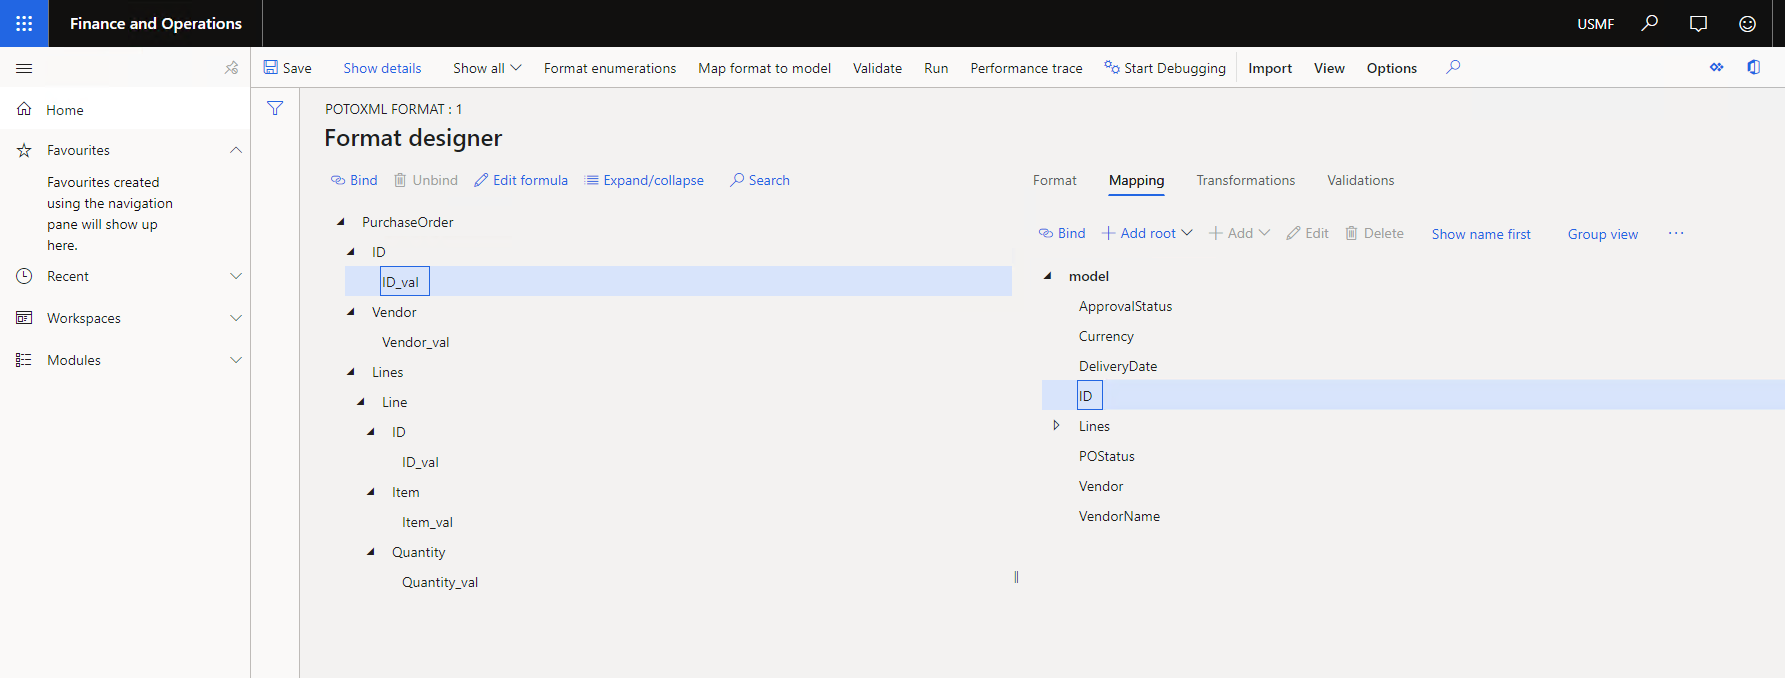
Figure 34. Binding XML values to data model fields

Machine generated alternative text:
Save 
Show details 
Show all v 
Format enumerations 
Map format to model 
Validate 
Run 
Y 
Performance trace 
Format 
Bind 
% Start Debugging 
Import 
View 
Options 
POTOXM FORMAT : 1 
Format designer 
Q) Bind Unbind Edit formula 
PurchaseOrder 
¯ Expand/collapse 
p Search 
Mapping 
Transformations 
Validations 
Add root v 
-F Add V Edit Delete 
Show name first 
Group view 
ID val = 
Vendor 
model.lD 
Vendor val = model.Vendor 
Lines = model.Lines 
Line 
ID val = 
@.Line.lD 
Item 
Item val = 
@.Line.ltem 
Quantity 
Quantity_val = 
@.Line.Quantity 
model 
ApprovalStatus 
Currency 
DeliveryDate 
ID 
Lines 
Line 
Category 
ID 
Item 
ItemName 
Quantity 
unit 
UnitPrice 
POStatus 
Vendor 
VendorName

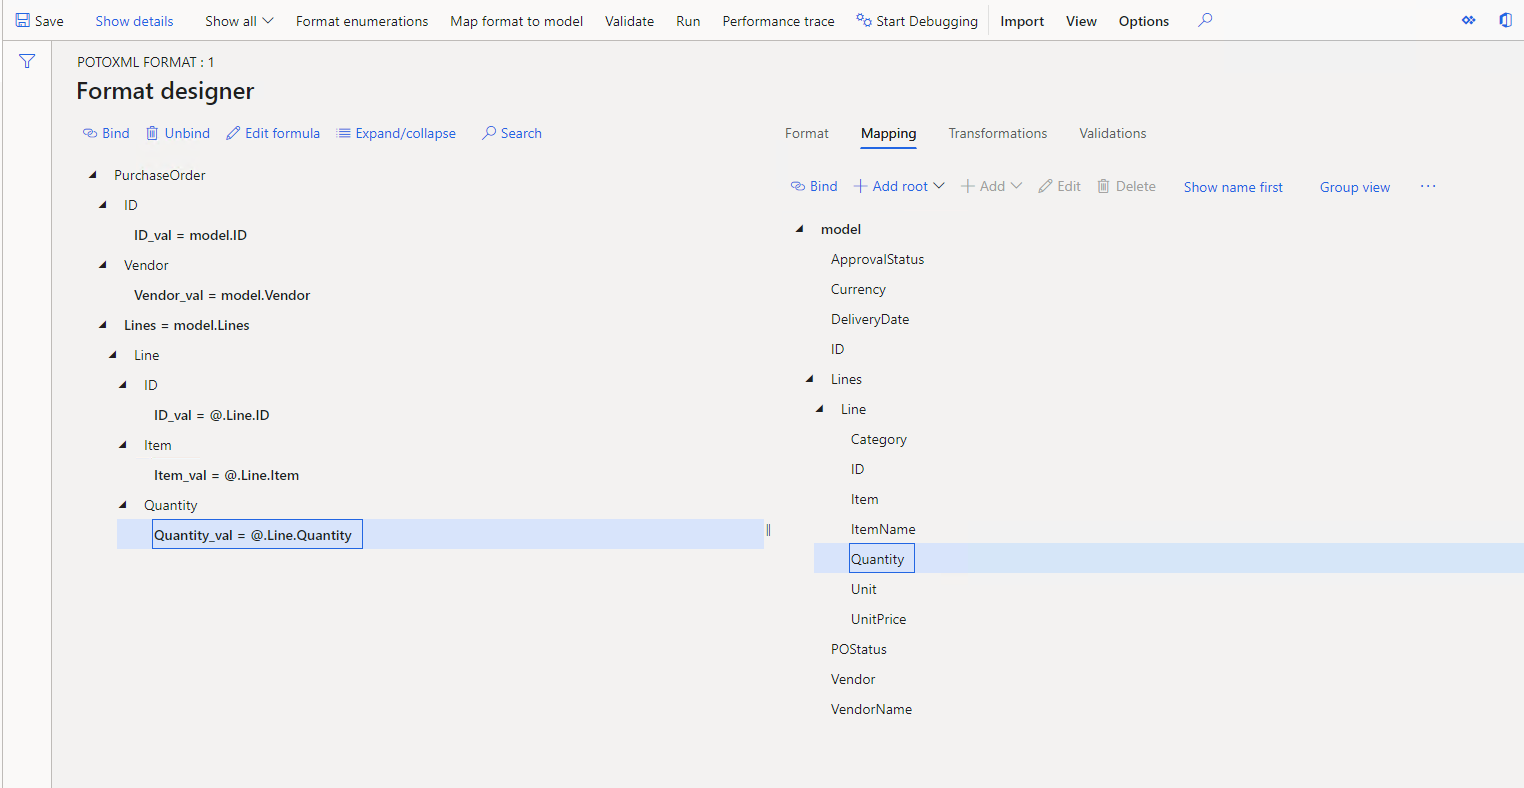
Figure 35. Mapping more fields

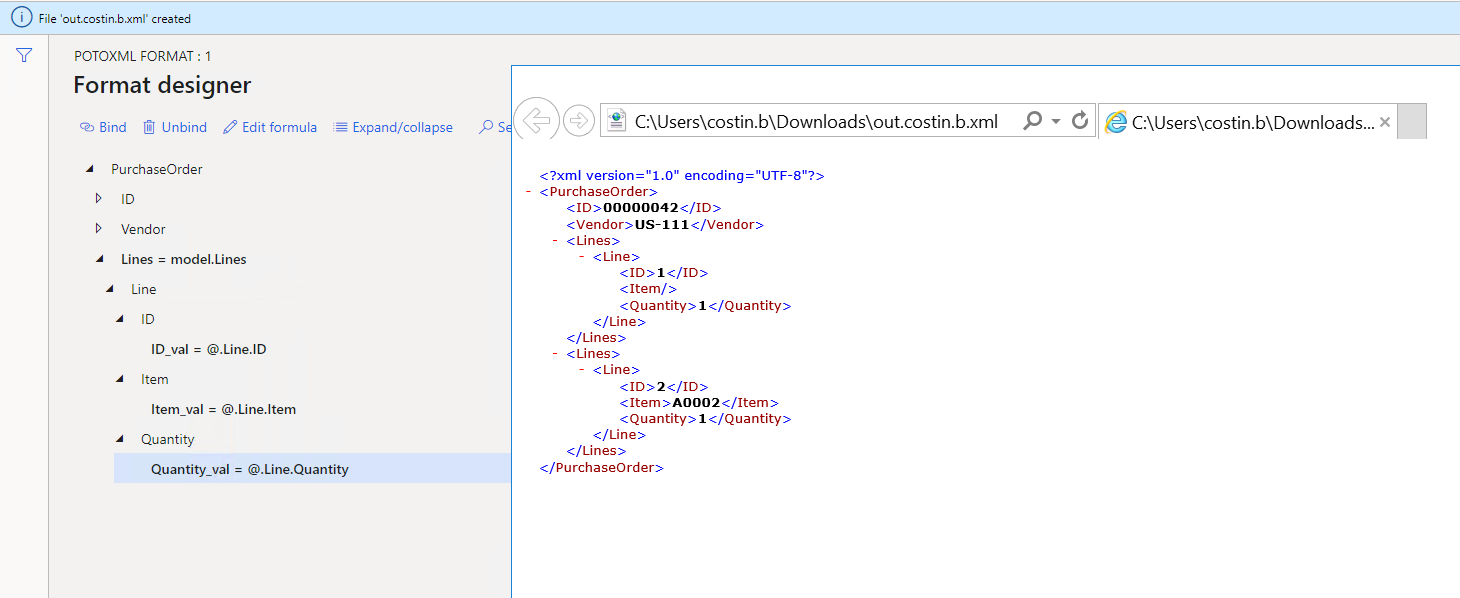
Figure 36. Checking current export format

Machine generated alternative text:
save 
Show details 
C) 
Finance and Operations 
Home 
Favourites 
Favourites created 
using the navigation 
pane will show up 
here. 
Recent 
Workspaces 
Modules 
Show all v 
Format enumerations 
Map format to model 
Validate 
Run 
Performance trace 
Format 
Bind 
% Start Debugging 
Import 
View 
Options 
USMF 
Group view 
CD cf X 
Y 
POTOXM FORMAT : 1 
Format designer 
Q) Bind Unbind Edit formula 
PurchaseOrder 
¯ Expand/collapse 
p Search 
Mapping 
Transformations 
Validations 
Add root v 
-F Add V Edit Delete 
Show name first 
ID val = 
Vendor 
model.lD 
Vendor val = model.Vendor 
Lines = model.Lines 
Line 
ID val = 
@.Line.lD 
Item 
Item val = 
@.Line.ltem 
Quantity 
ItemName 
unit 
UnitPrice 
VendorName 
VendorName val — model.VendorName 
ApprovalStatus 
ApprovalStatus_val = 
model.ApprovalStatus 
POStatus 
POStatus val — 
Currency 
DeliveryDate 
model .POStatus 
DeliveryDate_val = 
model.DeliveryDate 
model 
ApprovalStatus 
Currency 
DeliveryDate 
ID 
Lines 
Line 
Category 
ID 
Item 
ItemName 
Quantity 
unit 
UnitPrice 
POStatus 
Vendor 
VendorName 
Enabled

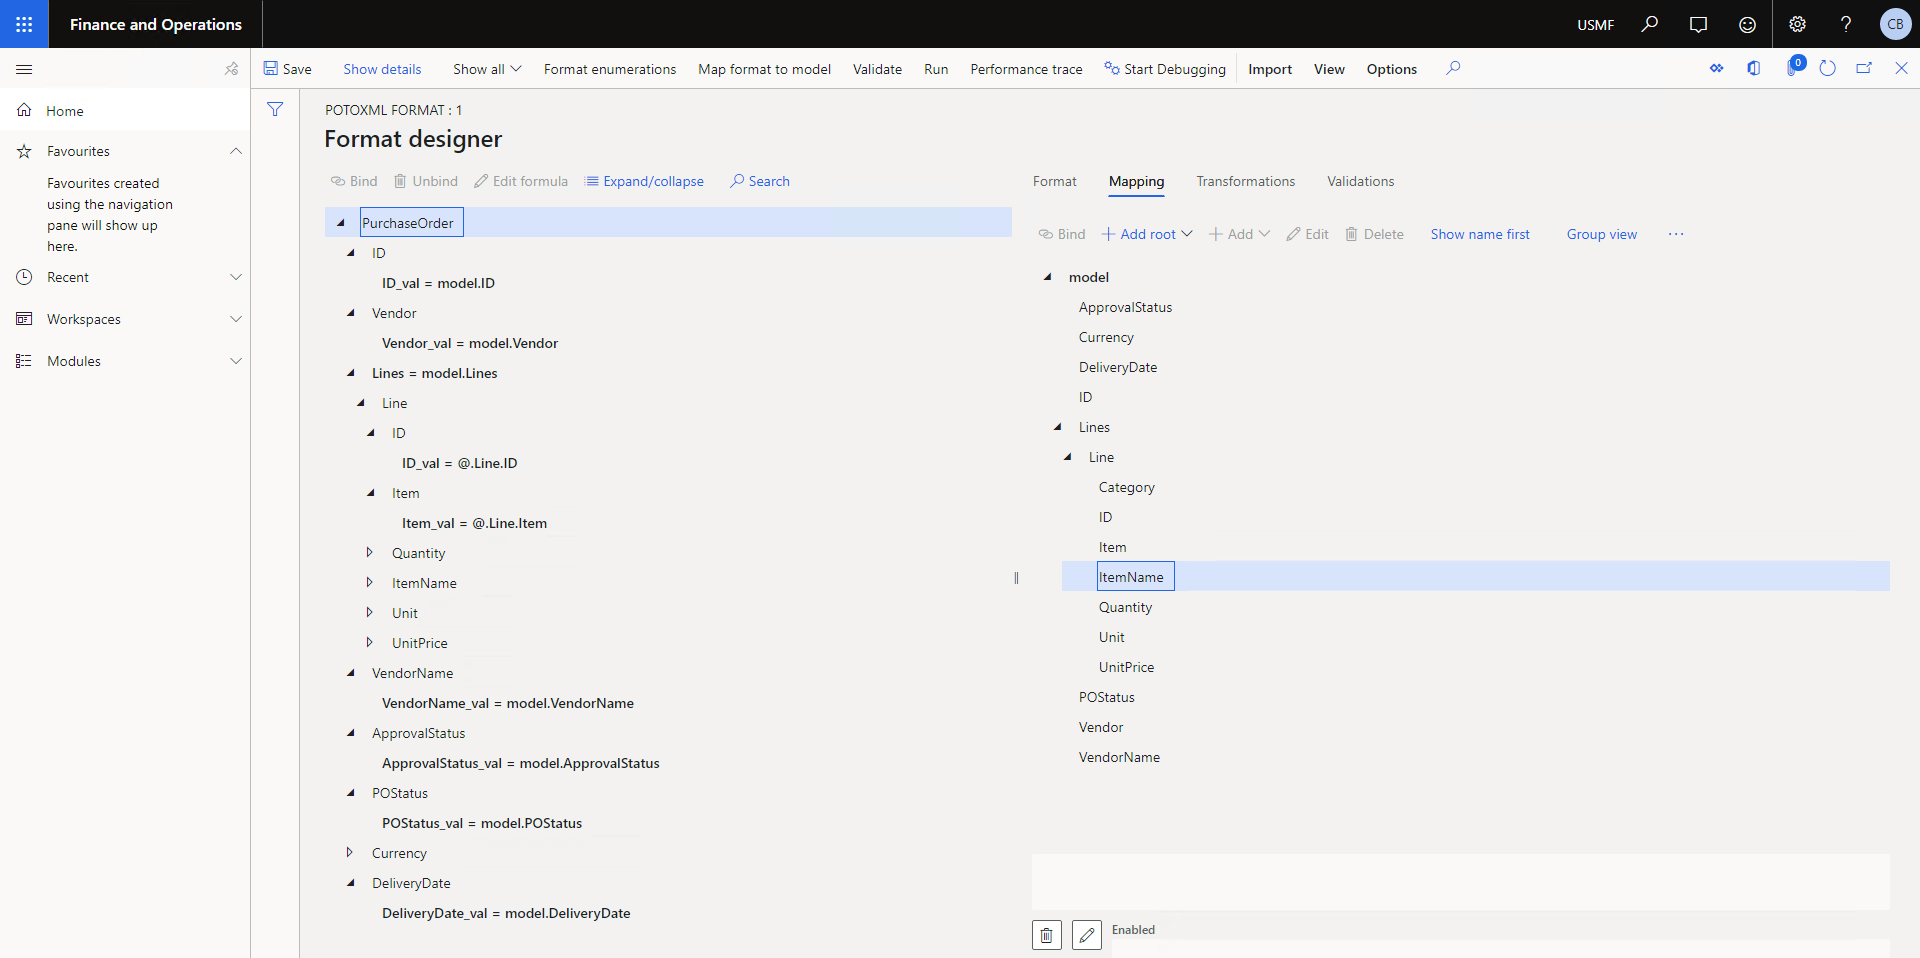
Figure 37. Finalising XML field mapping

Starting the export

We’ve come so far and were able to create such a complex mapping without writing any line of code. You’d be forgiven for expecting that the export is enabled automatically, just like it is for related data entities on forms (e.g., Export to Excel). Unfortunately, to start the export we need to write some code.

What we’ll do is:

  • Extend the PurchTable form
  • Add a new button named “ER Export”
  • When pressing ER Export, the selected PO is exported to XML using the format we’ve just defined

The format definitions are stored in the ERFormatMappingTable and we can find them by name. In the code below, we’ll provide the ID of the format as input when running the ER export.

Figure 38. Format configurations stored in the database

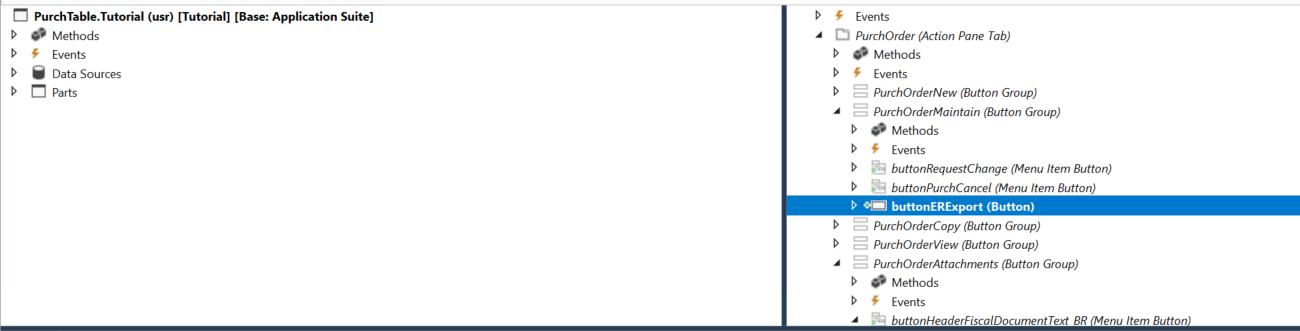
Figure 39. Adding new button to PurchTable form

class ERExporter
{
    [FormControlEventHandler(formControlStr(PurchTable, buttonERExport), FormControlEventType::Clicked)]
    public static void buttonERExport_OnClicked(FormControl sender, FormControlEventArgs e)
    {       
        FormDataSource purchTable_DS = sender.formRun().dataSource("PurchTable");
        PurchTable purchTable = purchTable_DS.cursor();
        ERExporter::ExportPO(purchTable.PurchId);
    }

    public static void ExportPO(PurchId _purchId)
    {
        Info(strFmt("Exporting: %1", _purchId));   
        Name formatName = "POtoXML format";
        Name erParamPurchId = 'model/parameters.PurchId';
        
        ERFormatMappingTable formatMappingTable;
        select formatMappingTable where formatMappingTable.Name == formatName;
  
        ERIFormatMappingRun runner = ERObjectsFactory::createFormatMappingRunByFormatMappingId(formatMappingTable.RecId, '', false);
        ERModelDefinitionInputParametersAction modelDefinitionInputParametersAction = new ERModelDefinitionInputParametersAction();
         
        modelDefinitionInputParametersAction.addParameter(erParamPurchId, _purchId);

        runner.withParameter(modelDefinitionInputParametersAction).run();
    }

}

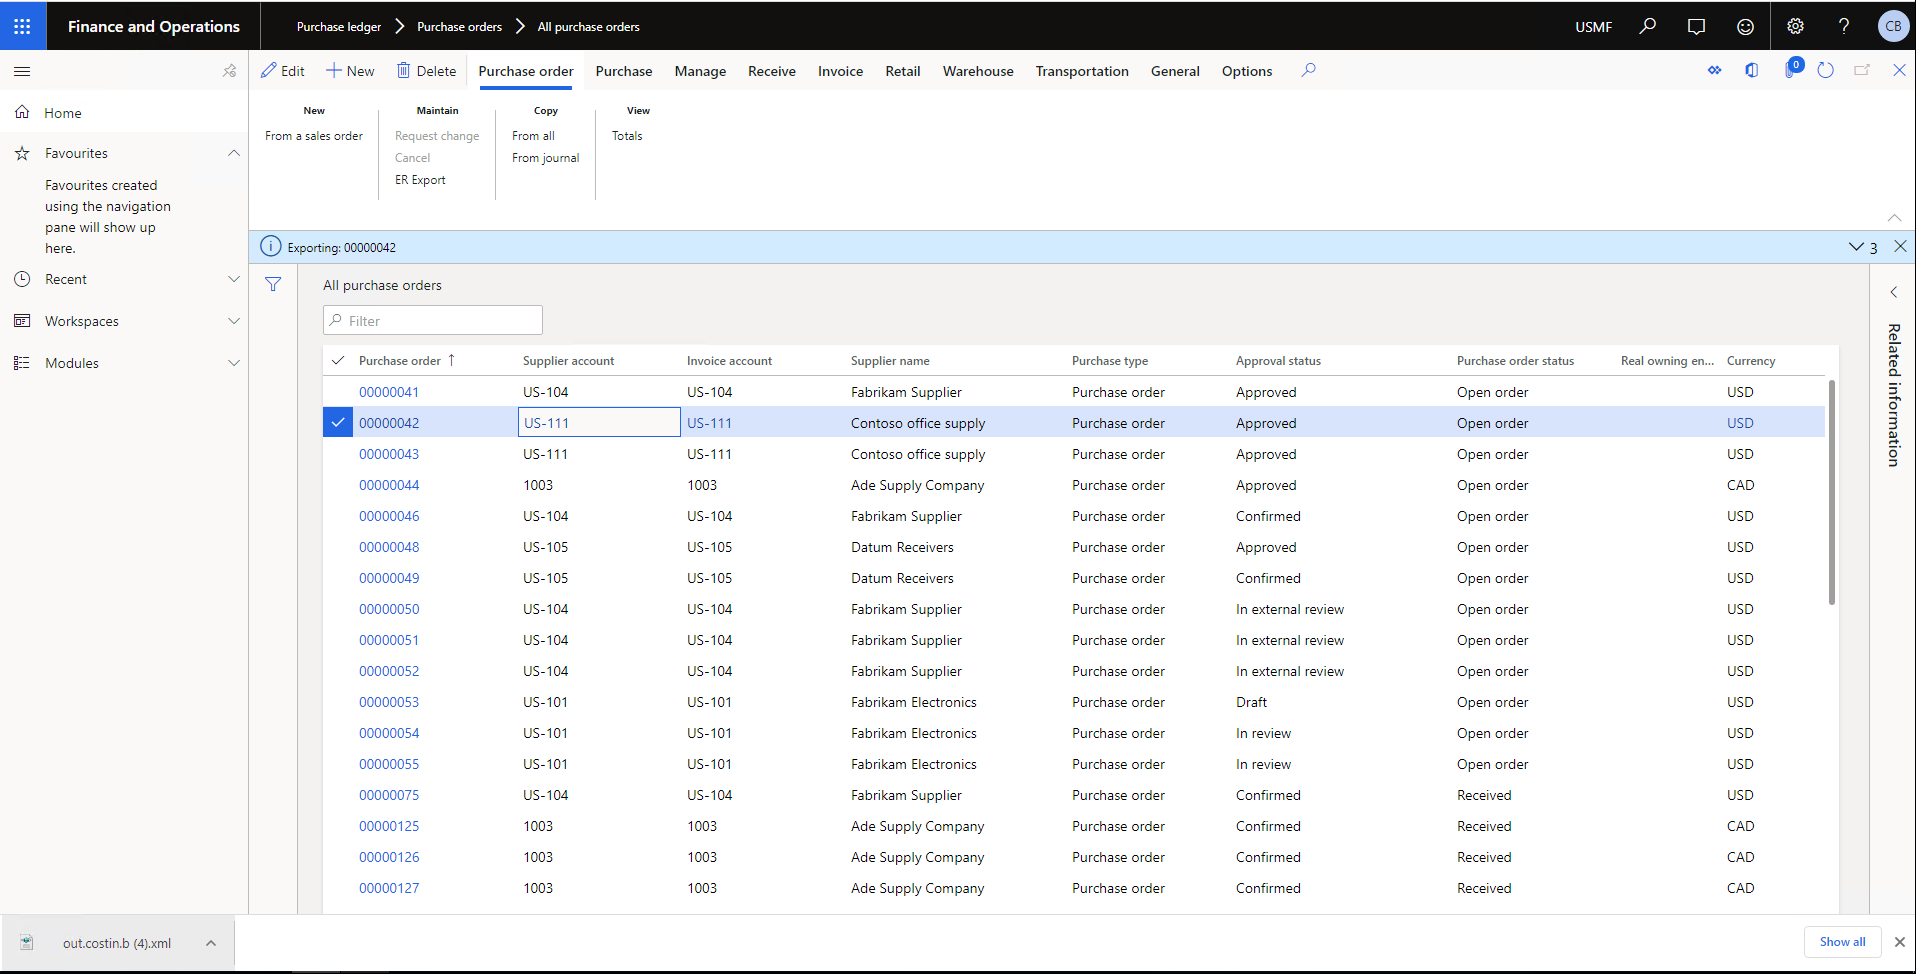
Figure 40. Running the export form the new custom button

As further improvements, rather than providing the file to the user for download, we can intercept it in the code as well and post it to another integration like a web service or Logic App. Microsoft provides the code sample and necessary setup (i.e. special document type) for achieving this.

Conclusion

Looking back at this simple export scenario, we can clearly see some key benefits of using Electronic Reporting:

  • We’ve implemented the first two parts of a typical ETL (extract – transform – load) process using standard D365F&SCM configuration
  • We’ve managed to export an XML file in a desired format without writing any code (the code was written for a nicer integration with the Purchase orders form).
  • We can select any table, any relation, any data type
  • We can support more than one export format (e.g. use Excel instead of XML) and multiple versions of the same format

Although not covered here, the deployment of solutions to multiple environments or to different customers integrates well with LCS, so the ALM story is pretty well-defined. Microsoft already provides many standard formats (e.g. SEPA, UK BACS format) to be downloaded from their Configuration provider.

We’ve also covered some topics that may seem obvious to an ER expert but are not as intuitive for someone just getting started. Here is a table with the key concepts to remember.

ConceptMeaningSee section
Configuration providerRegistration providing a link to a repository of reporting configurations. Useful for versioning and deployment of configurations through LCS.Minimal configuration of ER parameters, Conclusion
Reporting configurationHolds the data model and all the mapping rules, as well as versioning information for each.Minimal configuration of ER parameters
Data modelSimilar to the concept of a class definition in object-oriented programming. It includes fields of various data types.Defining the data model
Record listField type in a data model used for storing records. Similar to an array.Defining the data model, Mapping from database to data model
RecordField type in a data model used for storing complex types. Similar to a struct in C++.Defining the data model, Mapping from database to data model
Joe CRM
By Joe D365
Joe D365 is a Microsoft Dynamics 365 superhero who runs on pure Dynamics adrenaline. As the face of PowerObjects, Joe D365’s mission is to reveal innovative ways to use Dynamics 365 and bring the application to more businesses and organizations around the world.

Leave a Reply

Your email address will not be published. Required fields are marked *

PowerObjects Recommends